Sanug
Member
I would not decribe the M series viewfinder as dim. The later M models like MTL3 and MTL5 have bright viewfinders. Even at f4 the microprism is still usable. Better than the screen of the Asahi Pentax Spotmatic.


Thanks so much for this wonderful resource! I have a VLC (first version) with the problem you describe here - listed as (D) - where the film advance lever is loose. I wonder if you have any suggestions for how I might fix this? Thanks in advance!

I would not decribe the M series viewfinder as dim. The later M models like MTL3 and MTL5 have bright viewfinders. Even at f4 the microprism is still usable. Better than the screen of the Asahi Pentax Spotmatic.
Sorry , I was too busy in fixing few lenses and forgot to check here.
Praktica L series (including) VLC is unlike ordinally Jp camera. It has the tensioning and stopping mech all installed on the Right Upper Part.
If you haven't attempted repairing on any cameras before , Servicing a Praktica VLC could be very challenging and any improper practice could case failure. **There is no shortcut **
You can check the gears like I here mention in #10.
But before that , you have to take off
then
- Upper Cover , with 5 screws: front x2, back x2, under the finder has 1 flat screw ,
- Metering switch (don't loose the ball and the spring), A locking ring is there to hold the unit
- Winder (use acetone / anhydrous alcohol to dissolve the glue and remove the cover by sharp knife / fine suction cup / strong tape)
- Speed selector unit
- Desolder or unscrew to disconnect the flash cord on under the meter switch .
- Remove the film counting gear ,
- Shutter speed gears (the brass unit, 3 screws + 1 long screw with a handle inside the speed selecting dial) ** remember the ISO and shutter speed setting before removal**
After that it will show you what exactly happening inside.
Checking:
If the winder just swing freely ,
- Put back the winder , without installing the speed gear
- Try to advance/tension
- Watch the gears
- Check the spring (SP1/2/3) if they are in position.
What I have seen most, isthe SP3 failed to hold the hook that is for driving the gears.
But,
Remember each problem and related solution are unique. You have to study it by yourself and trace the problem.
The worse case I have ever seen is the tensioning lever hook was broke and I have to take off the metering complex circuit and lift up the mirror box for the hook replacement.
Hope my text helps .
To remove the advance lever, twist off the cap by heating it up and twist it off using a rubber sheet on the end of a dowel. There is a c clip underneath the cover that has to be removed. Repairing these cameras is very difficult. When I was younger I used to repair them but I wouldn't dare in my dotage.
Thanks Chuck, I've got as far as removing the c-clip and washer but there's an additional bit underneath which needs removing - I've ordered a spanner wrench for this purpose, so fingers crossed!

 www.micro-tools.com
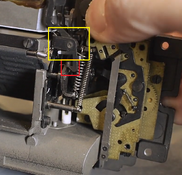
This is the part (SP3) of that likely causing advance lever failed to advancing film & tensioning the shutter.
One the spring is off from the position, the driving clamp/hook behind would failed to keep in pressed position in order to draw the wheel below.
The true cause of loosing this spring is unknown. But for cases like this I often found it from:
- Old grease jamming
- Deformed gears ( previously forced advancing film)
- Dropped camera
(Picture from Exakta RTL1000, which has same design as Praktica L series cameras)
View attachment 378965
Thank you, this is very helpful! Interestingly, this spring seems to be in place on my camera, and it turns when the advance lever is turned. However, the pieces below don't move at all. I'll keep testing and see if I can identify the problem.
My spanner wrench has arrived, so I've been able to get the top plate off - yours and Chuck's advice were very helpful here!
EDIT: Here's a link to a photo of my camera, in case that helps to diagnose the problem. (I've had to upload it separately as Photrio is throwing up an error when I try and add a photo - possibly because I'm too new.)
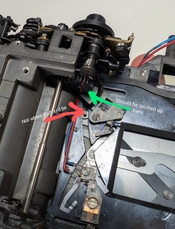
 This clamp should be pressing inwards when driving the gear below, and it is only released when the lever returns.
 Thanks for the photo.
I can see it hasn't been bended , but it seems to me that the clamp is not pressing inwards?
Besides I have seen you have taken off the film counting disk?
When putting it back, wound 2-3 cycles. The "1" mark should be 3 clicks from it's resting position, and that is where the pointer disk should be pointed at.
Thank you! Sorry, I'm not sure what piece you mean by "clamp"?
Noted re: film counting disk position!
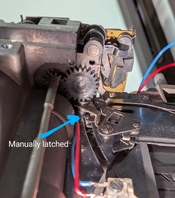
I've had a breakthrough, thanks to your comment about the clamp! You're exactly right: the clamp was on the wrong side of the spring. The spring seems to be slightly misshapen, but if I push the clamp in manually, I can get the camera to fire perfectly. Now I just need to figure out how to fix the spring itself, so that I don't have to push the clamp in every time. Thank you for all your help with this, really appreciate it!


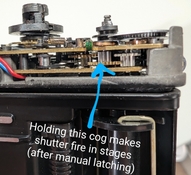
I have found a normal parts of that winding/advancing gear. You can see the " clamp & spring " positioning from these photos.
View attachment 379160
View attachment 379159
Hope these photos can help you.
Form your photo in the last message, I think, is try to use a fine (yes, very fine, sharp and pointy tip) tweezer to pull out the straight end of that spring and make it docked & hold well . Then this spring with back with force and position --> pressing the clamp on the other side in order the drive wheel below. It should work?

Perhaps because of the L series has been sold underpriced. Most "jammed" art not actually jammed, but previously have been mishandled by the user, like drops or abuse . For 7/10 cameras I repaired are actually just need to open the top, use a small screw driver to kick the shutter release underneath the speed dial, let the shutter completes its run and then everything would be back to normal again .
The others, from today's pov, is mostly due to old dried oil and grease + mishandling (WD40 inside...) causing improper operation.
MTL3 is the only model I always find troubles inside, even it looks super new there. That is the only model I would avoid .
Older Prakticas , like IV , or before they changed their name, e.g. Contax S M42 SLR, Pentacon SLR , I won't say they are excellent camera , but just a camera that historically important .
I have a praktica LLC and im kinda stumped on how to fix the shutter, it wouldn‘t cock it fully like what you said in (C), I’ ve tried cleaning the blades and all sorts of stuff. The lever would complete its cycle but the shutter would just drop down : ( Thanks in advance!Common mechanical faults:
A.
- unresponsive shutter release
- Failed lever advance ( can't move)
- mirror stays up but shutter has no movement / after exposure
Most common reason :
The camera has been dropped. The shock accidentally released the tensioned hook (shutter or mirror box) and that area got released.
B.
- A loud "Bang" sound and then everything is dead
Reason:
The shutter blades can't hold its position at top, and so they dropped at the very end of film advancing action .
It has accidentally released the mirror box tension causing the loud "Bang"
C.
- shutter snapped after advancing
Reason:
The shutter does not reset well, either insufficient pulling distance or some of the levers are stuck/holding as it position because of old grease
D.
- Film Advancing lever swings freely without driving the film or tension the shutter
Reason:
Use has forced to advance the film/shutter after the above fault present.
The re-tension shutter process is paused at the mid-way and so the winding lock clamp failed to perform
E.
- film counter failed to move
Reason:
Camera dropped on gound, the dented metal compress on the Film Counter push clamps
The FC clamps are detached from driving the counting disk , or from bottom of the advance leveI
| Photrio.com contains affiliate links to products. We may receive a commission for purchases made through these links. To read our full affiliate disclosure statement please click Here. |
PHOTRIO PARTNERS EQUALLY FUNDING OUR COMMUNITY:  |