reducing grain?

River Eucalyptus

H
River Eucalyptus

  • 0
  • 0
  • 38
Musician

A
Musician

  • 2
  • 0
  • 68
Your face (in it)

H
Your face (in it)

  • 0
  • 0
  • 66
A window to art

D
A window to art

  • 4
  • 0
  • 60

Recent Classifieds

Forum statistics

Threads
199,257
Messages
2,788,691
Members
99,844
Latest member
MariusV
Recent bookmarks
2

hoffy

Member
Joined
Jan 21, 2009
Messages
3,073
Location
Adelaide, Au
Format
Multi Format
Greetings all,

Just recently, I scanned in some 120 HP5 negatives, that were processed in Rodinal. Scanner is a v700, using Vuescan. I have to admit that I was spirited by how pronounced the grain was. To my eye, it certainly was more so then if I had done an optical print of the same neg.

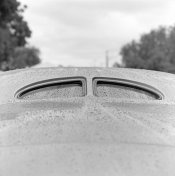
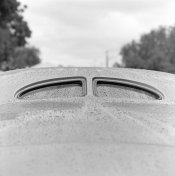
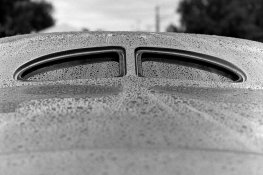
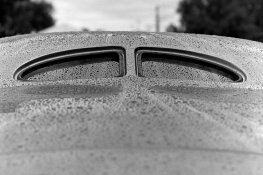
The image is attached below. I am mainly concerned about the grain in the sky. I am also mindful that I don't want to loose the rain detail if I over do it.

I would like to be able to slightly reduce the grain to what I would expect. Is there anything that I can do at the scan time to do this? Or, is it something I should handle within photo shop? If the second option, what software our plugin do people recommend?

Cheers.
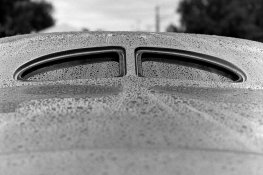
WEBRearWindows140326-0004.jpg
 
Last edited by a moderator:

Hatchetman

Member
Joined
May 27, 2011
Messages
1,553
Location
Chicago, IL
Format
Multi Format
I see what you are talking about. Looks like a 35mm scan. I would try scanning with settings at NO sharpening. Then sharpen manually at different settings to see if you can reduce that "aliasing."
 
OP
OP
hoffy

hoffy

Member
Joined
Jan 21, 2009
Messages
3,073
Location
Adelaide, Au
Format
Multi Format
OK, I am scanning with no sharpening - Grain reduction in Vuescan is also off (as is IR clean.....).

I have just looked at the scan output (I had saved it as a DNG file) and its not so pronounced - Obviously, giving it a big contrast boost in adobe RAW and PS has certainly given it more grain. But it is there...maybe I just need to look at what I am doing in post processing. The original, out of the scanner (resized) is attached:

RESIZEDScan-140326-0004.jpg

I want the grain to be still present, it just looks too much.

Just from curiosity sake, do people use things like Neat Image to clean up their grain?
 
Last edited by a moderator:

rbultman

Member
Joined
Sep 1, 2012
Messages
411
Location
Louisville,
Format
Multi Format
Can you use the Vuescan Multiscan feature with your scanner? This might help with some of the grain in the sky. What are you using for editing? Does it have a noise reduction feature?
 

Pioneer

Member
Joined
May 29, 2010
Messages
3,880
Location
Elko, Nevada
Format
Multi Format
I am curious why you would use Rodinal to develop HP5? I am certainly not an expert at this game but I rarely use Rodinal for anything over ISO100 for this very reason. The negative will likely be ok to print optically but the minute you scan you see the grain. Your 2nd scan is as good as I have seen. Unless this is what you want I would personally choose another developer for this, something like ID11/D76 is likely to perform a bit better.

Just a thought.
 

Hatchetman

Member
Joined
May 27, 2011
Messages
1,553
Location
Chicago, IL
Format
Multi Format
well, that one looks much better as far as the blotchy sky goes.....I would use NO noise reduction. Try unsharp mask amount = 150 Radius=1.1 Threshold =3.

use levels to bring up the black point.
 
OP
OP
hoffy

hoffy

Member
Joined
Jan 21, 2009
Messages
3,073
Location
Adelaide, Au
Format
Multi Format
I am curious why you would use Rodinal to develop HP5? I am certainly not an expert at this game but I rarely use Rodinal for anything over ISO100 for this very reason. The negative will likely be ok to print optically but the minute you scan you see the grain. Your 2nd scan is as good as I have seen. Unless this is what you want I would personally choose another developer for this, something like ID11/D76 is likely to perform a bit better.

Just a thought.

Just to clarify. I have re-attached the images to this post.

In this post, the first image is the scan, the second image is after I have been at it with Photoshop:

RESIZEDScan-140326-0004.jpg WEBRearWindows140326-0004.jpg

Sorry if this has caused confusion!

Now, In PS, apart from cropping, I have done the following:

Levels layer, with the 3 sliders set to 54, 0.67, 244
USM, amount 500% (yes, 500%), radius 0.4, threshold 0 - this layer, though, is reduced to 10% opacity - it is an action that I have been using for ever, when I started with Digital SLR's!

Looking at it now, its the mid levels adjustment that has accentuated the grain. I really wanted to punch it up (I.E., just about replicating a grade 5 contrast optical print) - I suppose this is the trade off!

As for using Rodinal - I did this on purpose for the express reason of getting some grain. When I process in D76, I tend to find that the images are probably too smooth. I wanted grain, I just didn't quite expect as much as I got.

Thanks for the help - I did run some 'noise' reduction over it in PS and this is the result:

WEBNRRearWindows140326-0004.jpg

Cheers
 

rbultman

Member
Joined
Sep 1, 2012
Messages
411
Location
Louisville,
Format
Multi Format
Can you mask out the sky and just apply the adjustments to the car? (Not a PS user.) I find the darkened trees a bit distracting. Leaving those less dense might allow you to apply less "punch up" to the car yet still get a nice effect. Nice work and nice shot.
 

hsandler

Subscriber
Joined
Oct 2, 2010
Messages
472
Location
Ottawa, Canada
Format
Multi Format
I have found the apparent grain in a flatbed scan is very dependent on the contrast in the negative and the black and white point settings of the scanner. This looks to be a relatively low contrast scene, so amping up the contrast with the scanner black and white points, or after in photoshop, amps the grain. Also, it is HP5 which is not particularly fine grained. The grain looks to me about par for the course. As others noted, it is best to scan with no sharpening and then do it later in photoshop. I generally use USM amount 225, radius 1.1, threshold 3 for a v700 scan, applied selectively to the areas I want sharp. So by masking or selection, you could skip the sky area. I also sometimes selectively use noise reduction on grainy areas. I use Imagenomic's noise plugin for this.
 

lenny

Member
Joined
Oct 27, 2005
Messages
305
Location
Petaluma, CA
Format
4x5 Format
This is one of my pet peeves. I am scanning a series of shots I did a long time ago with med format that for some stupid reason I souped in Rodinal. I think this developer is the worst. It's fine that some people like it. A long time ago some folks decided that if they were going to have grain, why not use that to their aesthetic advantage. It's an aesthetic choice that they get to make. Just like filing out the edges of the film carrier to make that black edge.

HOWEVER, Rodinal is not an all-purpose developer. It is a special purpose developer, meant to enhance grain. The combination of the activator, which has an extremely high PH and the Phendione has an effect which darkens the edges of the grains in the image. Thus, the images looks sharper, because each grain is articulated, but it also looks quite a bit more grainy. If you don't want grainy images, don't use this stuff.

Further if you want your images to be smooth, don't use HP5. It's a very grainy film. If you want smoothness, try Delta 100 (my favorite), Acros, TMax or TMY2. They will have lots of tightly packed grains, perfect for scanning. Don't use TMax developer, use Xtol (don't over develop with it) or one of the Pyro variants and you will have superb results.

The only way to reduce the grain in scanning is to use a drum scanner, preferably a Premier, as it has 3 micron adjustments, and scan it one or two steps higher than perfectly sharp. It can smooth the grains a bit, with a much better effect than noise reduction. However, I don't want to offer you much hope with that, either. Best solution is to get rid of the Rodinal and the HP5.

Med format film has the capacity to be incredibly smooth.

Lenny
 

artobest

Member
Joined
Oct 19, 2011
Messages
165
Location
South Wales
Format
Medium Format
Sorry if I've missed this, but do you sharpen a separate, masked layer? If you do, use an edge mask to isolate the edges and block the effect on smooth areas. Not sure if there are any decent online resources for edge-masking; I got my method from Fraser/Schewe's 'Real World Image Sharpening'. I turned it into an action in PS. The key is get a subtle transition between the sharpened edges and the masked sections.

Of course, the new Photoshop CC (and Lightroom/Camera Raw) has built-in masking (noise reduction) in their sharpening (in PS you find it in the Smart Sharpen module). This eliminates the need for edge-masking.
 

lenny

Member
Joined
Oct 27, 2005
Messages
305
Location
Petaluma, CA
Format
4x5 Format
Sorry if I've missed this, but do you sharpen a separate, masked layer? If you do, use an edge mask to isolate the edges and block the effect on smooth areas. Not sure if there are any decent online resources for edge-masking; I got my method from Fraser/Schewe's 'Real World Image Sharpening'. I turned it into an action in PS. The key is get a subtle transition between the sharpened edges and the masked sections.

Of course, the new Photoshop CC (and Lightroom/Camera Raw) has built-in masking (noise reduction) in their sharpening (in PS you find it in the Smart Sharpen module). This eliminates the need for edge-masking.

Edge masking is a cool technique. It's great for urban landscapes. I don't use it very often, as I am mostly dealing with the natural landscape. There are obvious delineations such as a sky, or water, etc. I would never sharpen those.

I primarily use two different techniques. Mostly its plain old Unsharp Masking. On occasion I use a High pass filter, in which case there is an additional layer (which can accommodate a vector mask as well). When I am using basic sharpening, I do NOT create an additional layer. There is no need. I have the main file, and when I am ready to print, I duplicate, flatten and sharpen a file to send to the printer. My RIP likes flattened tifs. I am starting out with a drum scan so things are sharp to being with and the radius is usually at .2.

Hope this helps,

Lenny
 
OP
OP
hoffy

hoffy

Member
Joined
Jan 21, 2009
Messages
3,073
Location
Adelaide, Au
Format
Multi Format
I made a conscious decision to use Rodinal. I wanted the grainy look, but I may have over done it. I think it works well for the event I was at (a Kustom Kulture rod show)!

For the noise reduction, I used neat image (I forgot I had it)

But I am curious about the sharpening methods described above.

My process has always been to flatten the image, add a duplicate layer, over sharpen with USM and the reduce the opacity to taste.

Where can I find a tutorial on the edge sharpening process?
 

Bill Burk

Subscriber
Joined
Feb 9, 2010
Messages
9,331
Format
4x5 Format
What if... You make a traditional Silver Gelatin enlargement and then shoot the print on a copyboard with your DSLR? I almost always find the grain on a print is less than the grain I get from a scan.
 
OP
OP
hoffy

hoffy

Member
Joined
Jan 21, 2009
Messages
3,073
Location
Adelaide, Au
Format
Multi Format
What if... You make a traditional Silver Gelatin enlargement and then shoot the print on a copyboard with your DSLR? I almost always find the grain on a print is less than the grain I get from a scan.

Eventually.

I am finding I don't have the time to get in the darkroom to make prints.
 

artobest

Member
Joined
Oct 19, 2011
Messages
165
Location
South Wales
Format
Medium Format
I tend to use Smart Sharpen these days as I find it compensates wonderfully for the (very) slight softness of the V750's (pretty good) optics. You have to select Lens Blur and More Accurate (or just Lens Blur in the new Photoshop CC module). This uses a kind of deconvolution sharpening that can really pull out detail instead of just sharpening edges, as USM does. You have to be careful with your sharpening radius, though - don't overdo it. I usually pull the amount slider over to the right and choose a radius that doesn't obliterate fine detail, then reset the amount accordingly. And make use of the Shadow and Highlight fade sliders, so the effect is blended in more naturally, without harsh haloes.

Alternatively, you can try the excellent Photokit Sharpener for its capture sharpening.

Oh, and one other thing - when I'm scanning black and white on the Epson, I scan as colour positive and use the Channel Mixer in PS to choose only the green channel, which I find is the sharpest and cleanest.
 

Bill Burk

Subscriber
Joined
Feb 9, 2010
Messages
9,331
Format
4x5 Format
Eventually.

I am finding I don't have the time to get in the darkroom to make prints.

Ah, I thought maybe you'd be able to get in the darkroom just this one time to solve a problem...

But on the original scan, I don't see any grain apparent in the sky. Perhaps you could work with masks and layers as artobest and rbultman suggested... leave that part of the image out of the work... I don't know if it would work but maybe you could add a solid density in the sky to bring it down, instead of amplifying what's there with contrast adjustments.
 
Photrio.com contains affiliate links to products. We may receive a commission for purchases made through these links.
To read our full affiliate disclosure statement please click Here.

PHOTRIO PARTNERS EQUALLY FUNDING OUR COMMUNITY:


Ilford ADOX Freestyle Photographic Stearman Press Weldon Color Lab Blue Moon Camera & Machine
Top Bottom