RB67 pinhole camera?

first-church.jpg

D
first-church.jpg

  • 4
  • 2
  • 38
Grape Vines

A
Grape Vines

  • sly
  • May 31, 2025
  • 5
  • 1
  • 29
Plot Foiled

H
Plot Foiled

  • 2
  • 0
  • 36
FedEx Bread

H
FedEx Bread

  • 1
  • 0
  • 33
Unusual House Design

D
Unusual House Design

  • 5
  • 2
  • 76

Forum statistics

Threads
197,971
Messages
2,767,483
Members
99,518
Latest member
amokphoto
Recent bookmarks
0

paul ron

Member
Joined
Jan 22, 2004
Messages
2,706
Location
NYC
Format
Medium Format
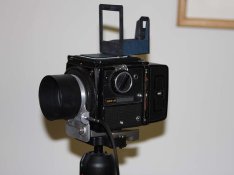
i once had a friend use an rb67 as a pinhole camera by fitting a front body cap with a pinhole lens.

i have my cap drilled n ready to accept a brass shim disc.

i just have no idea what drill size to use for the hole. then once i do drill it... how do i know what f-stop to gage my exposures?

:confused:
 

markbarendt

Member
Joined
May 18, 2008
Messages
9,422
Location
Beaverton, OR
Format
Multi Format
A 50mm lens with a 25mm aperture is an f/2 lens. 50/25=2 or f=50 50/2=25mm aperture

So if your body cap is 100mm from the film and your aperture hole is 2mm the 100/2=50 so f/50, run the bellows out to get 200mm and the same 2mm hole is f/100

Hope that gets you started on your math
 
OP
OP
paul ron

paul ron

Member
Joined
Jan 22, 2004
Messages
2,706
Location
NYC
Format
Medium Format
that simple?.... I'm on it, thanks.

I'll make a couple discs tonight n try it.

thanks for the link.
 

DWThomas

Subscriber
Joined
Jun 13, 2006
Messages
4,602
Location
SE Pennsylvania
Format
Multi Format
If you run Windoze, there is also Pinhole Designer which crunches lots of numbers. For the 2 cents it may be worth, a few years back I did what you're proposing with a Bronica SQ-A. (At the time I had tools available not found in the average home basement!)

On the SQ-A I measured a film to pinhole distance of about 90mm and used a 0.014 inch (0.36 mm) pinhole plate homemade by the dimple-and-sand process for a whopping aperture of about f/250.
 
Joined
Dec 10, 2009
Messages
6,297
Format
Multi Format

Jim Jones

Subscriber
Joined
Jan 16, 2006
Messages
3,740
Location
Chillicothe MO
Format
Multi Format
Dave Thomas is an experienced pinhole photographer. I agree with him about using http://www.pinhole.cz/en/pinholedesigner/ with a user constant of 1.4 instead of the one-size-fits-all Mr Pinhole. For over a hundred years there have been many arguments about the ideal diameter of a pinhole. Since there is more magic than science in pinhole photography, it doesn't really make that much difference to many photographers. If you want more information, go to http://jongrepstad.com/pinhole-photography/pinhole-photography-history-images-cameras-formulas/.
 

bsdunek

Member
Joined
Jul 27, 2006
Messages
1,611
Location
Michigan
Format
Multi Format
Yes, use MrPinhole. He has a lot of information. I use my Mamiya Press Super 23 for pinhole work. With extension tubes, you can have several focal lengths, each, of course, requiring different size pin holes for best results.
 
OP
OP
paul ron

paul ron

Member
Joined
Jan 22, 2004
Messages
2,706
Location
NYC
Format
Medium Format
Thanks for all the help.

I have tools n materials to do the lenses. My cap is already drilled n ready for my lens. Im going to do some drilling tonight after shoveling more snow.

Now that I see how easy it is to do the calculations I may also convert my ETRS... its 75mm focal length to the cap. I thought the RB was better because of the bellows but I see it doesn't matter.

Cant wait to get some pictures. this is going to be fun.
 

MattKing

Moderator
Moderator
Joined
Apr 24, 2005
Messages
52,268
Location
Delta, BC Canada
Format
Medium Format
When I originally saw your thread I was going to post that you will also need to figure out how to work with the mirror sequencing and double exposure interlocks on the camera, but then I realized who was posting, so I thought I needn't bother :whistling:.

Are you going to try to use the viewing system in the camera, or just guess as to framing?

Have fun!
 
OP
OP
paul ron

paul ron

Member
Joined
Jan 22, 2004
Messages
2,706
Location
NYC
Format
Medium Format
hahahaha yeah rbs are my kids.

im wondering if id be able to see anything in the viewfinder. im going to put in a plain ground glass because i think any other screen may just black out on me. i am using a prism for better brightness.

what do you think?

as for exposures, im going to run a few test rolls before taking her into the field. im just excited about long exposures because some of my pics are going to be sea scapes with tidal pools.
 

MattKing

Moderator
Moderator
Joined
Apr 24, 2005
Messages
52,268
Location
Delta, BC Canada
Format
Medium Format
I would try a chimney finder.

Maybe you can use the dark slide as a shutter!
 

DWThomas

Subscriber
Joined
Jun 13, 2006
Messages
4,602
Location
SE Pennsylvania
Format
Multi Format
I once tried putting an aluminum plate with a hole much larger than the desired pinhole on my SQ-A to see what I could see and it wasn't very encouraging. If you can put on a lens for the RB with similar focal length -- and if the lens has a manual stop-down for depth of field preview -- and if you could crank it down to f/32 -- it might give some idea, but I suspect the ideal pinhole for sharpness will be up in the f/200 neighborhood.

But that leads to another option -- which I've done with my SQ-A -- put on a lens of matching focal length (in my case, the 80mm), aim and compose, then swap with the pinhole body cap and make the exposure. That's one nice handy feature of a body cap setup.

Ultimately I made a sort of wireframe finder out of black mat board which I attached to a body cover with two-sided tape. I used the angle of view determined for the pinhole and fashioned a finder to cover the same angle. That is definitely an approximation -- but so is pinhole work! And it's better than nothing. If you're using the bellows in the RB I guess you could come up with a frame that mounts on the lens mount standard (somehow -- I've never handled an RB) and then mount some sort of peep sight toward the back of the body more or less in line with the film plane.

This was automatic when I made a pinhole lens board for my old B&J Press 4x5 which has a wireframe finder-- pretty handy.

My happy attempt on the SQ-A:
attachment.php


I tried a similar finder for a super wide angle 4x5 I made, but it was so wide it was difficult to use and I decided to just point in the general direction and live with what I get! (My 8x10 I added small pegs to sight along to determine the approximate edges of the view.)
 

Attachments

  • 96086435.jpg
    96086435.jpg
    44.3 KB · Views: 343
Last edited by a moderator:

DWThomas

Subscriber
Joined
Jun 13, 2006
Messages
4,602
Location
SE Pennsylvania
Format
Multi Format
Yes, use MrPinhole. He has a lot of information. I use my Mamiya Press Super 23 for pinhole work. With extension tubes, you can have several focal lengths, each, of course, requiring different size pin holes for best results.

Mr Pinhole is cool because it's web based and should run on most any computer, but I have two gripes about it.

1) There are assumptions for a constant or two and unless I've missed it (admittedly possible :whistling:), he doesn't say what he's using, which could be good to know.

2) It may be related to #1, but based on my own experience, his angle of coverage limits have appeared to be rather noticeably pessimistic.

That said, it will definitely give you usable numbers and get you started.
 

Jim Jones

Subscriber
Joined
Jan 16, 2006
Messages
3,740
Location
Chillicothe MO
Format
Multi Format
Mr Pinhole is cool because it's web based and should run on most any computer, but I have two gripes about it.

1) There are assumptions for a constant or two and unless I've missed it (admittedly possible :whistling:), he doesn't say what he's using, which could be good to know.

2) It may be related to #1, but based on my own experience, his angle of coverage limits have appeared to be rather noticeably pessimistic.

That said, it will definitely give you usable numbers and get you started.

I agree. It is a good simple program for anyone who wants one simple answer. It lets one move on to making pictures instead of exploring the rich field of pinhole technology. Sometimes we get so involved in that aspect that we have little time to make pictures. Pinhole photography at its best involves design and construction, and Mr. Pinhole is inadequate for that. At least Mr. Pinhole gives better information than young kids often get, and they can still have fun with pinhole photography. By the way, Pinhole Designer also works on a computer.
 

DWThomas

Subscriber
Joined
Jun 13, 2006
Messages
4,602
Location
SE Pennsylvania
Format
Multi Format
[ ... ] By the way, Pinhole Designer also works on a computer.

Wooops -- guess I should have said Operating System maybe. Pinhole Designer, which I have and use, is a freeware program one installs and it only runs on Windows. I assume, though have not tried it, that Mr Pinhole, being a bunch of web scripting, can probably be accessed and used with various browsers on the machines made by that fruit company and other systems. (Though I admit to not yet trying to use it from my new iPad.) I'm not up on it, I guess there are ways to run some Windows stuff cross platform via emulation, too.
 

ced

Member
Joined
Oct 10, 2011
Messages
866
Location
Belgica
Format
Multi Format
I think it better not trying to use a drill rather a pin/needle make a dimple and sand away with very fine emery.
You need a way to measure the size of the hole while doing this and a clean edge is I feel quite important helping with finer details in the image and flare reduction. This is described on the web if you do some searching.
Have fun and it is more satisfying doing it yourself.

PS. http://www.kodak.com/ek/US/en/Pinhole_Camera.htm
Use brass shim not aluminium!
 
OP
OP
paul ron

paul ron

Member
Joined
Jan 22, 2004
Messages
2,706
Location
NYC
Format
Medium Format
swaping lenses is a good idea... i like the makeshift sports finder though.

mrpinhole seems very informative for my purpose as a starter. im not looking for much technical background, i only need to know a few basics to make this fun. maybe later i may consider getting deeper into this. using my RB67 and a lens cap just seemed a step up from my oatmeal box experiments as a kid. the other reason for exploring pinhole was for the effects i can get using long exposures. ive got lots of outdated film to burn.

btw... mrpinhole web based runs on my android tablet. ive dowloaded the pc prog but havent tried it yet.

im going to drill the holes in brass shim stock. i can undersize the holes n burnish to final finish? like i said, tools are not a problem. ill make a pin n dimple anyway just to see if there is any noticeable difference but im doubtful.

today is my first go at this. I'll let ya know how it goes.
 

markbarendt

Member
Joined
May 18, 2008
Messages
9,422
Location
Beaverton, OR
Format
Multi Format
im going to drill the holes in brass shim stock. i can undersize the holes n burnish to final finish? like i said, tools are not a problem. ill make a pin n dimple anyway just to see if there is any noticeable difference but im doubtful.

A straight drilled hole has a sharp edge on each side of the material, essentially two apertures at very slightly differing focal lengths. This could be fixed by using a larger drill to clean up but not enlarge the hole.

A sanded dimple ends up with one sharp edge naturally.
 

DWThomas

Subscriber
Joined
Jun 13, 2006
Messages
4,602
Location
SE Pennsylvania
Format
Multi Format
My best performing pinholes have been made using dimple-and-sand with 1 mil (.001" / .025mm) brass shim stock. Drilling metal that thin could be tricky. I suppose one could clamp the stock between two pieces of "something" smooth and flat (and expendable) -- aluminum? Masonite? and use pretty high RPMs, but it might prove less than foolproof.

The ideal pinhole plate is infinitesimally thin with a perfectly round hole and a knife edge (the knife edge is automatic if the sheet is infinitesimally thin :laugh:
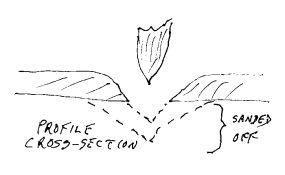
). If the plate has significant thickness -- say approaching the pinhole diameter or thicker, it's no longer a pinhole, but a tunnel! The latter produces vignetting and rapid fall-off of exposure, depending on the thickness.

I also blacken ("darken" might be a better word) my pinhole plates with Blacken-It from my friendly local model RR hobby shop -- there are a gazillion similar products. I'm given to understand some toners such as selenium can do the job but have not had success doing that myself.

OK -- there's today's hot tips (back to shoveling the other end of the driveway!)
 
OP
OP
paul ron

paul ron

Member
Joined
Jan 22, 2004
Messages
2,706
Location
NYC
Format
Medium Format
you guys are good!

im finding exactly what you've described as true. im using my etrs for these experiments because my son has my body caps on his cameras... of course since i need them.

i used a shim i thought was thin enough. drilled a #75 n a #80 hole. looking through the prism, i can see an image on the gg. its not very sharp and i also see a goldish dot in the center. i blackend it with a blue chemical that has no label but i know what its for... labeled as blackening. that helped but not much, the center is brighter n alot of image fall off at the edges.

so i read the tips of the day n shifted gears. i used a shim thats as thon as a heavy tin foil. used a very fine needle n started with a very tiny hole. it's a sharper image, still brighter in the center with alot of fall off. i then gently sanded the dimple with a 600 grit wet paper... not any different in the viewfinder. so i made a few more of these enlarging the hole a bit more each time.

ive got a nice sharp image... have no idea how big the hole is, have no idea what stop to rate it at either.

but my image still falls off at the edges. the center is still brighter.

tell me... which side does the dimple face?... film plane?

I'll get my rb caps back tonight. i can see how the focusing may come in handy.

btw the image in the prism is perfect. i cant see details in the dark shadows but the bright snow is very visable n sharp. framing should be easy. i just have to make a good seal with the eye cup to keep stray light out.
 

MattKing

Moderator
Moderator
Joined
Apr 24, 2005
Messages
52,268
Location
Delta, BC Canada
Format
Medium Format
My local best source for film related stuff recently had something in its used and consignment sales section that I couldn't figure out the market for.

But with this thread, I know where that market is.

Have you ever seen a Mamiya RB67 sports finder before? :D

s-l1600.jpg
 

DWThomas

Subscriber
Joined
Jun 13, 2006
Messages
4,602
Location
SE Pennsylvania
Format
Multi Format
With dimple and sand, the dimple should disappear.

A quick cheap and dirty sketch:
attachment.php


I usually use either #400 wet-or-dry sandpaper (or #600 if I'm feeling more patient), using it wet. I generally do both the dimpling and the sanding on a scrap of smooth mat board as backing.

The hot spot you're seeing in the center may not be real. Something about the angle of incidence from pinhole to ground glass vs the line of sight to your eye. Fall-off is usually pretty minimal for the first 50 or 60º of angle of view. That is, it might be worth a test with film before drawing too many conclusions.

I don't think the direction of the dimple remains should matter, as this is strictly straight line ray tracing, no fancy refraction thru glass.

(Taking a break from shoveling ... :cool: )
 

Attachments

  • _PinholePlateProfile.png
    _PinholePlateProfile.png
    4.5 KB · Views: 353

DWThomas

Subscriber
Joined
Jun 13, 2006
Messages
4,602
Location
SE Pennsylvania
Format
Multi Format
Addendum re: size measurement

You asked about measuring ...

I believe some folks measure their pinholes by scanning and counting pixels in a photo editor. Or you can scribe a couple of marks of known spacing on a scrap of film, put it in an enlarger and adjust to a known magnification, then replace the film with the pinhole plate and measure the image of the hole. I use a third way, having acquired, circa 19-ought-65, a hand-held 50x microscope with a direct measuring internal reticle calibrated in thousandths of an inch. (Used in evaluating PC boards and other etched goodies.) Obviously that is fairly handy, but assuming such a thing is still made, I wouldn't likely run out and buy it just to make pinholes!

The ultimate fantasy is that the sanded dimple comes out to exactly the desired diameter.

The next best result is it comes out a bit small. You can then plunk the plate back on a piece of mat board and gently work the hole a bit with a needle, perhaps even gently rotating the needle. This will enlarge it and push up a bit of upset around the edge which can be sanded off and you can sneak up on the desired diameter.
 
OP
OP
paul ron

paul ron

Member
Joined
Jan 22, 2004
Messages
2,706
Location
NYC
Format
Medium Format
im on it!

ive got a microscope... i may also have a measuring slide in there as well but it'll be in microns.

i was thinking... the hole has to be cone shaped... i can sharpen a pin to have a steeper angle to the tip? i think my drill press is sturdy n accurate enough. ive done crazier things before. im gunna play with that tonight.

im punching my holes on a hard rubber matt. its actually the orange membrane plumbers use for shower pans these days. i get a nice dimple but perhaps not enough of a dome. ill try the matt board but this shim stock is very thin n may just burst through out of control.

i see how pinhole technology drags you in deeper n deeper.... its just a lousey pin hole... but maybe not.

im done shoveling! nyc dos is busting up snow mounds for traffic to mush up. temps this week are going to be in the 40°f range again... back in shorts for me.
 
Photrio.com contains affiliate links to products. We may receive a commission for purchases made through these links.
To read our full affiliate disclosure statement please click Here.

PHOTRIO PARTNERS EQUALLY FUNDING OUR COMMUNITY:


Ilford ADOX Freestyle Photographic Stearman Press Weldon Color Lab Blue Moon Camera & Machine
Top Bottom