RB67 Back Rescue

3 Columns

A
3 Columns

  • 6
  • 6
  • 101
Couples

A
Couples

  • 4
  • 0
  • 89
Exhibition Card

A
Exhibition Card

  • 6
  • 4
  • 127
Flying Lady

A
Flying Lady

  • 7
  • 2
  • 139

Recent Classifieds

Forum statistics

Threads
199,053
Messages
2,785,440
Members
99,791
Latest member
nsoll
Recent bookmarks
1

Lukeod

Member
Joined
Sep 26, 2020
Messages
24
Location
Ireland
Format
Multi Format
Hi all,

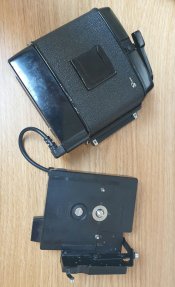
I bought a "for parts" Pro S power drive 120/220 film back cheap for the dark slide alone as I had lost one from another Pro SD back. The back arrived with the power pack (which sits under the RB67 body) and a few 120/220 pressure plates. The dark slide is fine so that's a success, but obviously I'm looking at the back now to see if I can get it going and have myself another working back.

I'm not even remotely expert in this, but from what I can see it looks in reasonably good shape aside from light seals and the pressure plate (or rather the plate to which the interchangeable 120/220 pressure plates are attached) which is cocked at an angle. I think the problem is a screw missing from the spot circled in the pic. I'm assuming this screw serves to hold the plate in the correct position, and it also appears to guide the sliding lock which holds the changeable pressure plates in place. If I could get this screw replaced I think it might be in business.

I'm hoping there's some solution aside from buying another "for parts" back, although I fear this is a precision piece which will be hard to replace. Any thoughts or advice on a fix would be welcome!

Pro S Power Back_2.jpg
 
OP
OP

Lukeod

Member
Joined
Sep 26, 2020
Messages
24
Location
Ireland
Format
Multi Format
Just realised this should probably be in the camera repairs forum - apologies.
 

Donald Qualls

Subscriber
Joined
Jan 19, 2005
Messages
12,310
Location
North Carolina
Format
Multi Format
Just "report" your own thread starter and ask the mods to move it. Not sure when they will, but that's how it's supposed to work...

Meantime, can you get to the other screw's head? The two are probably the same, so at least you can measure the major diameter and count the thread pitch -- even check the one you have against the vacant hole's threads to be sure they're the same.
 
OP
OP

Lukeod

Member
Joined
Sep 26, 2020
Messages
24
Location
Ireland
Format
Multi Format
Thanks Donald - reported.

Yes, I think working off the other screw is the approach I'll need to take, although getting at it isn't entirely straight forward. It's hollow, and and seems it will require a thread to actually remove it. Not something I've dealt with before, but just need the right tool.
 

Donald Qualls

Subscriber
Joined
Jan 19, 2005
Messages
12,310
Location
North Carolina
Format
Multi Format
Okay. I've never seen one of the motor drive backs. Is it a ProS or ProSD? They're significantly different, as I recall.
 
OP
OP

Lukeod

Member
Joined
Sep 26, 2020
Messages
24
Location
Ireland
Format
Multi Format
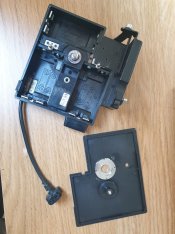
It's a Pro S, and yes, seems very different from the Pro SD ones I've seen. A battery pack attaches to the base of the body and a cable from there plugs into the back itself. It has a lever just like a manual one so can be used without the electronics which is nice - can't imagine ever needing the power myself.


20201002_144458_1.jpg
 

Donald Qualls

Subscriber
Joined
Jan 19, 2005
Messages
12,310
Location
North Carolina
Format
Multi Format
IIRC, the ProS version has built-in NiCd battery in that pack, and those (40+ year old) cells are almost certainly bad, though they can be replaced/upgraded to new NiMH (same charger will work). You could also build a battery pack to use LiFePO4 power tool cells (bring your own charger) and connect it to the original cord. I suggest those over lithium polymer (cell phones and laptops) because they're much more mechanically robust and less prone to catching fire if slightly abused (or just defective). Or you could build a battery pack to use alkaline cells -- just match voltage and use two sets in parallel to get the current needed.

Running it manually is a nice option not available with all power winders, but if you were banging through 20 frame rolls in two or three minutes (fashion shoots, for instance) you might well appreciate only having to think about cocking the body, rather than having to separately advance the film -- not to mention if you have the back rotated for verticals, the lever is ergonomically less advantageous. Of course, in that situation you'd have at least two inserts and at least one spare battery pack...
 
OP
OP

Lukeod

Member
Joined
Sep 26, 2020
Messages
24
Location
Ireland
Format
Multi Format
Just opened up the battery pack for a look - looks like 6 AAs. Looks clean enough in there actually. It'd be nice if the rest of the back gets going to give it a whirl.

I was delighted to find it could run manually. Absolutely if you were doing fashion shoots I imagine it would be power packs all the way, but the chances of me worrying about the time taken to crank the lever are very slim! I'm much more slow moving! 20201002_151144.jpg
 

David A. Goldfarb

Moderator
Moderator
Joined
Sep 7, 2002
Messages
19,974
Location
Honolulu, HI
Format
Large Format
Thread moved.
 

Donald Qualls

Subscriber
Joined
Jan 19, 2005
Messages
12,310
Location
North Carolina
Format
Multi Format
Thanks, @David A. Goldfarb , @Lukeod be sure to document everything (cell phone pictures, at the least), both so you can get it back together, and so you can make the information available to others on this thread.
 

Mamiya_Repair

Advertiser
Joined
Feb 7, 2019
Messages
223
Location
Nevada
Format
Medium Format
The screw that is missing is a 1.4mm x 2.5mm round head. It's easy to access the screw hole, just remove the two chrome film pressure springs (T-Springs) and the T-Spring base (two screws). Also, I can't quite tell from the photo, but it looks like the threaded insert in the plate holder that accepts this screw is not there?
 
Last edited:
OP
OP

Lukeod

Member
Joined
Sep 26, 2020
Messages
24
Location
Ireland
Format
Multi Format
The screw that is missing is a 1.4mm x 2.5mm round head. It's easy to access the screw hole, just remove the two chrome film pressure springs (T-Springs) and the T-Spring base (two screws). Also, I can't quite tell from the photo, but it looks like the threaded insert in the plate holder that accepts this screw is not there?

Thank you for that precise information! I'm away for the weekend but will have a good look again when home, and check if I'm understanding you correctly. Thanks again.
 
OP
OP

Lukeod

Member
Joined
Sep 26, 2020
Messages
24
Location
Ireland
Format
Multi Format
The screw that is missing is a 1.4mm x 2.5mm round head. It's easy to access the screw hole, just remove the two chrome film pressure springs (T-Springs) and the T-Spring base (two screws). Also, I can't quite tell from the photo, but it looks like the threaded insert in the plate holder that accepts this screw is not there?

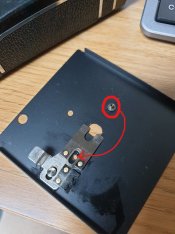
OK, got a few minutes unexpectedly so had a look at this and followed your extremely helpful instructions. This allowed me see the reverse of the plate holder where the problems seems obvious, and as you suspected. It seems clear that I need a replacement duplicate of the circled part in this pic, plus the screw you describe. It seems like a very easy fix if I could get these. The screw seems manageable, but the other part seems tricky. I suspect another "for parts" back is the only option? Any advice/thoughts/corrections greatly appreciated!

Inked20201004_122959_LI-2.jpg
 

Mamiya_Repair

Advertiser
Joined
Feb 7, 2019
Messages
223
Location
Nevada
Format
Medium Format
Yes, about the only option is to salvage the part from another back. I stock most Mamiya parts but this one I no longer have available. Repair will be simple, you just replace the complete plate holder as the threaded inserts are pressed/staked in place.
 
OP
OP

Lukeod

Member
Joined
Sep 26, 2020
Messages
24
Location
Ireland
Format
Multi Format
Yes, about the only option is to salvage the part from another back. I stock most Mamiya parts but this one I no longer have available. Repair will be simple, you just replace the complete plate holder as the threaded inserts are pressed/staked in place.

I found another of the same power drive backs with a different issue and going cheap, so I grabbed it. I realised I was going to need another dark slide if I get this back going again, so this will solve that problem too! Also more confident that I'll get the power going since I'll have parts from two backs to work with. I think I'll end up with at least one new working back plus two dark slides for less than €60 so happy enough. Funny to think this all arose from me losing a dark slide in the first place.

I would source the screw and two nuts, grind the edges of one nut to fit between the springs if that is how it should be and epoxy it in place. A nut and flat washer epoxied in place can be used if that is the correct configuration.

I was thinking about something with epoxy if there was no other option. I wouldn't have much experience on something this intricate, but if this second "for parts" back I've just bought is fixable in terms of its other problems I'll come back to it and see if I can work something.
 
Photrio.com contains affiliate links to products. We may receive a commission for purchases made through these links.
To read our full affiliate disclosure statement please click Here.

PHOTRIO PARTNERS EQUALLY FUNDING OUR COMMUNITY:


Ilford ADOX Freestyle Photographic Stearman Press Weldon Color Lab Blue Moon Camera & Machine
Top Bottom