Printing panorama

about to extinct

D
about to extinct

  • 2
  • 0
  • 89
Fantasyland!

D
Fantasyland!

  • 9
  • 2
  • 132
perfect cirkel

D
perfect cirkel

  • 2
  • 1
  • 127

Recent Classifieds

Forum statistics

Threads
198,748
Messages
2,780,357
Members
99,697
Latest member
Fedia
Recent bookmarks
1

Dietmar Wolf

Member
Joined
Mar 21, 2006
Messages
633
Location
switzerland
Format
Multi Format
Hi.

I have a Rollei with a rolleifix and put it on a tripod.
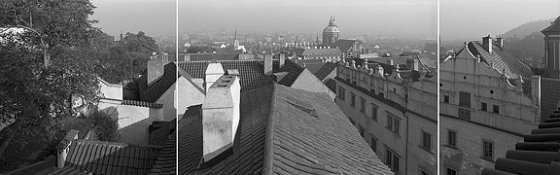
Last weekend I made a panorama with 3 sinlge pics shot next to another.

Now, I dont just want to view the pano on the monitor as digital file, composed from a curious software program, I want to print it on paper.

Does anyone has experience with doing this porperly. Is it possible to print it right next to another on one paper?

How do you do this. Does anyone has example pics in the gallery?
Is there already a thread with this topic?

Thank you very much.
 

Nick Zentena

Member
Joined
Nov 21, 2004
Messages
4,666
Location
Italia
Format
Multi Format
If you have a big enough enlarger you can just put the three negatives in a glass carrier and print. Is this 6x6? I guess you'd need a 5x7 or bigger enlarger.
 

Nick Zentena

Member
Joined
Nov 21, 2004
Messages
4,666
Location
Italia
Format
Multi Format
Omega and I guess others used to make sliding easels intended for portrait photographers. It let you make multiple images on one sheet of paper. The easel came with various masks you could remove one at a time to expose. Durst and others made some thing simpler for making four 4x5 images on a sheet of 8x10 paper.

I think you could make something similar at home if you want to print one at a time. Maybe take some thick matt board. Cut out the three openings. Place it on the paper. You'll need to keep the two sections you aren't exposing covered. The problem is you'll need to move the easel and make sure it's lined up right. Not impossible but it'll take some care.
 

Roger Hicks

Member
Joined
May 17, 2006
Messages
4,895
Location
Northern Aqu
Format
35mm RF
The classic trick is to overlap the exposures, and cut the prints (or mask the negs) to join at an 'easy' feature (the end-wall of a house is one of the easiest). If they're not overlapped, the joins tend to look very obvious. I've not tried this in many years, but I used to do it with a FARUX panoramic head and a Leica.

If you're printing continuously, use a sheet of white paper overlaid on the whole print, with the main features sketched in (do this from a physically cut-up 'joiner') and line everything up using the red filter over the enlarger lens.

Something that is not immediately obvious, until you think about it, is that it is much easier to get convincing 'joiners' with tele lenses and more pics, rather than wide-angles.

Cheers,

Roger
 

Monophoto

Member
Joined
Aug 27, 2004
Messages
1,689
Location
Saratoga Spr
Format
Multi Format
Dietmar -

There are three ways (actually, four) to do what you want to do. One is to print all three negatives onto one piece of paper at one time (Nick's suggestion). That would require an enlarger that could accommodate a negative width of 3x6cm plus the small reveal between the negatives. A 5x7 enlarger would require that you crop off the ends of the panorama, so to print the entire image you would need an 8x10 enlarger.

The second approach would be to expose the three negatives individually on one sheet of paper. As a practical matter, that would probably be very difficult to do because you have two constraints that have to be met - the images must align correctly to yield a continuous image, something that would be tedious to do under safelight illumination, and the exposure would have to be carefully tuned to give identical densities on both sides of each join. Going through the exercise of making a print from multiple negatives is good training in darkroom discipline, but I suspect that approach would be very frustrating in this case.

The third approach is as Roger described - make a print of each negative, and then carefully trim them and mount them together. The densities of the edges would have to be controlled to create the illusion of seamlessness, and you would need to have a vertical edges in the image to hide the seams. This is probably the simplest although "simple" here is a very relative term - what you want to do is inherently a lot of tedious work. It is also possible to rephotograph the final product to create a single negative from which additional prints can be made.

The fourth approach we can't talk about here - see Joe Lipka's portfolio in the latest Lenswork.
 
OP
OP
Dietmar Wolf

Dietmar Wolf

Member
Joined
Mar 21, 2006
Messages
633
Location
switzerland
Format
Multi Format
Another question.

Would you like a picture when printed the 3 negatives not closely together but with small white spaces between?

Does anyone have links to such pictures for me?

---
Louie, what about exactly cutting the negs, gluing them with sticky tape an glas and making contact prints?

Thanks a lot for your replies.
 

Valerie

Subscriber
Joined
Jul 22, 2005
Messages
1,195
Location
Magnolia, Tx
Format
Multi Format
Dietmar,

I am using my Rolleiflex and panoramic attachment to make panos. So far, I print each frame on a separate piece of paper with the intention of (maybe?) drymounting them together....I'm still in the playing stages here....and printing full frame.

(there was a url link here which no longer exists)

This may not help your situation, but gives you an idea of what else is being done.

Valerie
 

Monophoto

Member
Joined
Aug 27, 2004
Messages
1,689
Location
Saratoga Spr
Format
Multi Format
Dietmar -

The philosophical question of whether you should deface a negative is a personal matter. I choose to treat negatives as irreplaceable and never do anything permanent to mine.

But if you are willing to sacrifice negatives, and if your negatives are large enough to make contact prints (that might exclude 6x6 negatives), then carefully trimming and aligning negatives and making contact prints is another possibility.
 

Valerie

Subscriber
Joined
Jul 22, 2005
Messages
1,195
Location
Magnolia, Tx
Format
Multi Format
The ones in the gallery were from the proof sheet, cut up then pasted together (anything larger will not fit on my scanner). But the "real thing" is created by printing each neg separately, then arranging on a mounting board. So if a work is composed of 5 frames, it is printed on 5 sheets of paper....
 
OP
OP
Dietmar Wolf

Dietmar Wolf

Member
Joined
Mar 21, 2006
Messages
633
Location
switzerland
Format
Multi Format
Hi.

I exactly cut the negs (ouch!), glued them with sticky tape on glas (with little space between) and made contact prints. On top of the glass, to prevent the paper gets full black at the borders, l I put a cardboard with cutting an exact hole for good borders.

I will first send it to the postcard exchange members, then show it in the gallery.

I am not sure to do this type of "art" again. It was a lot of work. But on the other hand it made fun, too.
 

ic-racer

Member
Joined
Feb 25, 2007
Messages
16,544
Location
USA
Format
Multi Format
I have been using my rollei panorama head for a few years now and this is my list of ways to print the pictures. I have not tried all of them yet.

1) put the negatives next to each other in a large format enlarger rebate-to-rebate
2) contact print a string of negatives, again rebate-to-rebate
3) print whole frame including the rebate and filed-out negative carrier edge, and attach the images with some overlap to show carrier-edge-to-carrier-edge (super glue worked well for me to hold RC paper together)
4) same as above but dry mount without overlap
5) print less than full-frame and overlap the image area to align the image as close as possible
6) same as above but dry mount without overlap

in 1-6 above I imagine a rectangular mat window overlay over the entire panorama.

7) place the individual images behind square cutouts in a rectangular piece of overlay mat.

When using #3 above and using the presets on the rollei panorama head, there is a lot of overlap. Sometimes I just use a standard tripod head to get less overlap.
#3 tries to get this look but with rollfilm instead of sheet film:
http://www.rcalaw.com/gallery/artist.asp?artist=klett
 

George Collier

Subscriber
Joined
Feb 23, 2005
Messages
1,363
Location
Richmond, VA
Format
Multi Format
I have done a lot of this over the last 20 years from 4x5, Rollei, and 35mm. I have tried many ways to conceal or mask the "joins" and have never been able to completely because of slight differences between negs (the clouds don't stay still). To me, I accept the join and print each image on a separate piece of paper, cutting and joining when mounting. I leave a very small space if drymounting (maybe 2mm) and a small section of overmatte between windows if not drymounting. I like the clean formality of the look, the space being accepted and recognized as a part of the process.

Two samples attached - the Prague shot was actually hand-held 35mm with a 28mm PC lens. The White Hill was 3 4x5 negs shot horizontally, nearly full frame.
 

Attachments

  • Prague Pan 1.flat8".72res.jpg
    Prague Pan 1.flat8".72res.jpg
    70.4 KB · Views: 116
  • 3 White Hills.jpg
    3 White Hills.jpg
    59 KB · Views: 107

Tony Egan

Member
Joined
Oct 29, 2005
Messages
1,295
Location
Sydney, Australia
Format
Multi Format
You may be interested in the work of David Hilliard who uses the technique of adjoining images to create a "panorama" with some stunning results.
http://www.davidhilliard.com/02.html

An extract from his "about" page:
"For me, the construction of panoramic photographs, comprised of various single images, acts as a visual language. Focal planes shift, panel by panel. This sequencing of photographs and shifting of focal planes allows me the luxury of guiding the viewer across the photograph, directing their eye; an effect which could not be achieved through a single image"
 

George Collier

Subscriber
Joined
Feb 23, 2005
Messages
1,363
Location
Richmond, VA
Format
Multi Format
From the above post -
"You may be interested in the work of David Hilliard who uses the technique of adjoining images to create a "panorama" with some stunning results.
http://www.davidhilliard.com/02.html"

Very nice work, and you notice he is not concerned with perfect "joins", even has some parts of a panel appearing in the next panel where individual images overlap. I think (to the original question in the thread) that the idea is to find to total "recipe" of treatments and choices which best supports your images (intended and photographed), try different things, look, and feel the results. Meanwhile, enjoy and learn.

"You can observe a lot by watching" - Yogi
 

rmolson

Member
Joined
Feb 23, 2006
Messages
327
Location
Mansfield Oh
Format
Medium Format
printing a panorama

A few yeas ago I wanted a really large print 28 inches long from a section of a 4x5 negative. My D2 could not be modified enough in my rather tiny darkroom to handle such an enlargement .so I enlarged section of the negative in my B22 on to separate prints. Being very careful to match tones from edge to edge., not an easy task. Then using a technique I was taught in Navy Photo School years and years ago, And not having a defined edge print to print, I made irregular cuts on the paper. then I sanded down the under side of the paper edges as far as I could go and wet mounted the overlapping prints. Messy but when done well looks continuous. Also fiber base works better than RC for this technique.
 

palewin

Member
Joined
Nov 23, 2006
Messages
146
Location
New Jersey
Format
4x5 Format
I've recently used Roger Hicks' approach to make a number of panoramics. As suggested, the "best" way is to overlap the exposures a little. Then you print each exposure as an individual print (altho' I would suggest making duplicate prints, to allow for any mistakes in the trimming steps). Then, based on "eye ball" you trim the left-end print at the overlap point. Laying this print over the next print, line it up so that the trimmed edge lines up exactly where it should on the untrimmed print, and mark the "line" on the margins of the untrimmed print. Now the tricky part - using a rototrim type cutter, cut the untrimmmed print a fraction to the left of the marks, i.e. you can always trim away more, you can't "add back". Line up the prints and see if you got it right. If not, trim away the smallest amount (which is why I use the rototrim type cutter), and keep trimming until you have it exactly right. Repeat this process using the middle print and the untrimmed right-most print. Dry mount, and you're done. It is truly a finicky process, but short of using the "stitch" function in Photoshop, and printing digitally, its the only way I know to make panoramics.
 
OP
OP
Dietmar Wolf

Dietmar Wolf

Member
Joined
Mar 21, 2006
Messages
633
Location
switzerland
Format
Multi Format
Thanks a lot, Pete.

Special thanks to George and Tony. Your posts mean so much to me. I really had some problems an Friday and already thought that it is not possible.

The way of hilliard, you refered to, is the one I will do it. Thanks.
 

George Collier

Subscriber
Joined
Feb 23, 2005
Messages
1,363
Location
Richmond, VA
Format
Multi Format
One more comment about trimming - I always use razor blades to trim, with straight edges. The kind they sell for graphics arts and cleaning paint off of windows. They come with a metal guard over one edge to hold. The make the best edge.
 
Photrio.com contains affiliate links to products. We may receive a commission for purchases made through these links.
To read our full affiliate disclosure statement please click Here.

PHOTRIO PARTNERS EQUALLY FUNDING OUR COMMUNITY:


Ilford ADOX Freestyle Photographic Stearman Press Weldon Color Lab Blue Moon Camera & Machine
Top Bottom