Pre-dev soak disaster ~ comments?

Shishi

A
Shishi

  • 1
  • 0
  • 25
Near my home (2)

D
Near my home (2)

  • 2
  • 3
  • 110
Not Texas

H
Not Texas

  • 10
  • 2
  • 139
Floating

D
Floating

  • 5
  • 0
  • 58

Recent Classifieds

Forum statistics

Threads
198,549
Messages
2,777,026
Members
99,644
Latest member
RandomViews
Recent bookmarks
2

zinnanti

Member
Joined
Feb 12, 2009
Messages
92
Location
Santa Clarit
Format
4x5 Format
Hi -

I shot my first batch of 4x5. This was a test batch, so no serious images were lost. This might be a bone-head post, but I'm interested in comments.

This is Ilford Delta 100 developed in hangars in Ilfosol-S. The camera is a well cared for Omega 45D. Film was fixed for 3:45 minutes in an Arista 1:9 dilution.

Pursuant to advice, I gave the film a pre-development soak. As I was pulling the film from the holders, they wound up in the soak for anywhere from three minutes to 30 seconds. There was nothing separating the film sheets - they were lying on top of each other in a 8" x 10" tray. (That's probably where I blew it.)

The soak water looked ink filled (obviously after turning the lights on after fixing).

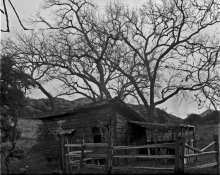
The negatives had fogging and "staining" which varied from negative to negative. It seems that the negatives on top had the least damage, but still had "burn" marks. I attached examples.

My development room is light tight (I think) and the film was developed in total darkness.

I am trying to figure out what factor it may have been.
- Was it soaking the film without separation?
- Was it my luminescent GraLab (which was easily three feet away from the film)?
- Do I have film holder (not hangar) issues?
- Are there light leak issues with the camera? (I doubt that because all the artifact is in different areas.)
- Is it necessary to do a pre-development soak?

I also noticed that there was zero contrast in the film. The tones seemed deadened, even with good sharp shadows when I shot the scenes.

Thanks a bunch for any comments.
 

Attachments

  • nbw-4x5-paramount-ranch-001-1.jpg
    nbw-4x5-paramount-ranch-001-1.jpg
    223 KB · Views: 165
  • nbw-4x5-paramount-ranch-002-1-1.jpg
    nbw-4x5-paramount-ranch-002-1-1.jpg
    146.6 KB · Views: 144
  • nbw-4x5-paramount-ranch-003-1.jpg
    nbw-4x5-paramount-ranch-003-1.jpg
    146.4 KB · Views: 165

Guillaume Zuili

Subscriber
Joined
Aug 3, 2005
Messages
2,926
Location
Los Angeles
Format
Multi Format
You need to soak completely each sheet otherwise they will stick together.
So one at a time you plunge a sheet in the soaking water.
This way when the sheets get into the developer you will be able to shuffle them without any trouble.
I see uneven development because they sticked together.
You should fix film at 1+4 not 1+9
 

CBG

Member
Joined
Nov 21, 2004
Messages
889
Format
Multi Format
A couple of thoughts / observations / guesses. I can't diagnose from this sample of results, but maybe you have a slight bellows leak, or maybe you got some light stuck film from the GraLab timer's luminescent dial. Three feet seems kinda close to me. I'm pretty casual about how dark a darkroom should be, but I wouldn't get near that close.

I don't think the presoak is necessarily the culprit for the density variations on your film - but maybe it could be - I wouldn't use a presoak as a holding tank as I unload film. I'd unload all films completely, then presoak all for same time, agitating to prevent films from adhering to each other, then move to developer etc... Keep everything uniform. Who knows what the difference between a thirty second, or a three minute presoak is. Adding one more variable to the process is akin to asking for issues. Add to that, the chance that without initial agitation, films might start to stick together.

The inky colored presoak water is probably just sensitization dies or anti halation dye leaching out of the film.

Maybe your scan boosted the shadow contrast, since your shadows don't look as bad as you describe when I look at the reproduction online.

Best,

C
 
Joined
Feb 16, 2006
Messages
2,349
Location
Merimbula NSW Australia
Format
Multi Format
Guillaume has probably hit the nail on the head. Looks to me like uneven development, you need to shuffle continuously in the water soak and development stages, after placing the sheets in one by one (not all at once), and don't try to process too many at once... I find six to be a good number.
The colour of your pre wash is just the anti halo dyes, and is quite normal, good luck with it.
Tony
 

John W

Member
Joined
Jul 18, 2008
Messages
128
Location
Seattle, WA
Format
4x5 Format
The soak water looked ink filled (obviously after turning the lights on after fixing).

FYI, that inky coloration is perfectly normal. It's a dark anti-halation backing on the film, there to prevent light from bouncing back through and potentially causing a "halo" effect around bright areas (thus the name). This backing comes off during processing, in your case during the pre-soak.
 
OP
OP

zinnanti

Member
Joined
Feb 12, 2009
Messages
92
Location
Santa Clarit
Format
4x5 Format
Thanks everyone. I appreciate the comments. I'm picking up another Yankee tank so I can unload into hangars, then soak with good separation and then develop. After another test, I'll report back on the thread.

Just to be on the safe side, I would like to replace the bellows on my Omega 45D. If there's any information out there about doing that without destroying the camera, I'd appreciate it.

Thanks again.

Tony
 

Lowell Huff

Member
Joined
Jun 11, 2003
Messages
170
Location
Los Angeles,
Format
35mm
With modern emulsions and chemistries, there is no need or advantage to pre-soak. It is just time you won't get back!
 

glbeas

Member
Joined
Sep 25, 2002
Messages
3,926
Location
Marietta, Ga. USA
Format
Multi Format
Just to be on the safe side, I would like to replace the bellows on my Omega 45D. If there's any information out there about doing that without destroying the camera, I'd appreciate it.

Thanks again.

Tony

Have you done a check in a darkened room with a flashlight inside the camera for pinholes in the bellows? Small ones can be patched and I've heard of some that cover the bellows with the darkcloth while shooting to deal with tiny pinholes in the pleats of thier bellows.
 
OP
OP

zinnanti

Member
Joined
Feb 12, 2009
Messages
92
Location
Santa Clarit
Format
4x5 Format
I ordered new bellows from Toyo today. When I bought the camera, the bellows were described as "light tight." When I went to pick it up, there was electrical tape all over the bellows. I figured I would just change the bellows and be done with it.

Toyo has an incredible parts stock. Believe it or not, I can also get replacement bellows for my Mamiya C33 (c. 1968).
 
Photrio.com contains affiliate links to products. We may receive a commission for purchases made through these links.
To read our full affiliate disclosure statement please click Here.

PHOTRIO PARTNERS EQUALLY FUNDING OUR COMMUNITY:


Ilford ADOX Freestyle Photographic Stearman Press Weldon Color Lab Blue Moon Camera & Machine
Top Bottom