Praktica VLC and CZJ electric lenses?

Relaxing in the Vondelpark

A
Relaxing in the Vondelpark

  • 5
  • 2
  • 95
Mark's Workshop

H
Mark's Workshop

  • 0
  • 1
  • 68
Yosemite Valley.jpg

H
Yosemite Valley.jpg

  • 3
  • 1
  • 82
Three pillars.

D
Three pillars.

  • 4
  • 4
  • 85
Water from the Mountain

A
Water from the Mountain

  • 4
  • 0
  • 104

Forum statistics

Threads
197,539
Messages
2,760,761
Members
99,398
Latest member
Giampiero1958
Recent bookmarks
0

Lucius

Member
Joined
Mar 12, 2022
Messages
227
Location
London
Format
35mm
I recently lucked out on a pair of CZJ electric lenses (35mm and 135mm) in excellent shape, both mechanically and optically, which made me wonder if I should get them a native body supporting open-aperture metering. Generally speaking I'm not a fan of Prakticas, but I guess I could put up with one if it worked, and the VLC seems like an interesting option, given its interchangeable viewfinder, besides the open-aperture metering. Is there a chance of the electronics working properly, given that there isn't just the camera to have things go wrong, but also the lenses? Would love to know if anyone uses electric lenses the way they were intended (not necessarily with a VLC), and in general any advice!
 
Last edited:

chuck3565

Member
Joined
Oct 25, 2015
Messages
93
Location
United States
Format
35mm
The electronics in the electric lenses are very reliable. {It is just a potentiometer.) I've seen a broken wire or two which is easy to repair. I would recommend a VLC2 or 3 since the viewfinder is brighter. The meter circuitry in both are reliable and very easy to repair. Most problems are caused by leaking batteries damaging the wiring. Occasionally, the soldering needs a touchup.
 
OP
OP

Lucius

Member
Joined
Mar 12, 2022
Messages
227
Location
London
Format
35mm
The electronics in the electric lenses are very reliable. {It is just a potentiometer.) I've seen a broken wire or two which is easy to repair. I would recommend a VLC2 or 3 since the viewfinder is brighter. The meter circuitry in both are reliable and very easy to repair. Most problems are caused by leaking batteries damaging the wiring. Occasionally, the soldering needs a touchup.

Thanks, that sounds reassuring! I'll be keeping an eye out for one then.
 
OP
OP

Lucius

Member
Joined
Mar 12, 2022
Messages
227
Location
London
Format
35mm
The electronics in the electric lenses are very reliable. {It is just a potentiometer.) I've seen a broken wire or two which is easy to repair. I would recommend a VLC2 or 3 since the viewfinder is brighter. The meter circuitry in both are reliable and very easy to repair. Most problems are caused by leaking batteries damaging the wiring. Occasionally, the soldering needs a touchup.

I just got myself a VLC2 with a stuck cocking lever: I bought it for the sake (and price) of the waist-level viewfinder, but I wonder if it can be fixed. Do you have any advice as to what might be the issue? Having googled the issue, it seems it's not uncommon in Prakticas, but I couldn't find any mention of it being successfully resolved...
 

chuck3565

Member
Joined
Oct 25, 2015
Messages
93
Location
United States
Format
35mm
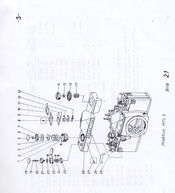
Yes, this condition can be repaired. First try to pull down on the shutter blades. Second, try slapping the bottom of the camera on a soft surface. Third, the camera can be disassembled and the catch on the film advance shaft can be pulled back. Disassembling these L series cameras isn't easy. I used to repair them when I was younger but I doubt I could be successful now in my dotage. Here is a diagram of the disassembly of the top of the camera.
 

Attachments

  • pg 3.jpg
    pg 3.jpg
    428.7 KB · Views: 82
OP
OP

Lucius

Member
Joined
Mar 12, 2022
Messages
227
Location
London
Format
35mm
Yes, this condition can be repaired. First try to pull down on the shutter blades. Second, try slapping the bottom of the camera on a soft surface. Third, the camera can be disassembled and the catch on the film advance shaft can be pulled back. Disassembling these L series cameras isn't easy. I used to repair them when I was younger but I doubt I could be successful now in my dotage. Here is a diagram of the disassembly of the top of the camera.
Thanks for the suggestions. I'd tried pulling down the shutter blades, but they didn't seem to give in and I didn't feel I should force them. Slapping the camera doesn't seem to make a difference either. I think I should be able to take the top plate off (thanks for the diagram), less sure though I'll be able to put it back. If I do take it apart, what should I be looking for?
 

chuck3565

Member
Joined
Oct 25, 2015
Messages
93
Location
United States
Format
35mm
Once the top is removed, the shutter delay assembly usually needs to be removed. To do this, the frame counter dial needs to be removed. Two spring loaded levers need to be drawn back. Be careful because the springs have a tendency to fly off. When the dial is replaced, the spring attached to it has to be wound up. There is a L shaped metal piece inside the film advance shaft attached by a flat head screw that needs to be removed before lifting the shutter delay assembly. Note the position of this lever and the position of the wiper on the large potentiometer under the bottom cover. They both need to be in the exact same position when the camera is reassembled. Also make sure the spring end is on the outside of the silver colored pawl on the edge speed assembly. It sometimes falls off when handling the assembly. The advance lever cap is removed by heating it then, using a soft rubber sheet on the end of a rod, twist it to break the glue. The speed dial can be pried up. Pliobond can be used to reattach both. Also, make sure the vertical silver lever is in the slot on the speed assembly when it is screwed back down. The first three L series cameras I tried to repaired I failed. I gave it one more go and succeeded. I wish you luck.
 
OP
OP

Lucius

Member
Joined
Mar 12, 2022
Messages
227
Location
London
Format
35mm
Once the top is removed, the shutter delay assembly usually needs to be removed. To do this, the frame counter dial needs to be removed. Two spring loaded levers need to be drawn back. Be careful because the springs have a tendency to fly off. When the dial is replaced, the spring attached to it has to be wound up. There is a L shaped metal piece inside the film advance shaft attached by a flat head screw that needs to be removed before lifting the shutter delay assembly. Note the position of this lever and the position of the wiper on the large potentiometer under the bottom cover. They both need to be in the exact same position when the camera is reassembled. Also make sure the spring end is on the outside of the silver colored pawl on the edge speed assembly. It sometimes falls off when handling the assembly. The advance lever cap is removed by heating it then, using a soft rubber sheet on the end of a rod, twist it to break the glue. The speed dial can be pried up. Pliobond can be used to reattach both. Also, make sure the vertical silver lever is in the slot on the speed assembly when it is screwed back down. The first three L series cameras I tried to repaired I failed. I gave it one more go and succeeded. I wish you luck.
Thanks ever so much, that's incredibly helpful, though it sounds a bit more complex than I'd hoped... Hopefully I gather enough courage (and tools) to attempt the operation soon!
 
Photrio.com contains affiliate links to products. We may receive a commission for purchases made through these links.
To read our full affiliate disclosure statement please click Here.

PHOTRIO PARTNERS EQUALLY FUNDING OUR COMMUNITY:


Ilford ADOX Freestyle Photographic Stearman Press Weldon Color Lab Blue Moon Camera & Machine
Top Bottom