
hi bill
you don't sub your dry plates ?
maybe i am misreading what you wrote, but you get your emulsion to
anchor onto the smooth glass surface without an intermediary layer for the emulsion to grab onto ?
i've never been that lucky .
=========================================================
Yes,
On The Light Farm website,I have an articlal that describes how I clean glass. I have been working with phographic images on glass for at leat 12 years now, and with silver.gelatin emulsion making for only two years. Cleaning is essential.
I do not always use hardener. And when I do it may be chrome alum or it may be glyoxal and even(Shhhhh!)formaldehyde. But no matter what hardener I use,or don't use, I Repeat, I never have frilling or lifting from the glass. Try my glass cleaning method.
Bill:rolleyes:
-
Welcome to Photrio!Registration is fast and free. Join today to unlock search, see fewer ads, and access all forum features.Click here to sign up
- Home
- Forums
- Analog Workflow Forums (100% Analog/Traditional)
- Darkroom
- Silver Gelatin Based Emulsion Making & Coating
You are using an out of date browser. It may not display this or other websites correctly.
You should upgrade or use an alternative browser.
You should upgrade or use an alternative browser.
Pouring plates, big ones.
-
A
- Thread starter studiocarter
- Start date

Recent Classifieds
-
For Sale Omega 6.5" inch Condenser for 4x5 format, D series, D2, DII etc
- Started by Jon Shiu
-
For Sale 5 GE 15w frosted white Safelight Bulbs
- Started by Jon Shiu
-
For Sale Omega D parts
- Started by mgb74
-
For Sale Zone VI 5x7 Enlarger & Accessories $1500 obo
- Started by oficinouno
Forum statistics
- Joined
- Jun 21, 2003
- Messages
- 29,810
- Format
- Hybrid
thanks bill
i think i will do just that,
thanks for letting me know about your article!
john
i think i will do just that,
thanks for letting me know about your article!
john
I'd like to add my support for Bill's creds as a glass authority. I don't know anyone who has more experience with more processes on glass than Bill. When Bill talks glass, I know I listen. I will add, from my own experience with silver gelatin dry plate emulsions, glyoxal is only suitable if what you want is a beautiful emulsion transfer. Michael Carter is spot-on with that observation.
And, a short additional note about chrome alum. It certainly doesn't do any harm, but it really isn't necessary for most people making dry plates today. Back when, it was used by the makers of commercial plates mostly because they didn't know the temperatures people would be working with. Today, with A/C, ice cubes, and digital thermometers, we don't have to worry so much about summer darkroom conditions. The same goes for added preservatives.
There is a downside to adding alum, at least for beginning or casual plate makers. It takes at least a couple of days to fully work. If you know for an absolute fact that you have ripened your emulsion to precisely the right point, this is all fine and dandy. But, if you have passed even a little bit into over-ripening, your plates can pick up a bit of fog before the alum has completely cured. If you under-ripened, your plates may continue to pick up speed. If there is significant time between the time you expose and process the first plate in a batch and the last plate, they may be fairly different plates, which makes exposure testing harder than it need be.
So...my advice is to keep things as simple as possible. Make small batches of emulsion and make them often. Don't think in terms making 'enough plates to last awhile', at least as you are starting out. If ever an old saying was true, it's here. Practice makes perfect.
It's really exciting to see all the new work being done with emulsions, including PE's continuing research. It will be very interesting to read this forum five years from now!
d
It's really exciting to see all the new work being done with emulsions, including PE's continuing research. It will be very interesting to read this forum five years from now!
That's a very nice thought. New techniques will be available due to the hard work of all the thinkers and tinkerers, and I suppose that the analogue images will be even more distinctive and valuable.
OP
OP
Glass Dry Plate Photograph that is 8x15 inches

Liquid Light emulsion on glass 8x15 inches. F45 for 15 seconds with a big old brass lens in a Vageeswari Camera Works camera. Sun was 320 -1 block or 280 foot candles. Development was in Dektol 1:3 in 2 min 45 seconds.
Liquid Light emulsion on glass 8x15 inches. F45 for 15 seconds with a big old brass lens in a Vageeswari Camera Works camera. Sun was 320 -1 block or 280 foot candles. Development was in Dektol 1:3 in 2 min 45 seconds.
That looks fantastic, Michael! Nice to see the technique I sent you works so well. I'll attach the same pics I sent you here. They'll be going on The Light Farm in a new article on coating as soon as I can type with more than one finger (carpal tunnel surgery).
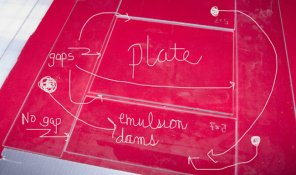
It's the same system as here: http://www.thelightfarm.com/Map/DryPlate/PlatePrep/DryPlatePart4a.htm, without the use of the well. Emulsion poured in the center of the plate spreads out over the edges evenly, and is stopped by the 'emulsion dams'.
It works perfectly. I line up a dozen plates and pour all of them in about a minute. I've never tried it with Liquid Emulsion, so I'm absolutely delighted to see it works with a commercial emulsion, too. Knowing Michael, I imagine he added his own twists .
.
It's the same system as here: http://www.thelightfarm.com/Map/DryPlate/PlatePrep/DryPlatePart4a.htm, without the use of the well. Emulsion poured in the center of the plate spreads out over the edges evenly, and is stopped by the 'emulsion dams'.
It works perfectly. I line up a dozen plates and pour all of them in about a minute. I've never tried it with Liquid Emulsion, so I'm absolutely delighted to see it works with a commercial emulsion, too. Knowing Michael, I imagine he added his own twists
.Attachments
Very nice result.
One of my glass plates is shown in the video here on APUG. Best wishes to you both.
My method is similar but does not require the dams. The coater itself acts as a dam.
PE
One of my glass plates is shown in the video here on APUG. Best wishes to you both.
My method is similar but does not require the dams. The coater itself acts as a dam.
PE
A well coater with a built-in blade, or a trailing glass rod, needs to have a starting point off the plate because the leading edge gets more emulsion laid down (unless, of course, I'm visualizing your coater incorrectly, Ron.)
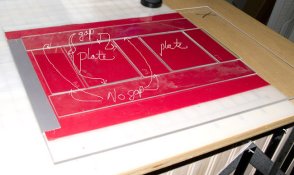
The nice thing about the 'dam surround' system is that it is totally adaptable to any size plate. You don't need a special size coater for each format. Flexible during a given coating session. too. Last time I coated four 4x5's and six WP -- just had to jigger the dams a bit. Coating all of them still took about a minute (set-up maybe five minutes.) The plates don't have to be pre-heated and if you've got the right emulsion temp, the emulsion flows over the edges of the plate and stops at the dams, giving you a perfect and even coating thickness. Nicest thing of all is it's cheap! The dams are re-useable.
ok, spouse being very firm that I MUST stop typing.
d
The nice thing about the 'dam surround' system is that it is totally adaptable to any size plate. You don't need a special size coater for each format. Flexible during a given coating session. too. Last time I coated four 4x5's and six WP -- just had to jigger the dams a bit. Coating all of them still took about a minute (set-up maybe five minutes.) The plates don't have to be pre-heated and if you've got the right emulsion temp, the emulsion flows over the edges of the plate and stops at the dams, giving you a perfect and even coating thickness. Nicest thing of all is it's cheap! The dams are re-useable.
ok, spouse being very firm that I MUST stop typing
.d
Ummm, I had not meant to criticize your method Denise, but the fact is that only one blade is needed - for the largest size width you wish to coat. And, you need not lose any plate due to more emulsion being laid down. There is simply one small notch at the edge from the tape holding it down.
So, yes, you are visualizing it incorrectly. I'm surprised, as I showed the method at the workshop you took!
Basically, my desire is not to start a debate but to merely point out that there are many ways to do this such as the wire wrapped rod (which is very inexpensive, but a tad messy and wasteful of emulsion). It too needs dams. There is also the original method involving pouring in which plates were poured up to rather large sizes with low mess and low waste. This is an acquired skill that takes a LOT of practice with gelatin blank plates.
Lets not get involved in this back and forth. Just agree that we can do it many ways and with varying amounts of mess and waste.
I wish you the best in your recovery.
PE
No worries, Ron. It never occurred to me that you were criticizing, or starting a debate. It felt like a conversation about coating methods. You, of all people, know that I embrace diversity of ideas and workflow strategies. I hope others are interested in joining the conversation, especially the Liquid Light folks. They have a lot of experience with getting emulsions down. Newbies to emulsions, tuning in for the first time, will probably be interested. I know I'm looking forward to hearing a description of how Michael adapted the emulsion dam method to make it his own with such phenomenal results.
No "back and forth', no debate, just an open, friendly conversation among emulsion enthusiasts, with no one feeling like they have to have the last word.
(And: we didn't get around to coating plates in your first workshop.)
No "back and forth', no debate, just an open, friendly conversation among emulsion enthusiasts, with no one feeling like they have to have the last word.
(And: we didn't get around to coating plates in your first workshop.)
OP
OP
the well method
There are so many ways to coat plates it was very confusing at first.
My way was to use glass of different thicknesses. Single strength glass is the photographic plate; it has smoothed edges. Surrounding it are double strength glass edge strips to contain the gelatin, like a dam, thanks D, and to raise the bar that scrapes the emulsion all over. I practiced with buttermilk to measure how much emulsion to use. That much was put into a heated nose pot, and dumped it out near the leading narrow edge of the glass inside. If emulsion hadn't already filled the narrow edge, I pushed it up and over then back all the way across using a puddle pusher; another polished edge piece would do the same thing.
This was all done on a sheet of rubber matt. Excess is required and then scooped up to be used again; an artist's palette knife is used. Too much left over is better than not having enough and running out.
Emulsion was 110 degrees F. Hotter than 120 and it forms swirls of silver on the surface. Nothing was added to the emulsion. The plates were not heated. The scraper was heated, that may have helped, but not if it is wet.
Liquid Light emulsion is very sticky and gets stringy. It needs to be cut carefully or the emulsion will pull off the plate as it stretches. I think I'll use a long wide cutter like a dry wall knife next time to remove the edge strips, instead of a razor blade, the edge could be sharpened instead of square...
Now I have yet another way to pour plates I tried that Ron told me about. Photo Flow was added to a canister of emulsion and hand poured onto 4x5 plates. One 35mm film canister is about an ounce; four drops of Photo Flow were added. 110 F was the temp and glass was hand held. I was able to pour 5 plates with some left over. Hitherto only 2 plates were possible without the addition of the new juice. Liquid Light was the emulsion. The new method produces thinner emulsion layers that fix in less than 5 min instead of up to 20 with a thicker layer.
Plates were left out in the open air; a dehumidifier had been added to the room; and a drape over the door blocked out the light so I could get out. In 4 hours the plates looked fully dry. They were put into the drying cabinet for the night and were shot and processed the next day. Wow.
The coating was uneven with these thin hand poured Photo Flow emulsions, but fast and easy. If I had heated my overhanging stone and allowed them to sit there for a minuet before pushing them onto the cold end of the stone the emulsion would have leveled out better than just holding it and looking at it before putting it onto the cold stone.
Bernie at Bernie's Camera Center, the only camera store left in W PA, wants to see one of my ULF plates. I had to purchase a set of 16x20 trays and some chemicals. He got me some 12x15 Ilford negative film, iso 125, and I'll take the plate over in a plate holder with some white paper behind it to show him when I pick up the film.
As far as I am concerned, the sooner all the details of how to coat plates are fully documented, the sooner more people will begin to use dry plate cameras again. They may then make their own emulsions. I may do that soon, too.
Last edited by a moderator:
Studiocarter;
As you and as I have said, there are many ways to coat plates. At the time Denise took my workshop, I had the blade, but we did not have plate holders or plates at the Formulary. Now they do have both. With the blade I had, I demonstrated how a plate was coated with it, but we were forced to coat only film.
For the workshop at GEH, I promise to have both blades and plates for demonstration of the method. I hope you can attend. The methodology will be documented in photos in the book. Mark Osterman, a world expert in plate coating will be teaching alongside me and he can also demonstrate pouring plates.
As for camera shops, I used to haunt Triangle Camera in downtown, but mainly Cadet Photo on 6th in Pittsburgh near the Dome Arena. I also was a regular at Brenner Photo Supply. Alas they are all gone now.
PE
Nice write-up, Michael! I love the innovation of making the dam bars just a wee thicker. I've been coating regular thickness glass and using the same thickness for my bars, but right before my summer 'vacation' I snapped a bunch of extra thin plates to use with a new-to-me half plate camera with book style holders that only take thin glass. Now I'll use my regular bars when I pour them. Thanks!
With your permission, I'll include your idea in my coating article -- with kudos to you, of course.
Ron, Have you found someone to make your blades? I hope so. They'd be a natural pairing with your book and DVD. (But I'm a bit dim, I'm afraid. I still don't see coating a 4x5 plate with an 8x10 blade. Can you post an illustration from your book? It would be a great sales teaser!
Happy 4th!!
d
With your permission, I'll include your idea in my coating article -- with kudos to you, of course
.Ron, Have you found someone to make your blades? I hope so. They'd be a natural pairing with your book and DVD. (But I'm a bit dim, I'm afraid. I still don't see coating a 4x5 plate with an 8x10 blade. Can you post an illustration from your book? It would be a great sales teaser!
Happy 4th!!
d
Denise;
Think "shim". It works.
As for blades, I may have found a new source, but the cost is still exorbitant. But, that is what you pay for Stainless Steel and precision milling.
PE
Think "shim". It works.
As for blades, I may have found a new source, but the cost is still exorbitant. But, that is what you pay for Stainless Steel and precision milling.
PE
OP
OP
Thanks DW, sure go ahead. I just made another 8x15 only thicker this time. It didn't quite cover the first draw and I had to push it back and forth. Lucky it was still hot and it worked fine. It took a full 3 ounces with little left over.
OP
OP
second view
Here is my second 8 1/2 x 15 inch plate. It was scraped on same sized glass edge pieces, the glass rod had 4 wraps of black plastic tape, the glass was preheated with a hair dryer, it had to be done twice because the tape stuck to the dry glass, pre-lubrication is required. Oh well, it turned out well with two applications anyway.
http://i822.photobucket.com/albums/zz148/studiocarter/Dry Plate Photography/034web.jpg
Very very nice. Congratulations.
PE
PE
Michael,
I think you're coming down the home stretch to Mastery, sir.
At this point in your explorations, do you favor the thicker glass surround method or same thickness with a wrapped-up glass rod? I've never had a problem with tape sticking, but I've only used two different brands. This is the reason it's so important to get a number of people working with a number of variations on the themes. You're really making a great contribution.
**********************
I still have high hopes for dry plate photography as a modern photographic expression. I started back into the darkroom yesterday. So excited, can hardly stand it! I never have quite understood photographers who have totally walked away from the magic room.
A reminder of Michael's website for newbies here: http://newlightfarmer.blogspot.com/
and my dry plate page:http://thelightfarm.com/Map/DryPlate/DryPlatePart1.htm.
Also, in case it's been overlooked, there's a thread on dry plate here in the plate camera forum. The forum has been mostly about plate camera and lens collection and some wet plate process, but hopefully it will start including more dry plate photography. (there was a url link here which no longer exists)
I think you're coming down the home stretch to Mastery, sir
.At this point in your explorations, do you favor the thicker glass surround method or same thickness with a wrapped-up glass rod? I've never had a problem with tape sticking, but I've only used two different brands. This is the reason it's so important to get a number of people working with a number of variations on the themes. You're really making a great contribution.
**********************
I still have high hopes for dry plate photography as a modern photographic expression. I started back into the darkroom yesterday. So excited, can hardly stand it! I never have quite understood photographers who have totally walked away from the magic room.
A reminder of Michael's website for newbies here: http://newlightfarmer.blogspot.com/
and my dry plate page:http://thelightfarm.com/Map/DryPlate/DryPlatePart1.htm.
Also, in case it's been overlooked, there's a thread on dry plate here in the plate camera forum. The forum has been mostly about plate camera and lens collection and some wet plate process, but hopefully it will start including more dry plate photography. (there was a url link here which no longer exists)
I never have quite understood photographers who have totally walked away from the magic rooom.
---------------------------------------------------------------------------------I also fail to understand the type of photographer who takes 50-100 rolls of 35mm in one day, develops them en mass, Then gose searching for the shot he wants. I like to spend 3 days setting up for 1 set of color separation negatives.
I have been ask by several people if I consider myself to be an artist or a scientist. My answere is " niether- I am a tinkerer, trying to be a magician."
Realy nice ultra-large dry plate! Makes me wanna go back to one of the established formula and do some art!
Bill
"A tinkerer trying to be a Magician."
I love that. Can I use it?
I love that. Can I use it?
Michaelbsc,
Sure. Why not? Brings to mind the Micky Mouse version of the Scorcerer's Aprentice. Little Micky is completely overwhelmed by his "tools"(mops) and medium(water). I can relate!
Sure. Why not? Brings to mind the Micky Mouse version of the Scorcerer's Aprentice. Little Micky is completely overwhelmed by his "tools"(mops) and medium(water). I can relate!
Studiocarter - Great art!!!! Thanks for the share!
Here is my second 8 1/2 x 15 inch plate. [...]
http://i822.photobucket.com/albums/zz148/studiocarter/Dry Plate Photography/034web.jpg
Except for the cars, it looks like it could have been taken 125 years ago!
Very Nice!
OP
OP
Thank you all for such nice comments on my pictures. They are great encouragement for me.
The same thickness method uses less emulsion, so, that means it is easier to fix, only takes a couple three minuets not 20, and it is thinner and that means cheaper. I also like the idea of being able to vary thicknesses to find what I like. So, I like your method. Thick edge pieces give one result with one pass. It is also very difficult to get away with one scrape across the plate; I more often do two or more passes; maybe more practice is needed.
The reason I used the thick and thin method was because I have a lot of old thin 8x10 glass plates to coat and no thin edge pieces.
Yea, getting close to correct exposures and development times, but not there yet. That one had the same exposure, f64 at 15 seconds, but it was brighter outside than the first one, 320+1. Development was less time at 1 min 20 seconds. Darks on the plate are not quite as dark and lights are less so. Since I have not made any contact prints as yet I do not actually know what a proper negative should be like. I like to see a wide distribution of grays, whites with grays, and blacks with lighter areas in them. Contrast. The second one turned almost all black in one minuet. That is no good; it is too difficult to judge time during short development. A half stop less light would extend development time and make it more manageable. This emulsion has almost no latitude at all.
At this point in your explorations, do you favor the thicker glass surround method or same thickness with a wrapped-up glass rod?
The same thickness method uses less emulsion, so, that means it is easier to fix, only takes a couple three minuets not 20, and it is thinner and that means cheaper. I also like the idea of being able to vary thicknesses to find what I like. So, I like your method. Thick edge pieces give one result with one pass. It is also very difficult to get away with one scrape across the plate; I more often do two or more passes; maybe more practice is needed.
The reason I used the thick and thin method was because I have a lot of old thin 8x10 glass plates to coat and no thin edge pieces.
Yea, getting close to correct exposures and development times, but not there yet. That one had the same exposure, f64 at 15 seconds, but it was brighter outside than the first one, 320+1. Development was less time at 1 min 20 seconds. Darks on the plate are not quite as dark and lights are less so. Since I have not made any contact prints as yet I do not actually know what a proper negative should be like. I like to see a wide distribution of grays, whites with grays, and blacks with lighter areas in them. Contrast. The second one turned almost all black in one minuet. That is no good; it is too difficult to judge time during short development. A half stop less light would extend development time and make it more manageable. This emulsion has almost no latitude at all.
Last edited by a moderator:
Studiocarter,
Just so I uynderstand you, befor I go making my 1868th mess- You preffer tape around the edges of a glass rod and drawing down to puring into the center and letting dams on all four sides stop the emulsion.? Denise has recomended the pour in the middle, with thicker dams at the edges for me. I think she is correct in that recomendation. My emulsions do not set up. They jus' keep on a'movin' til they start to dry.
Bill
| Photrio.com contains affiliate links to products. We may receive a commission for purchases made through these links. To read our full affiliate disclosure statement please click Here. |
PHOTRIO PARTNERS EQUALLY FUNDING OUR COMMUNITY:  |