


You are using an out of date browser. It may not display this or other websites correctly.
You should upgrade or use an alternative browser.
You should upgrade or use an alternative browser.
Post paper neg results here
-
A
- Thread starter gandolfi
- Start date


Recent Classifieds
-
For Sale NIKON D800 (read)
- Started by Acere
-
Want to Buy WTB Konica Hexar RF
- Started by axestrata
-
For Sale Multiple Signed Photographic Books
- Started by tallenpatterson
-
Want to Buy Color by Beseler Print Processing Drums
- Started by logan2z
Forum statistics
I tweaked your title.
You should link to one of yours, to get the ball rolling!
I would suggest "thea". You could use the Media tool which links to your Gallery uploads.
You should link to one of yours, to get the ball rolling!
I would suggest "thea". You could use the Media tool which links to your Gallery uploads.
Ericc
Member
I'm not sure this is the same thing but I did some Direct positive to paper photo's a few years ago.

I have a roll of slightly fogged kodak poly-constrast RCII paper that I can just cut to length and load into graphlex cartridges. Because you're going to bleach away the initial negative image the fog is erased. Depending on how fogged the paper is results in a reduction of your final density.
I don't recall exactly what I used for settings but I think it was like f/11 with exposures in the 1 to 3 seconds on a bright day.
This was a cheap fun way for the young nephews / nieces to get some photo's made at almost no cost.
I found that Permanganate Bleach works great in the reversal process. No need to deal with chromates.
BlueWind
Member
I'll start - hope to see many other examples
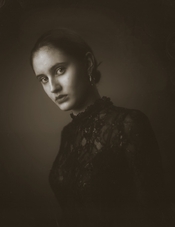
Thea (favorite portrait model for years)
FOMA RC paper - 13x18cm (5x7ish)
Paper negatives loves skin tones I think..
Excellent portrait !!
Could you share some details ? I've been using Foma 100 RC paper in 13 X 18 cm and was never able to get anything close to that. All I get are medium-dark flat grays (never black shadows).
Can I ask about the lens, the aperture and exposure time ??
I have even tried to print paper negatives (wet technique) and I got plenty of stains and irregularly developed areas (water under the glass, I presume).
Thank you in advance for your input
Regards
Joao
Hi joao. Thanks for your comments!Excellent portrait !!
Could you share some details ? I've been using Foma 100 RC paper in 13 X 18 cm and was never able to get anything close to that. All I get are medium-dark flat grays (never black shadows).
Can I ask about the lens, the aperture and exposure time ??
I have even tried to print paper negatives (wet technique) and I got plenty of stains and irregularly developed areas (water under the glass, I presume).
Thank you in advance for your input
Regards
Joao
Here I used an ancient Ross Petzval lens (dating from about 1854!) at full aperture (about F3.5) (Open flash) - I love the FOMA RC paper for this technique - it seems like it is a little more sensitive than other papers so I rate it to about 8-12 iso - The FOMA paper also seems to develop for a longer time than other RC papers which can give you subtle gray tones in your print.
BlueWind
Member
Hello Gandolfi
Thank you for your swift reaction. I think the information you kindly provided will be useful.
Regards
Joao
Thank you for your swift reaction. I think the information you kindly provided will be useful.
Regards
Joao

BlueWind
Member
Some tests with paper negatives & dry printing them
Paper negative, 13 X 18, Foma paper, exposure 25 secs (f 5,6). One light source on my left side, one flash. Black background

Scanned (heresy!) the paper negative and inverted it to positive, to compare with future results. No changes in lighting.

Dry print in FOMA paper using the paper negative shown above (4 seconds exposure under enlarger light). Some writing visible at the top of the frame causd by handwritten notes on the back of the photo. My mistake…

Dry print in FOMA paper using the paper negativeshown above (5 seconds exposure under enlarger light)

These are the very primitive devices (I don’t know their name in English) I used for exposing the final prints. Rudimentary but quite efective

Next steps: 1 - finding a way to shorten the model exposure time. This works well for still life, but 25 secs exposure time is unrealistic for portraits…
2 - Finding a better subject. The Terminator is very compliant, however I need something (or someone) who looks better.
Regards
Joao
Paper negative, 13 X 18, Foma paper, exposure 25 secs (f 5,6). One light source on my left side, one flash. Black background
Scanned (heresy!) the paper negative and inverted it to positive, to compare with future results. No changes in lighting.
Dry print in FOMA paper using the paper negative shown above (4 seconds exposure under enlarger light). Some writing visible at the top of the frame causd by handwritten notes on the back of the photo. My mistake…
Dry print in FOMA paper using the paper negativeshown above (5 seconds exposure under enlarger light)
These are the very primitive devices (I don’t know their name in English) I used for exposing the final prints. Rudimentary but quite efective
Next steps: 1 - finding a way to shorten the model exposure time. This works well for still life, but 25 secs exposure time is unrealistic for portraits…
2 - Finding a better subject. The Terminator is very compliant, however I need something (or someone) who looks better.
Regards
Joao
AnselMortensen
Subscriber
Primitive devices = contact printing frames.
BlueWind
Member
Contact printing frames ! That's it. Thank you Ansel.
Despite their lack of sophistication, they are very efficient
Regards
Joao
Despite their lack of sophistication, they are very efficient
Regards
Joao
Donald Qualls
Subscriber
they are very efficient
Those were evolved over most of a century, starting from Fox Talbot's day and developmental improvements largely ending when enlarging became the dominant method of printing (concurrent with 127 and smaller becoming the more popular consumer film formats). Those 19th century photographers were a smart lot, they just had more primitive materials to work with.
BlueWind
Member
Those were evolved over most of a century, starting from Fox Talbot's day and developmental improvements largely ending when enlarging became the dominant method of printing (concurrent with 127 and smaller becoming the more popular consumer film formats). Those 19th century photographers were a smart lot, they just had more primitive materials to work with.
Thank you Donald. I bought them long ago, never intendig to use them, I just liked their look and their simplicity.
It was a good decision !
Regards
Joao
MTGseattle
Subscriber
I'm embarrassingly lost. Can someone kick me a link to read up on this? In @BlueWind examples above: emulsion to emulsion in the contact frame, then expose, then develop like a normal print? I didn't think an rc (or any regular enlarging paper) would let enough light through.
As to subject matter aside from the terminator. Almost anything comes to mind. There's that guy with the famous pepper photo, or you could assemble found objects into little compositions (Paul Caponigro's later work), get terminator out of there and close in on the flowers.
I agree that one would want to iron out any wrinkles without an actual model sitting around.
Donald Qualls
Subscriber
I didn't think an rc (or any regular enlarging paper) would let enough light through.
Hold a fixed out piece of enlarging paper up to a strong light: you can see some light through it. I had trouble contact printing paper to paper back in the 1970s, because we only had fiber based paper (at least at my school) and the paper base had a texture that would print through -- but RC is essentially film with a heavy white coating under the emulsion, and that coating will pass plenty of light to make a contact print (or even to print from it with an enlarger, though your exposure times will run long compared to regular negatives).
I know of one photographer who regularly makes paper negatives to contact print to get pictorial results.
The regular way to get more light through the fibre base paper negative is to oil the back of it. For some, the paper texture coming through is a desirable characteristic of the process.
The regular way to get more light through the fibre base paper negative is to oil the back of it. For some, the paper texture coming through is a desirable characteristic of the process.
MTGseattle
Subscriber
Thank you both.
Donald Qualls
Subscriber
oil the back of it.
Actually, probably better is to wax the paper. Melted beeswax isn't too hot to handle safely, will make the paper translucent just as cooking oil would, and when at room temperature will be less prone to transfer to other paper or textiles that come into contact with the back of the negative. Paraffin wax (sold in the canning section of most supermarkets) works, too, and is cheaper than beeswax, but requires higher temperature to melt and may carry a higher burn hazard (not to mention the possibility of autoignition when melting if you don't use a double boiler and get the wax hotter than it needs to be).
Actually, probably better is to wax the paper.
There's an article (linked to in this Photorio thread) or, more directly, here which talks about using oil and wax. Both work.
BlueWind
Member
Let me clarify: I used Fomaspeed Variant matte paper, both for the negative and the positive.
The dry negative is placed over a unexposed sheet of the same paper, emulsion facing emulsion. Both are placed in the contact printig frame. It provides an uniformly strong pressure on both sheets - this may be important, I believe.
The printing frame was placed under an enlarger light for 5 seconds (no filter), The positive was developed as usual. I tried with a 4 secs exposure also, but the final positive was not as good.
In the past I tried wet printing and it is very messy - and the results were terrible. I never used oil or wax..
I have tried to dry print using only a piece of ordinary 3mm glass and I was not happy with the result. Maybe a thick (heavy) glass will do the job as well... Close uniform contact between emulsions seem to be important.
Regards
Joao
Donald Qualls
Subscriber
Close uniform contact between emulsions seem to be important.
This is a necessary ingredient not to lose sharpness between the negative and positive. If there's a gap, that area will be blurred (and it only takes a tenth millimeter to show, if there's sharp detail in the negative). Heavy glass works, but a frame is better if you have one.
Use of a waxed negative is still dry printing -- the negative is waxed and allowed to cool, which simply allows more light to pass through the paper (I think this only matters with fiber paper, nothing in RC to take up the wax or oil).
You could also lengthen your exposure by stopping down the enlarger lens; this would give you time to dodge and burn if the scene needs it. Contrast filters will work the same way they would in enlarging a film negative (including split filtering). And something that's much easier on a paper negative: you can retouch with pencil on the back of the negative (or on a piece of tracing paper or synthetic drafting vellum, so you can "undo" if needed).
You may prefer the results from using a glossy paper for a paper negative.
BlueWind
Member
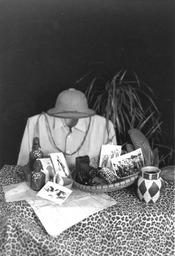
“ Colonial memories”, a new trial with paper negatives. No manipulation of light or sharpness,
Boring technical details here – images # 38, 39 and 40

Regards
Joao
Boring technical details here – images # 38, 39 and 40
Large format camera
In July 2017 I bought an old and rusty Large Format camera in a fleamarket. It had been made in Murcia, Spain, by a company called ANACA (that was also the brand of the camera). This company made studio cameras from 1953 to 1978. I was atracted by the lens , a Schneider-Kreuznach Xenar 1:4,5...
public.fotki.com
Regards
Joao
Attachments
BlueWind
Member
Another trial with paper negative 13 X 18 (Fomaspeed variant). Paper negative scanned and converted to positive.
 LvB 9_11 s flash 2L f8 15 secs 400 mm by João Avelar, on Flickr
LvB 9_11 s flash 2L f8 15 secs 400 mm by João Avelar, on FlickrWolfgang Kraus
Member
My first time seriously trying a paper negative – except for the fingerprints it tuned out quite satisfying.
Taken with a Zeiss Ikon Ideal 225 9x12 folding plate camera with a Carl Zeiss Jena Tessar 1:4.5 f=15cm lens (from ca. 1927) with maximum rise on Ilford Multigrade IV RC De Luxe photo paper. A Y2 (K2) yellow filter helped taming the contrast of the paper; it also resulted in the blue sky not being rendered overly bright. The effective speed with the filter was about ISO 3. Exposure was approximately 1/2 second at f/14. The negative was developed in Multigrade developer (if I remember correctly) and copied with a DSLR (Pentax K-1) and 50mm Macro lens.

220917001 9x12 paper negative by WK Tests, on Flickr
Taken with a Zeiss Ikon Ideal 225 9x12 folding plate camera with a Carl Zeiss Jena Tessar 1:4.5 f=15cm lens (from ca. 1927) with maximum rise on Ilford Multigrade IV RC De Luxe photo paper. A Y2 (K2) yellow filter helped taming the contrast of the paper; it also resulted in the blue sky not being rendered overly bright. The effective speed with the filter was about ISO 3. Exposure was approximately 1/2 second at f/14. The negative was developed in Multigrade developer (if I remember correctly) and copied with a DSLR (Pentax K-1) and 50mm Macro lens.
220917001 9x12 paper negative by WK Tests, on Flickr


| Photrio.com contains affiliate links to products. We may receive a commission for purchases made through these links. To read our full affiliate disclosure statement please click Here. |
PHOTRIO PARTNERS EQUALLY FUNDING OUR COMMUNITY:  |