Plaubel Makina restoration

Tyndall Bruce

A
Tyndall Bruce

  • 0
  • 0
  • 29
TEXTURES

A
TEXTURES

  • 4
  • 0
  • 56
Small Craft Club

A
Small Craft Club

  • 2
  • 0
  • 52
RED FILTER

A
RED FILTER

  • 1
  • 0
  • 45
The Small Craft Club

A
The Small Craft Club

  • 3
  • 0
  • 52

Recent Classifieds

Forum statistics

Threads
198,903
Messages
2,782,790
Members
99,743
Latest member
HypnoRospo
Recent bookmarks
0

hartacus

Member
Joined
Nov 15, 2016
Messages
115
Location
Sydney, Australia
Format
35mm
I finally got around to unboxing the Plaubel Makina that I bought last year.


From what I can tell, it's a slightly modified original model, with the Anticomar 100mm f/2.9 lens. It came with a Rada 120 format film back (no frame counter but red windows behind a spring-mounted door) and a ground glass.

When I say "unboxing", I mean taking it out of the box I put it in straight after I received it. The army satchel it came in also contained a dead bedbug, so it went into a box with half a can of bug spray and was sealed tight for about nine months. I didn't have a flamethrower handy, you see.

Anyway, now that I've overcome this bout of bedbug-specific entomophobia, I'm pretty keen to get to work restoring this old mate. I'm making this thread to keep track of the restoration.

I have a feeling this is going to be a big job. It's also going to be a slow job, as I have a small kid and a full time job and time is rare.

Initial condition report:
- I've done an initial rough clean (mostly just removing bug spray residue, but also quite a lot of dirt of the ages)
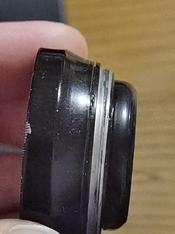
- The shutter cocking lever (below the lens, to the left of the lens in the picture) is detached, and I need to find screws to reattach it. Sold this way, brought the price down, I'm okay with that.
- The shutter opening toggle (for focusing with a ground glass) works freely
- Bellows appear in reasonable condition, if slightly sticky. Haven't light tested yet.
- Some rust on the body and handle
- Obvious paintwork issues on the front face and lens surround. Judging from the sharp edges on some of the missing paint, and some scratches near the inner lens, someone's tried to "restore" the camera previously without an appropriate level of TLC.
- Scissors, speed finder and other unpainted metal quite tarnished
- Aperture works but is stiff
- Focusing knob appears to work; have not tested calibration of focus indicator
- Lens is free of fungus, though possibly a bit hazy
- Viewfinder is missing. The screw holes for attaching it are still there, so I'm assuming it was removed by a previous owner. Speed finder only, both parts of which are moving freely.
- It has a cold shoe, which I've not seen on other Plaubel Makinas in my searches
- It also has what seems to be a two-pin flash connector on the front, also not seen on other examples online
- Light seals on the body and the film back look OK but I don't trust them yet

So I've got a pretty long list of things to fix, and a few decisions to make. I was wondering, for a while, whether to strip the black paint (properly) and silver-plate it as a 100-yr celebration sort of thing, but I'm cooling to that idea. The black paint looks really good when it's in good condition, and there are enough chrome Makinas out there. There's also the option of maintaining its 'patina' and preserving it in its current condition - removing and stabilising rust, restoring mechanical function, but maintaining tarnish and current paintwork. Thoughts?

I've also got some questions for anyone who's worked on a Makina I or similar camera before:
- What is the body (not the faceplate) covered in? Is it just paint, or is it some kind of thin leather adhered to the metal? I can't easily tell. Leather would seem strange, but it doesn't look like just paint.
- What's the best way to polish that bare metal?
- I am assuming that the best way to restore the paint (on the front plate at least) is probably to remove it completely and re-paint it. What's the best paint to use? Is automotive spray-paint (used properly, slow application of several layers) up to the task?
- If re-painting is the best option, what's the best way to restore lettering?
- Has anyone measured the specifications of the three screws that attach the shutter cocking lever?
I'm sure I'll have many more questions as I go, but I'll start with those.

Any information you could provide would be excellent. It turns out to be a really hard camera to research, because there are a lot more Plaubel Makina II, Plaubel Makina III, and Plaubel Makina 67 cameras out there on the internets. I can make inferences based on some sources I've found on the Makina II, but any specific info would be great.
 

nosmok

Subscriber
Joined
Jun 11, 2010
Messages
682
Format
Multi Format
To answer a few of your questions: It is leather covering the body; that cold shoe is a later addition, and probably a very useful one. That 2-terminal flash socket is AFAICR a genuine Plaubel type, probably added to the camera by a dealer, but they later went to a 3 terminal connection so even if you hunt down a Plaubel flash it may not work out of the box. My experience with the Mak I bellows is that it's of very good quality and probably worth keeping and patching, as most replacement bellows taper anyway.

As regards the lens and shutter: after opening the hood on mine and discovering the nest of levers and linkages and screws, that just serve to move the controls of a nothing special rim-set Compur to the front panel, and considering that my glass was in bad shape, I took the whole lens assembly off and screwed a 101mm Kodak Ektar in a Supermatic to the back of the front standard. Checked the focus on the ground glass, shimmed it, works perfectly. That's how my project went, best of luck with yours.
 

AgX

Member
Joined
Apr 5, 2007
Messages
29,973
Location
Germany
Format
Multi Format
Member alexvaras started threads on the Makina II and III, maybe they are helpful too.
 
OP
OP
hartacus

hartacus

Member
Joined
Nov 15, 2016
Messages
115
Location
Sydney, Australia
Format
35mm
Thanks for your replies. Really interesting about the leather covering and flash connector. The leather seems mostly in good condition except around the corners where it's been knocked off. The bellows do appear to be in good condition so I'll definitely maintain them. Alexvaras's posts have been very useful references too.

I've got some more pictures of the condition, and I've done some initial cleaning.


I've found some screws to repair the shutter cocking lever. They are screws I got to repair a Voigtlander. They're not a perfect aesthetic match, but they seem to be the correct thread, so they're functional.


There is evidence that it's been repainted before.


And it has definitely tried to be opened before.


The bellows appear to have been re-glued at some point as well but are becoming detached again.


Aperture blades are clean.


One shutter blade has a little surface rust but they seem otherwise clean. The shutter works at all speeds, and the speeds seem approximately accurate.


The mechanisms for working the shutter and aperture. Shutter is operated by the lever at the top right. Aperture is operated by the slider on the side plate, which interfaces with the small black screw on the actuation lever. The aperture is quite stiff, and nearly seizes at about f/6, but can be operated through the whole range.


I removed some corrosion from the ground glass holder (green and red rust), and from one corner of the body (white corrosion). The corrosion on the ground glass holder would have prevented it from sitting properly... had the last person to use it not tried to put the ground glass in the wrong way around.
The handle is in a pretty rusty state as well. It also appears covered in thin leather. Really not sure how to restore it.


The rear and middle lens elements seem clear (haven't fully cleaned them yet), but the front element has some dirt or haze on its rear surface. I haven't been able to find a way to dismantle the front lens unit to get to the rear surface of this lens. Does anyone know how to do this? or is it a sealed unit?


Last edited:

nosmok

Subscriber
Joined
Jun 11, 2010
Messages
682
Format
Multi Format
Now that I see them in close-up, that's a replacement bellows. The originals that I've seen are all black leather with a smoother finish. For holding it down and fixing occasional light leaks, you might wish to get some 3M 850 black polyester tape. It sticks to bellows, sticks to panels, is light tight and extremely thin so it doesn't interfere with folding. It's very expensive but a roll lasts a LONG time. 3/4" width is good.
 
OP
OP
hartacus

hartacus

Member
Joined
Nov 15, 2016
Messages
115
Location
Sydney, Australia
Format
35mm
Now that I see them in close-up, that's a replacement bellows. The originals that I've seen are all black leather with a smoother finish.
That is very interesting to know. Thank you! I had wondered, as they seem to be in better aesthetic condition than the rest of the camera.
 
OP
OP
hartacus

hartacus

Member
Joined
Nov 15, 2016
Messages
115
Location
Sydney, Australia
Format
35mm
I have investigated the lens further. Interestingly, the haze on the front element is most visible via reflection under an LED light, as in my post above. It's barely visible at all via transmission from a ceiling light. It's kind of middling in diffuse sunlight - slightly milky but not as obvious as under LEDs.

I am still wondering how to dismantle the front group, if that's even possible. It looks as though the nameplate might unscrew via the filter thread, but the nameplate is so small and the lens is so convex that I'm dubious about the possibility of getting sufficient purchase (there are no holes for a spanning wrench).
 

Nokton48

Member
Joined
Oct 8, 2006
Messages
2,994
Format
Multi Format
It's looks to me like it has had a cold shoe (fairly modern) added to it, which means you could put just about any supplemental viewfinder available, or make one (?)

That will make the camera pretty accurate, not a guess framer. It would be good if it was a 100mm viewfinder. Graflex Speed Graphic viewfinders would work well, for instance.

There are Makina collectors around here and there. I have a Makina thread on APUG here:

https://www.photrio.com/forum/threads/oh-man-plaubel-makina-iii.127486/

You might want to add to it? :smile:
 
OP
OP
hartacus

hartacus

Member
Joined
Nov 15, 2016
Messages
115
Location
Sydney, Australia
Format
35mm
It's looks to me like it has had a cold shoe (fairly modern) added to it, which means you could put just about any supplemental viewfinder available, or make one (?)

That will make the camera pretty accurate, not a guess framer. It would be good if it was a 100mm viewfinder. Graflex Speed Graphic viewfinders would work well, for instance.

There are Makina collectors around here and there. I have a Makina thread on APUG here:

https://www.photrio.com/forum/threads/oh-man-plaubel-makina-iii.127486/

You might want to add to it? :smile:
Love your thread - those are some lovely Makinas!
Yeah I'll have to investigate getting a finder - would be much easier, I guess. I can see the screw holes for the original finder are still there so it's either an external finder or a replacement.
 
OP
OP
hartacus

hartacus

Member
Joined
Nov 15, 2016
Messages
115
Location
Sydney, Australia
Format
35mm
A further update on the lens front group - in trying to unscrew the face plate, I couldn't loosen it with a rubber ring alone, so I applied some isopropyl alcohol to try to loosen it up but it dissolved the paint >.< so a bit of a setback there. I stopped at that point (wasn't wearing suitable protective gear for removing (presumably) lead based paint), but since the paint on the front group is in a mess anyway, I'll keep removing it and see what I find.
 

Alex Varas

Subscriber
Joined
Mar 24, 2018
Messages
817
Location
Bilbao
Format
Medium Format
Impressive and very nice Makina!! I haven't had that model in my hands yet.


For the front lens ring I would use acetone (the real one) just few drops into the thread, it does the job much better than isopropyl alcohol.


Yes, those bellows are not original but if they are light tight all is good, for glueing them back I would use UHU POR or similar, so far it has done very well when glueing to metal.


If I'm not wrong I have a couple of non working dial compur shutters so I might have the screws you need for your cocking level, let me know the diameter from the ones you have used and I will check at home.


Repainting the metal... as somebody tried before you can at least remove the black and have the shiny metal one, I have seen it online and it does look cool, of course after polishing... if it doesnt go well you always can use spray for cars if you are able to remove or cover all non black metal parts. On this I have no experience yet.

For metal polishing I was adviced "shimmering ...." I haven't got it yet so I'm using some normal (and smelly) "esponje" for metal.


Leather treatment, first cleaning with leather balsam, then use Fiebing's black leather dye, it can be diluted with isopropyl alcohol for more layers, I do twice the tinting, then remove the excess if dye if any and finally shoe cream, the best quality the better, all these previous was adviced by Paul Barden. Of course leave the proper time for drying from one phase to another. For glueing leather back any good glue for leather will do.

https://flickr.com/photos/11782047@N02/sets/72157713341347028


For the scissors, they are matched together in the middle and with the front plate at each corner, the screws should be visible, the ones going to the camera body I guess you have to peel the leatherette, this has to be done carefully, applying some drops of isopropyl alcohol or lighter fluid and peel millimeter after milimeter, if frist drops don't dissolve the glue a few more will do, if you see there is leatherette remains in the body when doing this try from another spot, if it's really old as I see all this process should be quick as soon as glue loose strength.

After peeling the screws for scissors should be visible, my guess. For polishing you can follow as above.


Screws... I saw some rust on the camera, it just happened now that I broke one rusty screw before applying two drops of acetone before trying to unscrewing, I did with the other three and all went fine, I would do the same on every screw from your camera, now I have learnt that no only tin or bronze screws need this step :smile:


For the shutter you can follow this pictorial:


https://flickr.com/photos/11782047@N02/sets/72157702963232405


You are definitely in the good way, take your time for each step.


Regards,

Alex
 
OP
OP
hartacus

hartacus

Member
Joined
Nov 15, 2016
Messages
115
Location
Sydney, Australia
Format
35mm
For the front lens ring I would use acetone (the real one) just few drops into the thread, it does the job much better than isopropyl alcohol.

Thanks very much for your post Alex, very helpful!

I have only just today found time to get back into this camera, and I've attempted to use some acetone to free the front lens ring. Unfortunately, it seems to dissolve the paint on the lens group as readily as isopropyl alcohol does. I tried to clean out the threads as effectively as possible but I still haven't been able to move the ring. I suspect that it's a combination of the ring being stuck in quite solidly, and the angle of the ring making it very difficult to get enough friction on the surface to overcome whatever is holding the threads - which, after all this dissolving of paint, is probably an even more effective glue than when I started.

I also noticed that someone (not me) had previously tried to unscrew the back of the lens group - there are a couple of grooves on opposite sides of the back of the group where someone has tried to open it with a shifting spanner or wrench which naturally slipped. I noticed that there was a thin line just inside the threads that looked like it could have been a join, but on removing some paint to investigate it looks like it was just a relic of the lathe.

I've also started wondering whether removing the rear element of this group might be feasible. I haven't removed enough paint to see what's holding it in, but the edges of this concave element are at the very back of the group (i.e. when sitting the group down on a flat surface, it's resting on the edges of the rear element) so I think it must be an adhesive of some kind rather than a ring. But what kind of adhesive, and how I'd replace it, I do not know.

I have to admit that I'm despairing of ever getting into it, and thinking that it might be better to accept the softness of the hazy lens as a characteristic bestowed by its century-old life. But I am very curious about whether it's possible - specifically, whether anyone has actually done it.
 

Alex Varas

Subscriber
Joined
Mar 24, 2018
Messages
817
Location
Bilbao
Format
Medium Format
The rear lens is a double cemented at best, being an easly Anticomar it will be triplet so only one glass, in any case it's not advised to do anything, just clean the surfaces.

About the front lens, are you trying to remove the ring where the lettering is? Or from the rear side?
 
OP
OP
hartacus

hartacus

Member
Joined
Nov 15, 2016
Messages
115
Location
Sydney, Australia
Format
35mm
About the front lens, are you trying to remove the ring where the lettering is? Or from the rear side?
I'm trying to remove the ring where the lettering is. I've investigated the rear side but it doesn't seem possible.
 

Alex Varas

Subscriber
Joined
Mar 24, 2018
Messages
817
Location
Bilbao
Format
Medium Format
I think that’s the way, the key is using the correct rubber tool for making a good grip with the lettering ring.
It never happened to me lettering paint was removed but it could.
 

Nokton48

Member
Joined
Oct 8, 2006
Messages
2,994
Format
Multi Format
I have investigated the lens further. Interestingly, the haze on the front element is most visible via reflection under an LED light, as in my post above. It's barely visible at all via transmission from a ceiling light. It's kind of middling in diffuse sunlight - slightly milky but not as obvious as under LEDs.

It might be flary if pointed into the sun, or if sun is in the frame.

I'd try some test shots one roll It might be fine for using as it is
 
OP
OP
hartacus

hartacus

Member
Joined
Nov 15, 2016
Messages
115
Location
Sydney, Australia
Format
35mm
I think that’s the way, the key is using the correct rubber tool for making a good grip with the lettering ring.
It never happened to me lettering paint was removed but it could.
I had another go. I cut the edge down on my rubber lens ring to try to match the angle of the lettering ring as best as I could (had to trim out the inside as well to avoid the glass). It was slightly too small, but the thinness of the modified tool meant it stretched more, so I'm fairly confident that it was gripping the lettering ring though also the glass a little. Even so, and even with some pretty liberal applications of acetone, I couldn't move it. Fairly certain that the grip between the rubber and the ring was good, because the rubber was not sliding as I was attempting to twist, it just wouldn't budge.

I think I'm going to give up on the lens haze for now. At least until I can get some more rubber lens rings! And I'll decide what to do about the aesthetics of the lens when I'm further through the restoration - whether to re-paint as much as possible, whether to strip more of the paint for a silver look, or whether to leave it weathered. That way I can rescue the hash I've made of the lens's paint job by at least making it consistent with the rest. Not sure I'll be able to re-paint that lettering ring though, as it's too close to the lens and very thin. Might be a job to attempt after a caffeine detox so that my hands are steadier :tongue: Thanks for your help though Alex - I'll be sure to report back here if I'm successful with a better tool.

Edit: Here's an image of the lens with the front plate paint removed. It's a mess, I know, and possibly also oxidising, which I'm not terribly happy about. The condition of the paint around the outside rim is as it came to me, quite scratched up. Also here's a photo of the modification I made to the rubber tool (and before I cleaned it, oops), showing the angles matching the face ring (outside) and avoiding the glass (inside).
IMG_3306.JPG IMG_3309.JPG

I'd try some test shots one roll It might be fine for using as it is
Good suggestion. I think that's what I'll aim for next. I think the roll film holder is a bit loose on the body, so I'll probably need to replace the flocking at very least. And I need to check the bellows for light leaks - they're new and look like they're in good condition, but there's a suspicious looking potential gap where they join the front. Next week's task, I think.

Great stuff; love the thread!
Thanks for dropping by!
 
Last edited:

aconbere

Subscriber
Joined
Aug 2, 2023
Messages
283
Location
Seattle, WA
Format
4x5 Format
What are the chances you figured out a way into the front cell? I have a copy of this lens that is absolutely FILLED with dust, would love to get it open to clean it, but I can’t figured it out (if it’s possible at all).
 

aconbere

Subscriber
Joined
Aug 2, 2023
Messages
283
Location
Seattle, WA
Format
4x5 Format
Following up I was able to open the front cell.

Here’s a picture showing where the two parts screw together.
 

Attachments

  • IMG_4439.jpeg
    IMG_4439.jpeg
    169.3 KB · Views: 46
Photrio.com contains affiliate links to products. We may receive a commission for purchases made through these links.
To read our full affiliate disclosure statement please click Here.

PHOTRIO PARTNERS EQUALLY FUNDING OUR COMMUNITY:


Ilford ADOX Freestyle Photographic Stearman Press Weldon Color Lab Blue Moon Camera & Machine
Top Bottom