Pinhole negatives and transparencies and digitizing issues

Near my home (2)

D
Near my home (2)

  • 2
  • 3
  • 49
Not Texas

H
Not Texas

  • 5
  • 0
  • 62
Floating

D
Floating

  • 4
  • 0
  • 29

Forum statistics

Threads
198,532
Messages
2,776,695
Members
99,638
Latest member
Jux9pr
Recent bookmarks
0

MattKing

Moderator
Moderator
Joined
Apr 24, 2005
Messages
52,697
Location
Delta, BC Canada
Format
Medium Format
This thread is the result of the discussion that arose in this thread started by Grandpa Ron: https://www.photrio.com/forum/threads/film-to-monitor.183873/
His initial post in that thread sets out two approaches he took to digitizing his pinhole negatives. I wanted to respond by talking about the special issues that pinhole represents, and how to deal with those issues, but felt constrained by the fact that the Pinhole Photography sub-forum is in a purely analog part of Photrio, and that discussions about digitizing techniques don't belong there - they belong in this part of the site.
So first, I thought I would quote Grandpa Ron's initial post, and then I'd make some observations about how digitization and pinhole can go together.
First the quote:
"Once I got reasonably happy with my PH techniques I wanted to share them. That meant they had to be digitized.

Putting a negative on a home scanner with an external light source shining down on it. This is a rather common technique. Unfortunately with 35 mm even the finest scan resolution available to me (2400 dpi), would show scan lines when enlarged to view on the monitor. I switched from 35 mm to 4x5 film which help considerably. Still, occasionally I still could detect some scan lines.

I watch a video on converting 35mm slides to digital with a light board and a digital camera with a close up lens. After making a light board I found I could buy and 9"x12" board used for artist tracing for $13.00, all I needed was a white sheet of plastic to defuse all the tiny little led lights. It is more uniform and brighter than my home made board.

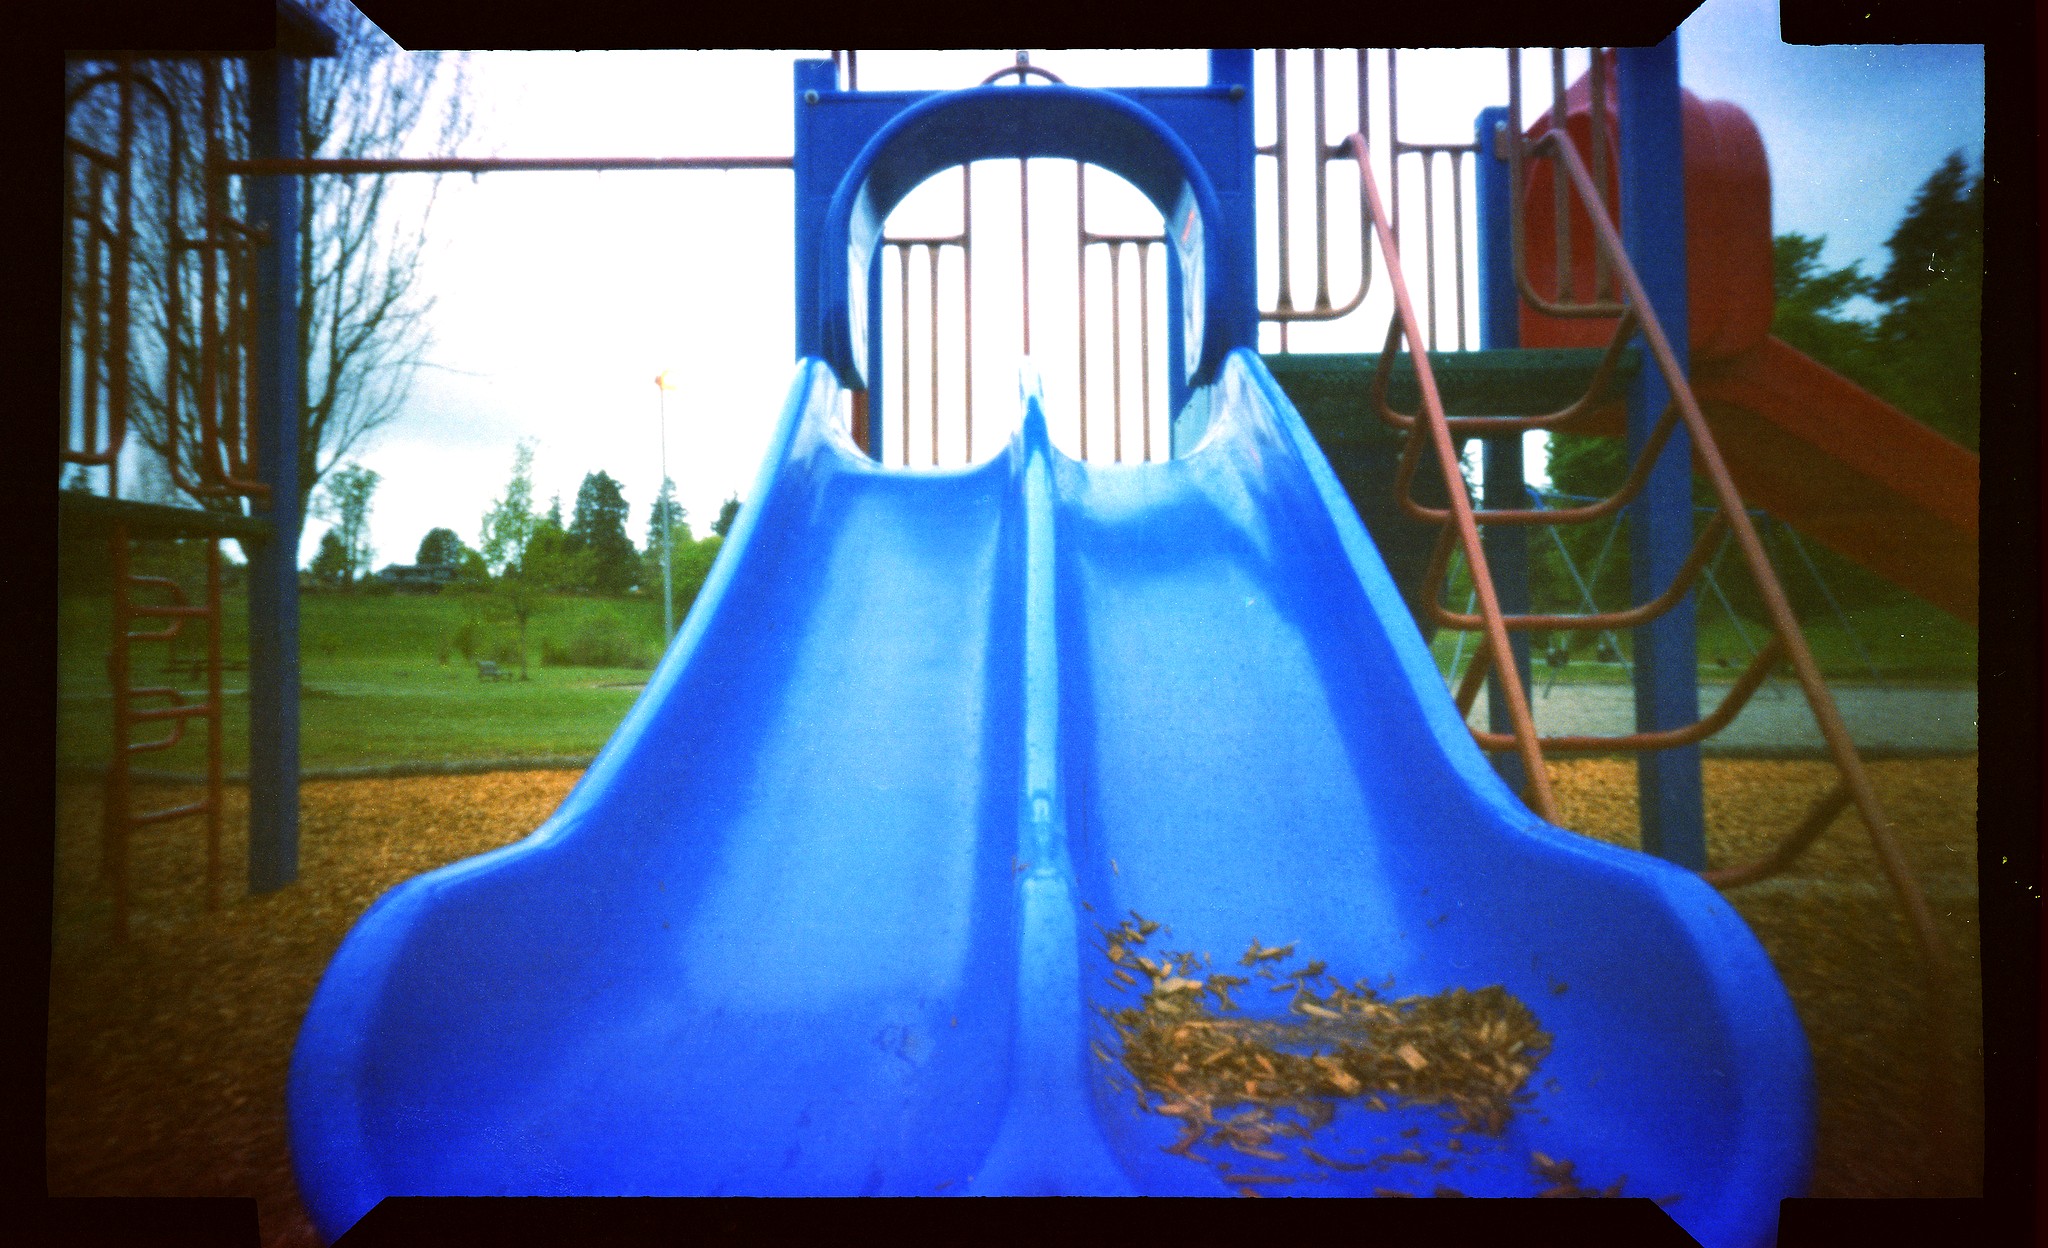
This image is from the scanner.


scanner-jpeg.273680


This image is with the Light board. Using the digital camera has far better resolution and contrast.
light-board-jpg.273681

This photo was taken in the woods on a sunny day, at with 200 ISO film and f360 for 60 sec.

I just thought I would add to the tribal knowledge of the board.

Have fun"
 
OP
OP
MattKing

MattKing

Moderator
Moderator
Joined
Apr 24, 2005
Messages
52,697
Location
Delta, BC Canada
Format
Medium Format
Continuing on the subject, I'd suggest that Pinhole Photography requires a different approach when it comes to digitization. Primarily, this is a result of the following factors:
1) most of what we see as "sharpness" is actually acutance, or contrast at the edge of details in the image (aka "edge contrast")*;
2) the pinhole process is disruptive of acutance, because it overlays image over image, and thus tends to minimize edge contrast;
3) all forms of digitization also tend to disrupt acutance, because they break up continuously variable image details into discrete digital information, and all forms of digitization require some form of "sharpening" in order to counteract that and other digitization effects;
4) it is easier to digitize (minimized unwanted additions to the image) if the light source used is highly diffused. However, highly diffused light sources minimize contrast and, in particular, suppress edge contrast;
5) all the various above-noted factors tend to have a cumulative deleterious effect on apparent sharpness.

Before commenting on the two approaches listed by Grandpa Ron, it is probably important to mention that the subject of "sharpness" is both very important - we have a strong reaction to what we perceive to be a "sharp" image. Much of the "sharpness" effect is subjective, not objective. Objectively measured resolution has a surprisingly small role to play in the determination of "sharpness".

One of the more effective (although usually slower and less convenient) ways of digitizing a pinhole photograph is to use the analog techniques available to maximize sharpness in a darkroom print, and then to scan that print. I'll try to post about that method in Grandpa Ron's original thread.
 
OP
OP
MattKing

MattKing

Moderator
Moderator
Joined
Apr 24, 2005
Messages
52,697
Location
Delta, BC Canada
Format
Medium Format
Moving on to Grandpa Ron's original posts, I'll start with his first described method - the document scanner with a jury rigged additional light source.
First, there are of course obvious problems with using a scanner set up for reflective media and its own built in light source to scan transmissive media (a negative) with another source of light behind it. That negative is being bathed by light from all different directions, resulting in high amounts of contrast destroying flare. The lines observed by Grandpa Ron might be due to problems with the sensor, or may be due to too much light, from to many directions, resulting in the software reporting clipping.
In any event, a scanner calibrated to reflective media and its own light source is not going to perform optimally when another diffused light source is added. When you add how much diffused, edge contrast diffusing light is present and wrapping around those already "challenged" pinhole negative edge details, it is not surprising that acutance is hard to find in the results, not to mention tonality.
One could improve this method if:
1) the built in scanner light source was turned off;
2) the light source behind the negative was masked or otherwise adjusted to make it more directional and focused on the negative itself. It would also be beneficial to make the source more contrasty and directional. A point source would be close to optimal, but that would truly be impractical. The source would have to have its intensity and spectrum adjusted to match the requirements of the scanner's sensor.
Of course, anything that increases contrast and sharpness of the negative's image will do a great job of revealing any and all dust and marks on the negative.
 
OP
OP
MattKing

MattKing

Moderator
Moderator
Joined
Apr 24, 2005
Messages
52,697
Location
Delta, BC Canada
Format
Medium Format
Next, I'll move on to Grandpa Ron's second approach - a backlit negative, a digital camera and a close-up lens - and address some of the issues that arise.
It is important to remember that, unlike a standard negative, a pinhole negative exhibits relatively low contrast and, in particular, very low edge contrast (acutance). For that reason, techniques that are often employed in digitization to avoid an unwanted increase of contrast are actually counter-productive with pinhole negatives.
As mentioned in the first post, digitization tends to reduce acutance and that reduction normally requires at least some compensation using the sharpening tool.
But the more important contribution toward the destruction of contrast, edge contrast and tonality comes from the light source.
All of Grandpa Ron's efforts to make the large light source more even have the additional effect of making it more diffuse, with a corresponding reduction of the contrast and edge contrast in the digital result.
Even light is good, but even and diffused light doesn't work well with pinhole negatives, and when you add the acutance reducing effect of digitization, you are left with a low contrast image with poor acutance and tonality.
With pinhole, you will be better off with a light source that is more focused and directional. It would help to move the negative farther away from the source. A more elaborate light source, involving condensors and even a point source would be even better, although difficult and probably impractical. Whatever you do, you want to avoid light that wraps itself around the imaging in the negative. For similar reasons, it is particularly important to avoid stray light and other sources of flare between the negative and the camera.
 
OP
OP
MattKing

MattKing

Moderator
Moderator
Joined
Apr 24, 2005
Messages
52,697
Location
Delta, BC Canada
Format
Medium Format
Finally, I thought it prudent to make some comments about Grandpa Ron's reluctance to use some of the digitally available tools to deal with issues with "sharpness".
Pinhole negatives are, by their very nature, somewhat "challenged" when it comes to sharpness, but if you print them optically you can get really good results.
However, as I've pointed out, if you choose to digitize them, the process tends to make their sharpness much worse. I would suggest that it is totally appropriate to counteract the effects of that sharpness reduction through digitization by using some digital tools to restore it.
The most important digital tool for that purpose is the "sharpening" tool that employs a form of unsharp masking. Unsharp masking is also available in the darkroom, and printing pinhole negatives is a great application of it.
In addition to compensating for the deleterious effects of digitization, I would suggest that it is fair and proper to make a further improvement, through a combination of the unsharp masking sharpening tool and the contrast adjustment tools, to adjust the image for viewing on a backlit computer screen.
For illustration, here is a before and after example, taken from a roll of ancient Kodak 120 Vericolor film exposed in my Noon 6x12 pinhole camera set to 6x9.
The first is an image as it came out of an old but functional consumer grade Canon scanner, resized for posting here:
upload_2021-5-6_21-26-10.png


The second is from the same negative and same scan, with appropriate digital corrections applied.
Any and all sharpness and image fidelity is present in the original negative. I would suggest that if you are going to display it digitally, it is reasonable to reveal what is there.
 

Adrian Bacon

Subscriber
Joined
Oct 18, 2016
Messages
2,086
Location
Petaluma, CA.
Format
Multi Format
3) all forms of digitization also tend to disrupt acutance, because they break up continuously variable image details into discrete digital information, and all forms of digitization require some form of "sharpening" in order to counteract that and other digitization effects;

I'm not entirely sure I agree with that. What equipment you're using and how you're doing it absolutely can affect it for the worst, and digitizing it at a lower resolution than the content of the image isn't a great thing to do, but the simple act of sampling it at a given sampling rate with a digital device in and of itself isn't necessarily going to reduce or disrupt acutance. Remember, digital sampling devices tend to have a contrast response of 100% all the way up to its maximum frequency it can sample. If your contrast response is 100%, then whatever fine detail that is rendering onto the sensor will have very, very close to full contrast if not full contrast all the way out to the maximum resolution the sensor can sample.

Now, that being said, what absolutely does affect this, is what is between the sensor and what is being sampled, namely the lens, or optical stack. I hate to break it to the enlarger community, but enlarger lenses aren't particularly flair resistant. The lenses on flatbed scanners are even less flair resistant. Any good modern lens on a digital camera tends to be extremely flair resistant, and is actually extremely easy to test. Point the camera at a light source and take a picture. You'll immediately be able to see just how flair resistant that lens is. Some modern lenses are nearly impossible to get to exhibit any kind of flair, and only finally do it when pointing the light into the lens at a really weird angle up close where you can manage to start bouncing some light off the insides of the lens that normally wouldn't ever have light hitting them under normal usage, and even then, because of the lens design and coatings used, yes, it's showing a little flair, but compared to really old lenses, or lenses of lesser quality, not really. If you can get one of those lenses in macro form, they are ideal for scanning film for that exact reason.

4) it is easier to digitize (minimized unwanted additions to the image) if the light source used is highly diffused. However, highly diffused light sources minimize contrast and, in particular, suppress edge contrast;

Diffused isn't quite the right term. You probably mean soft and diffused. In this area, light has two qualities: hard and soft. Specular and diffuse. You can have a very hard diffuse light, and a very soft specular light. Or a very hard specular light, or a very soft diffuse light. The softness of the light is the size of the light relative to what it is lighting. The bigger it is, the softer it is. The smaller it is, the harder it is. What makes it specular or diffuse is how directional the light rays are. Diffuse is the light rays are going pretty much every direction, specular is the opposite of that.

The most important digital tool for that purpose is the "sharpening" tool that employs a form of unsharp masking. Unsharp masking is also available in the darkroom, and printing pinhole negatives is a great application of it.
In addition to compensating for the deleterious effects of digitization, I would suggest that it is fair and proper to make a further improvement, through a combination of the unsharp masking sharpening tool and the contrast adjustment tools, to adjust the image for viewing on a backlit computer screen.

I'm actually not a fan of the unsharp mask in digital land. I get that's what mostly analog guys go for, being that's what is available in the darkroom, but in digital land, there are much more flexible and fine grained ways to sharpen an image. I very much prefer to make multiple masked layers in Photoshop with a high pass filter applied to each with the frequency of each high pass filter tuned to the level of detail I want to amplify. The unsharp mask tends to be a pretty blunt way to get there, where the high pass filter allows much finer control of both the frequencies you want to increase the contrast for (this is what sharpening is after all), as well as how much. Combined with the layer masks, you can be very selective about how you punch up a picture. Sharpening is very much an art form, and unfortunately, in this day and age, it is waaaay over used and over applied in digital land. It's much better to use it as tool to draw the eye to what you want to emphasize, very much like how you would use composition, and lighting to draw the eye.

That being said, there is some benefit of "global sharpening" on an image, especially with regards to pinhole images so that the general perception of the image isn't that it is lacking acutance, but that should be very gentle and minimal with finer tuned and selective sharpening happening on the final resolution output.

All that being said, there's a few things about @Grandpa Ron 's original post that has me scratching my head. That's definitely not how I'd do it.
 

Truzi

Member
Joined
Mar 18, 2012
Messages
2,648
Format
Multi Format
One comment I'm glad to make in this sub-forum is I don't think Grandpa Ron's issue was truly scanner v. a digital camera.

I have a couple scanners with 35mm, 120, and 126 film holders, and I don't get the lines or other results he does when using a holder. However, I've no 4x5 holder, and the built-in back-light only goes wide enough for 120.
With 4x5 I was basically in the same situation as Grandpa Ron and tried what he did - it's a natural thing to do at first.

In trying to scan 4x5 I had rigged a back-light, with and without various types of diffusion, and I got the lines he mentioned. I learned there are many reasons this does not work as well as one would hope. Also, a proper negative holder also keeps the negative at a good distance for the scanner to "focus," and a really good (expensive) holder has adjustable height.

As for his examples, I believe a better image contrast would be somewhere in between the two. If it weren't for scan lines, I'd say the scanner image gives more to work with for digital manipulation.

While I'm thinking out loud, I wonder if a slide-copy attachment for a camera might give him better results (obviously it's not going to work with 4x5, lol). If one could be adapted to his digital camera it would at least make the process easier.

(I have digital and hybrid turned off, so may not remember to check this thread in the future.)
 
OP
OP
MattKing

MattKing

Moderator
Moderator
Joined
Apr 24, 2005
Messages
52,697
Location
Delta, BC Canada
Format
Medium Format
Adrian and Truzi:
Thanks for your observations.
With respect to the choice of sharpening tool, I would suggest that the fact that these are pinhole negatives complicates the issue, because of the way the pinhole process affects acutance in the first place. With pinhole, sharpening needs to be heavy handed, if it is going to have much effect.
My purpose in this thread was to address the additional challenges that a pinhole negative (or transparency) creates, among other things.
 

Adrian Bacon

Subscriber
Joined
Oct 18, 2016
Messages
2,086
Location
Petaluma, CA.
Format
Multi Format
With pinhole, sharpening needs to be heavy handed, if it is going to have much effect.

I totally agree with that. I've been experimenting around with 4x5 pinhole, and yes, you need to step on it pretty hard relative to taking a picture with a lens just to get that baseline acutance.
 

grat

Member
Joined
May 8, 2020
Messages
2,045
Location
Gainesville, FL
Format
Multi Format
With apologies to Ron, I took his "bad" version, and applied two corrections to it:

Scanner_1.jpg


First, I hit the "auto contrast" button. The contrast in the original image was a bit low. Secondly, I applied a slightly different sharpening technique that I've become very fond of when scanning film negatives, ie "frequency separation". In simplest terms, you separate the image into two layers-- edge detection to get details, and Gaussian blur for the color information. You then blend them back together to produce a single image-- but by varying the amount of blending, you can alter the amount of sharpening (or softening).

In Affinity photo, you can control how strong the split is visually.

The end result is you can decide what detail level you want to sharpen-- one of the risks when sharpening a film image is that you start sharpening the grain. This technique avoids it.
 
OP
OP
MattKing

MattKing

Moderator
Moderator
Joined
Apr 24, 2005
Messages
52,697
Location
Delta, BC Canada
Format
Medium Format
Thanks grat.
This is a great example of why I started this thread here.
 

NedL

Subscriber
Joined
Aug 23, 2012
Messages
3,388
Location
Sonoma County, California
Format
Multi Format
I can't add to what's been written already, my scanning and repro-photographing skills are awful -- to the point that I've basically given up and don't even try to make digital copies of my salt prints -- the colors are always wrong and the texture is wrong and the subtle glow in the highlights that makes them beautiful disappears. But with pinhole I often run into the opposite kind of problem... most of my pinhole negatives are on paper, and they are rarely smaller than 5x7 inches and often 8x10 or 7x11 or 8x12 inches. These negatives have tons of detail in them, but still have that "pinhole" soft look. If I make a contact print and hold the result in my hand, it retains the "pinholiness". But whenever I scan or photograph them ( negative or positive ) and then reduce the size to show on the web, they lose a lot of the character that makes them special... and look more like a photograph made with a lens.
 

grat

Member
Joined
May 8, 2020
Messages
2,045
Location
Gainesville, FL
Format
Multi Format
That makes sense. Scaling an image down will increase the apparent sharpness. I'm not convinced I didn't over-do my tweaks to Ron's original scan.

Have you tried scanning your pinhole images at a low resolution? Like 120 (random number picked out of air)?
 
OP
OP
MattKing

MattKing

Moderator
Moderator
Joined
Apr 24, 2005
Messages
52,697
Location
Delta, BC Canada
Format
Medium Format
Scaling an image down will increase the apparent sharpness.
This is a really important point. And sharpening tools have a much greater effect on the scaled down image than the high pixel count image.
 

ced

Member
Joined
Oct 10, 2011
Messages
866
Location
Belgica
Format
Multi Format
Maybe overdone but from screen grab the result is okay...
Manip.jpg
 
Photrio.com contains affiliate links to products. We may receive a commission for purchases made through these links.
To read our full affiliate disclosure statement please click Here.

PHOTRIO PARTNERS EQUALLY FUNDING OUR COMMUNITY:


Ilford ADOX Freestyle Photographic Stearman Press Weldon Color Lab Blue Moon Camera & Machine
Top Bottom