I've never owned a step wedge, nor have I even seen one. So that leaves me out.
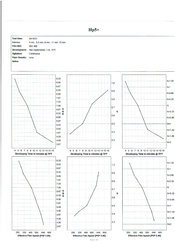
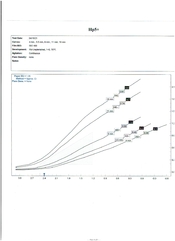
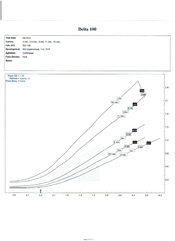
For me the best test, I reckon, is the simplest one ever devised (by me, tho' I would never claim to be its original creator, surely others have done this, long before I came along and bought my first Yashica TLR. Some guy named Ansel, I think, thought it up on or about 1940, tinkered with it a bit, expanded it, and made his reputation out of it, along with LF snapshots of Yosemite. Obviously, it must work.).
First, you find a brick wall. Then you wait for an overcast but bright day.
Put your camera (loaded with film, of course) on a tripod and expose as follows -
Normal exposure - then reverse, three steps (-0.3, -0.7, -1.0), then forward, three steps (+0.3, +0.7, +1.0).
Process the film as you always do. Normally. Evaluate the results.
Next, repeat the process on a sunny day. As per above.
By which time you may have figured out that something seems to be wrong with your processing workflow. Especially if you use replenished developer, or you home-brew using chemistry not intended for film developers (supermarket laundry borax instead of sodium metaborate, etc etc). So you test your developer by reshooting the lot, dividing the rolls into three equal parts, and developing for 0.5 (half) the time, 1.0 (normal) time, and 1.5 (normal and half again).
Eventually you go insane from it all - and the problem goes away by itself.
Last edited:
 Yes, for starters, set your meter to 2/3-stop slower than box speed. I assume that's what you mean with "2/3 box speed" - if not, then you should be aware that each film-speed number is 1/3-stop away from the next. So, if you have an ISO 400 film, you'd move down two numbers, i.e., pass 320 and set your meter to 250. Does that make sense?