-
Welcome to Photrio!Registration is fast and free. Join today to unlock search, see fewer ads, and access all forum features.Click here to sign up
You are using an out of date browser. It may not display this or other websites correctly.
You should upgrade or use an alternative browser.
You should upgrade or use an alternative browser.
Paper negative to salted paper
-
A
- Thread starter nede
- Start date
Recent Classifieds
-
For Sale Rollei 40mm Sonnar F2.8 LTM
- Started by RoboRepublic
-
For Sale Schneider Kreuznach Super Symmar HM 210mm
- Started by Guivd
-
For Sale Pentax Spotmatic SPII M42 SMC Film Kit
- Started by J Durr
-
For Sale FS: Linhof 4x5 Plate Holders
- Started by B.S.Kumar
-
For Sale 3x Olympus CH-2 microscopes (220V)
- Started by Doug Richardson
Forum statistics
- Joined
- Jun 21, 2003
- Messages
- 29,832
- Format
- Hybrid
salut nède
calotypes are made of paper.
what you need to do is wax the paper
to make it sorta-see-through
i have waxed them for paper negatives (cyanotypes + silver)
and it worked better with a lighter bond paper.
there aren't many single weight papers ( slavich? )
or coat your own, or make calotypes ..
bon chance!
john
Hi Nède,
I'm still a beginner but I've been doing this with some success. Many of the hints and tips you will see for paper negatives are intended to reduce contrast. These include pre-flashing, using dilute developer, and using a yellow filter with variable contrast paper. For salt prints, just skip all of that, use your photo paper straight out of the box, and give a bit more exposure than you would to make a normal contact print. Develop to completion with full strength developer. It is okay if the highlights are very dense!
Once you have your negative, a starting point for exposure in your contact printing frame is about an hour or 90 minutes facing open sky to the North ( away from the sun ) followed by about 20 or 30 minutes direct exposure to the sun... although it depends on the time of day and time of year quite a bit. So far I've been finding something different from what I've read, which is that the full sun exposure seems to bring out contrast in the shadows and midtones while the north facing exposure seems to bring out detail in the highlights. At least, that's my impression so far...
I have a single BLB fluorescent bulb and it is difficult to make a salt print from a paper negative with it. Starting time is about 14 hours, up to about 16 or 20 hours and one problem is that the salt print can start to develop some fog in that amount of time. If you are working with exposures that long, it helps to add a little more citric acid... I'm using 6% and the paper doesn't start to fog until about 24 hours after coating. Also it does not develop as much contrast as prints made in the sun.
Salt prints can be very delicate and beautiful, and they can show very lovely subtle detail in the highlights. They are so pretty when they come out of the contact frame, it can break your heart when they change in the hypo.
Have fun, and be patient! It can take a fair amount of playing around to start to get the details right, so remember to have fun doing it and don't get too set on the idea of having it look a particular way until you've done a few and have a feel for what they can be like.
I'm going out tomorrow to make two paper negatives for salt printing, if either one comes out you'll see it in the MSA gallery soon!
Good luck and have fun with the paper negatives!
thank you for your answers 
I tried wetplate negative for salted paper but journey is too long for me now, I'll give paper a try...
Sun is getting strong here, I can play around and shorten exposure time.
Thank you very much, I'm "amazed" by the warm feeling of the apug community!


I tried wetplate negative for salted paper but journey is too long for me now, I'll give paper a try...
Sun is getting strong here, I can play around and shorten exposure time.
Thank you very much, I'm "amazed" by the warm feeling of the apug community!

Hello Nède,
First of all, I love your work.
Here are some websites about paper negatives, you might like:
http://www.ilfordphoto.com/aboutus/page.asp?n=151
and
http://nonphotography.com/blog/photography-techniques/techniques/how-to-make-a-salt-print/
and
Dead Link Removed
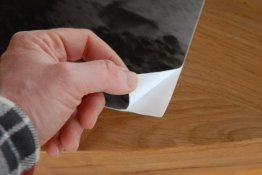
I have used Ilford and Kentmere B&W photo paper before, for making paper negatives. When the paper is normally developed and dried, I tear off (gently) the plastic back layer of the photo paper and then rub the back of the negative with linseed oil making circles, until it is all absorbed (and then once or twice more). This makes the paper more transparent and it will shorten developing times.
Use a surgeon's knife to loosen the corner of the back layer and pull it of slowly, pushing the paper down with your other hand. And try it first on some miss-prints before you do it with your real paper negative!!

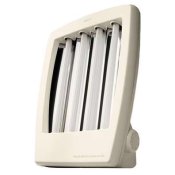
You can use direct sunlight, or UV lamps from "facial studio" (or whatever these are called in English/French) like this one:

Just make a small wooden box containing this device, lamps facing down about 10 cm above the table. You then make sandwich of salted paper with a negative in a normal picture frame and put it underneath the machine. With paper negatives, start testing at 15 minutes. It all depends on the strength of the lamps. etc. Doing it outdoors using real sunlight is much more fun, but - like today overhere - there isn't always sunshine in Holland. So this machine helps us through the winter
I hope you will post some of your Salt Prints here in the future!!
Bert from Holland
http://thetoadmen.blogspot.nl
First of all, I love your work.
Here are some websites about paper negatives, you might like:
http://www.ilfordphoto.com/aboutus/page.asp?n=151
and
http://nonphotography.com/blog/photography-techniques/techniques/how-to-make-a-salt-print/
and
Dead Link Removed
I have used Ilford and Kentmere B&W photo paper before, for making paper negatives. When the paper is normally developed and dried, I tear off (gently) the plastic back layer of the photo paper and then rub the back of the negative with linseed oil making circles, until it is all absorbed (and then once or twice more). This makes the paper more transparent and it will shorten developing times.
Use a surgeon's knife to loosen the corner of the back layer and pull it of slowly, pushing the paper down with your other hand. And try it first on some miss-prints before you do it with your real paper negative!!

You can use direct sunlight, or UV lamps from "facial studio" (or whatever these are called in English/French) like this one:

Just make a small wooden box containing this device, lamps facing down about 10 cm above the table. You then make sandwich of salted paper with a negative in a normal picture frame and put it underneath the machine. With paper negatives, start testing at 15 minutes. It all depends on the strength of the lamps. etc. Doing it outdoors using real sunlight is much more fun, but - like today overhere - there isn't always sunshine in Holland. So this machine helps us through the winter

I hope you will post some of your Salt Prints here in the future!!
Bert from Holland
http://thetoadmen.blogspot.nl
thank you very much for your kind words Bert. (I've been on your website...the quantity of information is very impressive)
today is very sunny so I'm trying with a soft 8x10 negative I did 1week ago.
Wi ll try peeling paper the first time I shoot!
thank you for the links, I'll read them tonight!
be sure I'll come back to show my success (or total failure )
)
Thank you very much for your help
today is very sunny so I'm trying with a soft 8x10 negative I did 1week ago.
Wi ll try peeling paper the first time I shoot!
thank you for the links, I'll read them tonight!
be sure I'll come back to show my success (or total failure
 )
)Thank you very much for your help

| Photrio.com contains affiliate links to products. We may receive a commission for purchases made through these links. To read our full affiliate disclosure statement please click Here. |
PHOTRIO PARTNERS EQUALLY FUNDING OUR COMMUNITY:  |

