Paper Negative Reversal Process

about to extinct

D
about to extinct

  • 0
  • 0
  • 58
Fantasyland!

D
Fantasyland!

  • 9
  • 2
  • 121
perfect cirkel

D
perfect cirkel

  • 2
  • 1
  • 125
Thomas J Walls cafe.

A
Thomas J Walls cafe.

  • 4
  • 8
  • 303

Recent Classifieds

Forum statistics

Threads
198,748
Messages
2,780,320
Members
99,693
Latest member
lachanalia
Recent bookmarks
1

aaronmichael

Member
Joined
Nov 29, 2010
Messages
242
Location
Long Beach,
Format
Large Format
Not sure if this is supposed to be posted in this forum but I figured a lot of pinhole photographers work with paper negatives and that's what my question is about. I want to try the reversal process with some of my 8x10 pinhole paper negatives (that I'll shoot in the future). I've read some things about how it's done but am still a little confused. Also, in my case, I'd be doing this at the lab at school so - could someone give me a quick explanation of how it's done and tell me what I need to ask the people working at the lab for when I try it out. This is just for fun so I don't need to use the best of whatever chemicals, I'd be happy with any results even if they were bad. We very well might not even have the right things at the lab to do it. Any instruction would be greatly appreciated!
 

Photo Engineer

Subscriber
Joined
Apr 19, 2005
Messages
29,018
Location
Rochester, NY
Format
Multi Format
You will need Dektol, Sodium Hypo, Potassium Dichromate, Sulfuric Acid, Hardening fixer, and Sodium Sulfite.

Process:

Dektol 1:2 or 1:3 for 1 - 3 minutes DBI..
clear in Sodium Sulfite bath (about 20 g/L) 1 min
Wash 1 - 2 mins.
Bleach in Dichromate + Sulfuric acid (formulas all over APUG and elsewhere for this)
clear in above clear about 1 min
Wash 5 mins
Turn on the lights and FOG the paper front and back.
Dektol again but with 500 mg /l of Sodium Hypo, DBI again.
Stop
Hardening fix
Wash

This should work. There are many many alternates for the bleach and the redeveloper.

PE
 
OP
OP
aaronmichael

aaronmichael

Member
Joined
Nov 29, 2010
Messages
242
Location
Long Beach,
Format
Large Format
You will need Dektol, Sodium Hypo, Potassium Dichromate, Sulfuric Acid, Hardening fixer, and Sodium Sulfite.

Process:

Dektol 1:2 or 1:3 for 1 - 3 minutes DBI..
clear in Sodium Sulfite bath (about 20 g/L) 1 min
Wash 1 - 2 mins.
Bleach in Dichromate + Sulfuric acid (formulas all over APUG and elsewhere for this)
clear in above clear about 1 min
Wash 5 mins
Turn on the lights and FOG the paper front and back.
Dektol again but with 500 mg /l of Sodium Hypo, DBI again.
Stop
Hardening fix
Wash

This should work. There are many many alternates for the bleach and the redeveloper.

PE

Thanks for the quick reply and step by step instructions. Can any of the chemicals be eliminated or are all of them required and if all of them are required do they have names besides their chemical names? I just want the greatest chance of our lab having what I need. Since it's in a class darkroom, not my personal one, can I fog the paper under the enlarger rather than turning the lights on? Wouldn't want to kick everyone out of the darkroom just to fog my paper.
 

Photo Engineer

Subscriber
Joined
Apr 19, 2005
Messages
29,018
Location
Rochester, NY
Format
Multi Format
Your best bet is to use a prepared reversal kit.

An enlarger might be too weak in output to fog the paper correctly.

Take the paper out of the darkroom and fog it in room light.

There are dozens of methods for doing this type of process.

PE
 
OP
OP
aaronmichael

aaronmichael

Member
Joined
Nov 29, 2010
Messages
242
Location
Long Beach,
Format
Large Format
Your best bet is to use a prepared reversal kit.

An enlarger might be too weak in output to fog the paper correctly.

Take the paper out of the darkroom and fog it in room light.

There are dozens of methods for doing this type of process.

PE

Thanks, appreciated.

Anyone else care to chime in?
 

2F/2F

Member
Joined
Apr 29, 2008
Messages
8,031
Location
Los Angeles,
Format
Multi Format
Hi,

FYI, you don't have to do this with your in-camera paper. You can just make a negative and use a contact printing frame to smash it face to face with another piece of paper. It is just like making a contact print or proofsheet. And you get more control of contrast that way, and can burn/dodge.

Especially since you are in a group lab, this would probably be a preferable way to go about it. At least until you set up your own darkroom...and for the reversal procedure, it literally just needs to be "A Dark Room," with some trays in it. No enlarger necessary.
 
OP
OP
aaronmichael

aaronmichael

Member
Joined
Nov 29, 2010
Messages
242
Location
Long Beach,
Format
Large Format
Hi,

FYI, you don't have to do this with your in-camera paper. You can just make a negative and use a contact printing frame to smash it face to face with another piece of paper. It is just like making a contact print or proofsheet. And you get more control of contrast that way, and can burn/dodge.

Especially since you are in a group lab, this would probably be a preferable way to go about it. At least until you set up your own darkroom...and for the reversal procedure, it literally just needs to be "A Dark Room," with some trays in it. No enlarger necessary.

Well the problem is that I've made many contact prints with paper negatives and I'm just starting to get bored with it which is why I wanted to try out the reversal process for fun. Maybe I'll just have to get creative with my contact printing to keep me entertained until I personally have the proper chemicals and setting to do it.
 
OP
OP
aaronmichael

aaronmichael

Member
Joined
Nov 29, 2010
Messages
242
Location
Long Beach,
Format
Large Format
Some question about process and chemistry:

1. Does the sodium hypo = sodium hypochlorite?
2. Where can I find the potassium dichromate if we don't have it at the lab? Would Freestyle carry it?
3. Where can the sulfuric acid be found if we don't have it at the lab?
4. How long should the paper be fogged for under indoor lights before it's taken back into the darkroom?
 

Photo Engineer

Subscriber
Joined
Apr 19, 2005
Messages
29,018
Location
Rochester, NY
Format
Multi Format
Sodium Hypo = Sodium Thiosulfate

Chemicals can be purchased from many companies. I use the Photographers Formulary in Montana, and APUG sponsor.

Use Battery Acid. It is 37% Sulfuric Acid and can be purchased at any auto store. Use gloves, goggles and an apron when handling the stuff and when handling and using the bleach.

You can do the final development in total room light, but I would use 1 minute room light exposure to each side if you go back into the darkroom.

AAron, are you sure you want to mess with the chemicals? You can buy a kit for this!

PE
 
OP
OP
aaronmichael

aaronmichael

Member
Joined
Nov 29, 2010
Messages
242
Location
Long Beach,
Format
Large Format
Sodium Hypo = Sodium Thiosulfate

Chemicals can be purchased from many companies. I use the Photographers Formulary in Montana, and APUG sponsor.

Use Battery Acid. It is 37% Sulfuric Acid and can be purchased at any auto store. Use gloves, goggles and an apron when handling the stuff and when handling and using the bleach.

You can do the final development in total room light, but I would use 1 minute room light exposure to each side if you go back into the darkroom.

AAron, are you sure you want to mess with the chemicals? You can buy a kit for this!

PE

Hahah - I just talked to the people working at our lab and they gave me a big warning about working with these chemicals and other chemicals. I think I'm just going to have to stick to contact printing for now :sad: Either that or buy some direct positive paper or a reversal kit.
 

holmburgers

Member
Joined
Aug 13, 2009
Messages
4,439
Location
Vienna, Austria
Format
Multi Format
If you are careful and recognize how to work with the chemicals, there's no reason that you should be afraid to handle them (or let others suggest it's frightful).

The potassium dichromate is the only chemical that probably isn't in a normally stocked darkroom. I've heard that some kind of Kodak Tray Cleaner will work, as it's basically an ideal bleach of sulfuric acid & potassium dichromate.

Hypo clearing agent is sodium sulfite + a pinch of sodium bisulfite; I don't see why that wouldn't work for the clearing bath.
 

andy_k

Member
Joined
Apr 21, 2012
Messages
38
Location
Vancouver BC
Format
Medium Format
This thread inspired me a little to try making reversal photographs straight out of the camera.
However, my approach has been to employ the Sabbatier effect onto a contrasty and medium dense paper negative.
This results in a positive with a good range of tones and fair crispness, but it definitely constrains overall contrast.

I definitely haven't mastered this technique at all, but I have made a few nice looking images fooling around.
This is a self portrait that I reversed, scanned, and photoshopped a little to improve the contrast range for better computer screen viewing.
I have attained fairly normal (say a 4 stop range) level of contrast on more recent experiments, but the pictures themselves don't look as nice.

This was on some highly expired Ilfospeed Grade 3 RC, in 6x6 format. I find better results come using full strength developer, and a flash to reverse the negative.
 

Attachments

  • 209776_472405876124122_289909343_o.jpg
    209776_472405876124122_289909343_o.jpg
    315.5 KB · Views: 556

holmburgers

Member
Joined
Aug 13, 2009
Messages
4,439
Location
Vienna, Austria
Format
Multi Format
andy, this sounds like a really fascinating method. A unique & intriguing approach!

Are you utilizing an exposure at a certain point in the development, or is it some kind of pre/post-exposure flash?

It's remarkable to me that such a good positive can be got by simply exploiting exposure at the right time... whoa!
 

SMBooth

Member
Joined
Jun 29, 2008
Messages
1,192
Location
Melbourne, N
Format
Multi Format
A friend had a different approach to this and we tried it out last night. It really using the basis of a lith article by Ed Buffaloe in blinking eye. http://unblinkingeye.com/Articles/NbyR/nbyr.html
A sheet of paper (MG RC)was exposed in camera for twice the metered exposure (in testing it was found to get the best end result), then under a enlarger set to about 700mm high and lens stopped down to f22 we preflashed the paper for 6-8 sec. Developed , Stop, lights on, Bleach, Wash, Clear, redeveloped in same developer, wash, we then fixed and washed again get to clear the slimy feel. End result is pretty good. That's the basics anyway, we need to do some more testing using some originals which have been exposed the same to determine what different preflash times do to the contrast.
 

Attachments

  • Reversal Test001.jpg
    Reversal Test001.jpg
    96 KB · Views: 592

desertrat

Member
Joined
Aug 13, 2005
Messages
228
Location
Boise, ID
Format
Multi Format
Can a reversal bleach be made with potassium ferricyanide? I have a good deal of this, and prefer to save my small supply of potassium dichromate for other things, if I can.
 

ME Super

Member
Joined
Apr 17, 2011
Messages
1,479
Location
Central Illinois, USA
Format
Multi Format
IIRC a ferricyanide bleach is a rehalogenating bleach. This would turn your developed paper negative back into an unexposed piece of paper, which after exposure to room light would quickly turn solid black. The dichromate and permanganate bleaches remove the developed silver, leaving the remaining silver halides behind. The reexposure to light gets you a developable positive image.
 

holmburgers

Member
Joined
Aug 13, 2009
Messages
4,439
Location
Vienna, Austria
Format
Multi Format
A friend had a different approach to this and we tried it out last night. It really using the basis of a lith article by Ed Buffaloe in blinking eye. http://unblinkingeye.com/Articles/NbyR/nbyr.html
A sheet of paper (MG RC)was exposed in camera for twice the metered exposure (in testing it was found to get the best end result), then under a enlarger set to about 700mm high and lens stopped down to f22 we preflashed the paper for 6-8 sec. Developed , Stop, lights on, Bleach, Wash, Clear, redeveloped in same developer, wash, we then fixed and washed again get to clear the slimy feel. End result is pretty good. That's the basics anyway, we need to do some more testing using some originals which have been exposed the same to determine what different preflash times do to the contrast.

Thanks for sharing the details; I need to try this someday.
 

andy_k

Member
Joined
Apr 21, 2012
Messages
38
Location
Vancouver BC
Format
Medium Format
andy, this sounds like a really fascinating method. A unique & intriguing approach!

Are you utilizing an exposure at a certain point in the development, or is it some kind of pre/post-exposure flash?

It's remarkable to me that such a good positive can be got by simply exploiting exposure at the right time... whoa!

it seems that about halfway to developing out the image (30-40 seconds) if i just hit the bathroom lights for a split second (halogen, not bad), or hit it with a high power xenon strobe (much better).

i really have had very inconsistent results so far. unfortunately i burnt the bulb on the higher watt strobe unit i was using (24W bulb), and trying to get the paper to reverse with a vastly smaller bulb is not working at all. i haven't put any time into more exposures with the bathroom light, although that's what i was working with at first.

i think this process has a lot of potential for producing some very very interesting pictures, as unique and unreproducible direct images.
 

andy_k

Member
Joined
Apr 21, 2012
Messages
38
Location
Vancouver BC
Format
Medium Format
okay, took some time this morning to revisit the process!

here's my setup in my bathroom:
i've obviously got my camera, homemade softbox (on a really wimpy Pentax AF160 i got for free, supported by a rubik's cube on top of the focusing screen), single halogen light source, 1:8(ish?) ilford multigrade developer, a water bath for stopping and washing, and rapid fix.

the whole approach is very imprecise, because i'm dealing with expired paper and didn't want to get my phone to use as a timer while i was in there banging the portraits out. i metered the bathroom light at EV 3.5 for EI 12 (which i estimated a full stop slower for the paper, roughly--so more like a true EV 1.75 for EI 6) with my handy little incident meter, and the softbox i'm eyeballing off the exposure chart on the back as a half-stop under normal ( EI 25 @ f8, 1m = EI 6 @ f2.8, <1m + power reduction from diffuser). the flash exposure came out fairly close to true, though a little under. however the mostly-flash exposure (shortest shutter-open time) came out the nicest.

the procedure for each was to expose, fog the plate a touch with light through the crack at the bottom of the door (~1 s), develop to completion in darkness (~1 min), flash the bathroom light to initiate reversal (0.3 - 0.1s, you get a good look at the negative at this point), develop to completion (~50 s), put in water stop bath for ~10s letting the developer work its way out (and at this point your eyes have well adjusted again and can clearly see your plate has darkened), fix for whatever feels comfortable and wash in the sink for a couple minutes.

these are the fruits of my efforts today, arranged top to bottom, right to left. the first was a gross underexposure (i had accidentally left the stop at f8). the second shot was as lit as i could possibly get it for ~4s exposure and the flash, and reversed with ~0.25s of bathroom light--it came out with badly blown highlights on my nose and forehead that did not reverse. i believe that this unwillingness of fully developed halides to reverse means there are very hard limits on the maximum contrast ratio that can be captured with this process.

the rest of the shots in the right column were experimenting with exposure and flash time. when i do proper scans of these images i'll make a post of my recollected exposure data (whatever that'll mean) in a later post.

the two (i feel) more successful exposures on the left column were the last two, and were a bit different. these exposures were for shorter times, roughly 1.5s, and when flashed with the overhead light showed almost no density at all as a negative image. in fact, for the top image on the left the paper was completely white, i couldn't see any density at all when i flashed it, and agitated it for a good minute and a half in the developer hoping i could get something out of it. the lower image was about the same for exposure and density when i initiated the reversal, and just trusted that i'd see something. obviously they're much lighter in tone, but i'm happier with them as there are very little to no unreversed highlights. i believe this is a factor of both shorter exposure times to avoid blowing highlights on the front end, and more gentle reversing exposures.
 

Attachments

  • IMG_0445.jpg
    IMG_0445.jpg
    455 KB · Views: 412
  • IMG_0454.jpg
    IMG_0454.jpg
    501.7 KB · Views: 487

andy_k

Member
Joined
Apr 21, 2012
Messages
38
Location
Vancouver BC
Format
Medium Format
here're some scans of the photographs I made yesterday, all calibrated to maximize the scanner's range and replicate the relative tonal characteristics of each image. i scanned in color because there are slight hue differences with different exposure levels. i have not manipulated these images at all to make them comparable, but the actual photos have a characteristic gray-brown hue to them, rather than the blue or green color these scans show.

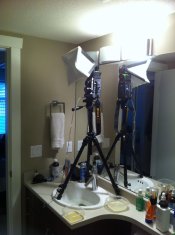
first, a little more technical information about the procedure. i placed myself in the focal plane, which i established with a no. 2 diopter and racking the bellows in all the way at wide open (Sekor 80mm f 2.8 blue dot). camera is loaded with lightly flashed paper, lights on, expose, lights off, develop to completion (1 min), flash for reversal, develop to completion (+water bath soak to a stop), fix, lights on and figure out what to do for the next one. as above, i metered the bathroom light at EV 3.5 for EI 12 and eye-balled exposure from there.

the first image was an overall failure. the following (second) plate was made with a 5s exposure with the flash. reversal exposure was roughly 0.2s. obviously blown highlights on my nose and forehead retained their density in the reversal process, and average density was high with a low contrast.
8140107769_ae34e70fab_b_d.jpg

this next plate was exposed for about 3.5s with the flash and the door open (with light from my room lights and outside through the window). the reversing flash was a touch longer, about 0.25s. nice high density on the frame edge, and shadows, less held-over black blown out highlights, although the overall contrast is ridiculous and detail is only on my ear and neck where the exposure was lower.
8140138856_c5c7f47d92_b_d.jpg

this plate had an exposure of 3s with the door closed, and the flash. the reversing exposure was about 0.25s. better detail, no blown highlights, but again low contrast and higher average density.
8140107645_860dcdf6c3_b_d.jpg

this plate had an exposure of 6s, without the flash (didn't fire the first time so did a double exposure). reversing exposure was much shorter, about 0.1s. terrible blowing of highlights again. however, i was encouraged by the very high overall contrast generated by the short reversing exposure.
8140138680_f54e8d0a72_b_d.jpg

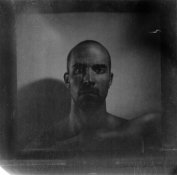
this plate was essentially all bulb, ~1.5s exposure. reversing exposure was at first 0.1s, but i saw the negative showed no perceptible density after a full minute of development. after a few seconds of development in the dark and not seeing any color change i flashed again for 0.1s, and developed for a full minute and let it rest in the water bath hoping something would come out. great tonal range, detail, lower average density, better overall contrast. this is my favourite photo, basically an accident (but a happy one).
8140107509_9c9602bc2e_b_d.jpg

this plate was ~2s exposure with flash, and a 0.1s reversing exposure (maybe shorter). i trusted that the nearly-zero observed negative density would produce a positive image, and produced a high contrast, low maximum density image. there is a black mark in my left eye (remember, rotated inverse images) from a blown unreversed highlight. as a side note, i'd ripped the corner off to test my developer that had been sitting in the tray at the start of the day to see if it was good having been mixed a couple days before (it wasn't, so i started this series of photos with fresh).
8140107461_bc4523db4a_b_d.jpg

this was my most successful image from my first experiements with this approach, and was produced essentially by accident. scanned with the same scanner, same settings, for comparison. exposure for this image was with my flash (bare) held at arm's length, shot twice, ~20s exposure in lower incident light only through my bedroom window. reversing exposure roughly 0.2 seconds (i'm guessing, this was a month ago).
8140138522_b2f33f2db2_b_d.jpg

so it seems to me that there is a LOT of leeway for producing a recognizable photograph, but definitely needs dialing in to get good repeatable results. flatter, even lighting seems to have the ability to produce good detail and appealing contrast. from my experiments it seems that the strength of the latent image is less important than the duration of the reversing exposure--longer secondary exposure can compound with long initial exposures and solarize the crap out of your image. good, healthy developer seems to help the process along to generate good positive density, but definitely hurts tonality with fogged highlights and lower contrast.

this information is all but useless, and is really just a place to start for anyone else interested in experimenting. i'm sure you'll all pay closer attention to what you're doing than i have. :smile:
 
Last edited by a moderator:
Photrio.com contains affiliate links to products. We may receive a commission for purchases made through these links.
To read our full affiliate disclosure statement please click Here.

PHOTRIO PARTNERS EQUALLY FUNDING OUR COMMUNITY:


Ilford ADOX Freestyle Photographic Stearman Press Weldon Color Lab Blue Moon Camera & Machine
Top Bottom