Paper negative enlarger prototype

about to extinct

D
about to extinct

  • 0
  • 0
  • 48
Fantasyland!

D
Fantasyland!

  • 9
  • 2
  • 116
perfect cirkel

D
perfect cirkel

  • 2
  • 1
  • 122
Thomas J Walls cafe.

A
Thomas J Walls cafe.

  • 4
  • 8
  • 295

Recent Classifieds

Forum statistics

Threads
198,746
Messages
2,780,297
Members
99,693
Latest member
lachanalia
Recent bookmarks
0

bergytone

Member
Joined
Sep 8, 2014
Messages
168
Location
Grand Haven,
Format
Multi Format
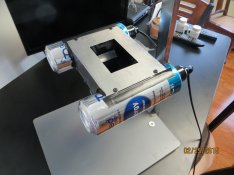
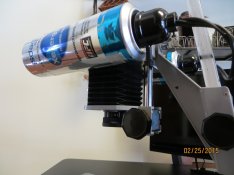
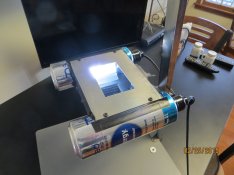
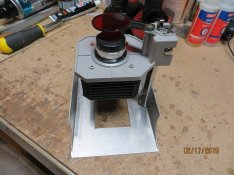
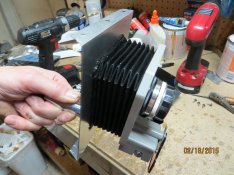
I have just finished a prototype of a paper negative enlarger. Inspired by member 'blindpig''s version of an opaque projector that he posted last year, I decided to try my hand at making one. Here's what it looks like:


attachment.php
attachment.php
attachment.php


I started with an old Vivitar enlarger (the one I used in high school) and used it's easel and lens holder with bellows. I wanted to be able to enlarge my paper negatives from the 6x6 or 6x9 vintage folders I've been playing with, as contact prints from them lose some sharpness, and are kind of small.

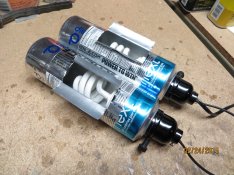
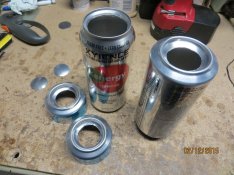
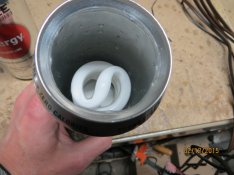
The light sources are made from energy drink cans and pepsi cans carefully cut up. (that energy drink tastes awful by the way) I had to cut the ends out to fit the lamp socket, and cut the other end out so I could get the bulb in and out. The nice thing about aluminum cans is that they are easy to work with, and they can be jammed inside each other for a perfect light tight fit.

attachment.php
attachment.php
attachment.php


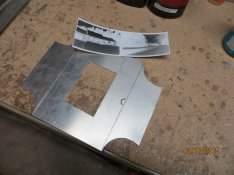
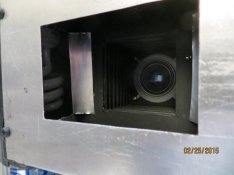
I used aluminum sheet to make the 'light box'. The aluminum I used must be some grade of aircraft aluminum, as it was very hard to bend up. There's an upper and a lower section, with the lower section being glued to the bellows from the Vivitar.

attachment.php
attachment.php
attachment.php


I painted the inside black and used automotive grade black silicone to caulk up the joints to make it light tight. The initial tests were very exciting. I am using my Omagar 80mm enlarger lens, which limits the size of the print I can make. It's nice, because it screwed right into where the vivitar 50mm lens was. The negative is placed right onto the top opening, and a piece of glass is used to keep it flat. I was impressed that with a piece of white paper in the opening, the resulting projected image was pretty evenly white.

I put a text doc on the top with fine print (the back of the Ilford Multigrade filter box) and enlarged it to 8x10 size and I could see the letters were sharp and crisp. Putting some paper negatives up there projected them beautifully, and I think this is going to produce nice prints. Contrast of the image seemed normal.

Can't wait to see how it works... the proof's in the printing
 

Attachments

  • enlarger 1.jpg
    enlarger 1.jpg
    245.3 KB · Views: 1,242
  • enlarger 2.jpg
    enlarger 2.jpg
    202.1 KB · Views: 1,172
  • enlarger 3.jpg
    enlarger 3.jpg
    231.4 KB · Views: 1,244
  • enlarger lights.jpg
    enlarger lights.jpg
    776.2 KB · Views: 1,215
  • enlarger lights 2.jpg
    enlarger lights 2.jpg
    358.2 KB · Views: 1,180
  • enlarger lights 3.jpg
    enlarger lights 3.jpg
    231.2 KB · Views: 1,167
  • enlarger frame 1.jpg
    enlarger frame 1.jpg
    371.4 KB · Views: 1,156
  • enlarger frame 2.jpg
    enlarger frame 2.jpg
    365.2 KB · Views: 1,217
  • enlarger frame 3.jpg
    enlarger frame 3.jpg
    303.9 KB · Views: 1,229

Joe VanCleave

Member
Joined
Jan 20, 2004
Messages
677
Location
Albuquerque,
Format
Pinhole
This is very interesting. I've also been wanting to make one of these.

I'd be interested to hear around how you prevent glare and hot-spots on the shiny, glossy negatives, that would show up on the prints.

Very interested in seeing your resulting prints.

~Joe
 

AgX

Member
Joined
Apr 5, 2007
Messages
29,973
Location
Germany
Format
Multi Format
Once there was a commercial enlarger that allowed either to use a paper- or a film-negative.
 
OP
OP
bergytone

bergytone

Member
Joined
Sep 8, 2014
Messages
168
Location
Grand Haven,
Format
Multi Format
Joe, I just tried something. I put a mirror on the top, where the negative would go. I saw a small amount of flaring near the sides, but otherwise it showed up dark. The flaring was due to my 'reflector' on the lower edge of the light tubes. I put a couple pieces of black felt down on them and almost all the flaring went away...
here's the reflector I was talking about:

attachment.php


The only thing I see that is a distortion is that the side edges show a small shadow... due to the thickness of the aluminum plate. But that can be cropped out.

Here's a question to you and earlj.... the bulbs I'm using are the 'daylight' florescent CFL. Will these have too much blue light for printing on MGiV? Will I be better with the 'soft white' bulbs, as they have a color temperature closer to tungsten?
 

Attachments

  • enlarger 4.jpg
    enlarger 4.jpg
    188.6 KB · Views: 930

Joe VanCleave

Member
Joined
Jan 20, 2004
Messages
677
Location
Albuquerque,
Format
Pinhole
...Here's a question to you and earlj.... the bulbs I'm using are the 'daylight' florescent CFL. Will these have too much blue light for printing on MGiV? Will I be better with the 'soft white' bulbs, as they have a color temperature closer to tungsten?

I don't have any direct experience in printing with either of those light sources, so you're best to experiment a bit with both kinds.

~Joe
 
OP
OP
bergytone

bergytone

Member
Joined
Sep 8, 2014
Messages
168
Location
Grand Haven,
Format
Multi Format
Shane, the light is reflecting off the negative, or whatever you put up on the top. I can put my hand up there and I get a perfect image (in color) of my hand on the easel. The concept of reflected light casting an image is a little hard to grasp, but your scanner does that when you scan in the reflective mode. It has a light that travels down the platen and the sensor just picks up the reflected light and dark areas reflected off the paper. I'll try to get a front view image up tomorrow.

I did a few quick tests with the enlarger tonight. Didn't have a lot of time, but I ran some test strips through. I am seeing slightly more light at the edges, meaning the illumination isn't uniform. One of the problems I have is that I don't have any really sharp paper negatives just yet. I'm still learning exposure times with the paper negatives and It's hard to get outside shots right now with snow all over, and sunny days just produce blown out paper negatives. I have a bunch of pinhole paper negs, but as we all know, they are a bit soft.

If someone wants to send me a nice, sharp 6x9 paper negative with good tone, that will save me some time. PM me if that's something that you can help me with.
 

NedL

Subscriber
Joined
Aug 23, 2012
Messages
3,388
Location
Sonoma County, California
Format
Multi Format
My enlarger has a fluorescent light that is extremely blue. I usually do split grade printing with a green filter and a deep blue (47B) filter, and it works great. I read that normal multigrade filters might not work well with my light ( the steps not evenly spaced, with some of the steps being too large and some not doing much at all ). So, if the light is really blue, you could try reading about split grade printing and doing part of the exposure with a green filter.
 
OP
OP
bergytone

bergytone

Member
Joined
Sep 8, 2014
Messages
168
Location
Grand Haven,
Format
Multi Format
One thing I don't like about these CFL florescents is that they have that warm up time before they reach full brightness. To get consistent results I'll have to let them warm up good with the lens cap on. then quickly get the print going before they cool down. I may try some incandescents, but heat will be a real problem.
 

NedL

Subscriber
Joined
Aug 23, 2012
Messages
3,388
Location
Sonoma County, California
Format
Multi Format
I hold a black card under the lens for 30 seconds, then use it to time the print as well, with a metronome. That might work. Actually, my card is black underneath and white on top.
 
OP
OP
bergytone

bergytone

Member
Joined
Sep 8, 2014
Messages
168
Location
Grand Haven,
Format
Multi Format
I was experimenting last night with trying to make the image cast on the easel even. When I put a white piece of paper on the negative opening, I get a pretty even white light image. I used my Ilford exposure meter to measure the light levels from edge to edge and with the lens open all the way, the image was very close to even. Within a couple of small graduations on the meter. But when I stopped the lens down, I could plainly see a darker spot in the middle of the image, like a 'reverse vignetting'. For each increase in lens stop I could see the darker spot in the center grow larger. I used the Ilford meter and could see that there was now 10 to 12 divisions of difference edge to edge.

Can anyone explain why stopping the lens down effectively creates a darker center image? Being that this enlarger arrangement has no 'condenser' for the light, maybe that has something to do with it. I can probably do my exposures with the lens wide open, maybe I'll have to just get lower wattage bulbs to give reasonable exposure times. Focusing will be much more critical too.

Does anyone have any thoughts on how I can stop down the light without 'reverse vignetting'?
 

AgX

Member
Joined
Apr 5, 2007
Messages
29,973
Location
Germany
Format
Multi Format
The less point-like the light source is, the less effect a condenser will have. Thus the lack of a condenser could not be the reason behind that dark spot.

Is that spot actually circular?
 

blindpig

Member
Joined
Dec 5, 2013
Messages
123
Location
Nixa,Mo.
Format
Multi Format
Sorry about being slow to respond but have been away for a while and am just now catching up.
From my experience with the reflective enlarger there hasn't been a reflective problem causing uneven or hot spots in the illumination.I suspect that the light inside the head is getting to the lens without bouncing off the negative,try shielding the lens from direct light.Another problem could be the closeness of the lens to the negative( if you recall I mentioned that you might need a 150mm or longer lens to allow proper light angles for the area being copied). It could be necessary to forgo the glass in your negative carrier as the circle you are seeing that gets sharper when stopping down is probably the lens it'self reflecting off the glass(which would be made easier with non image forming light striking it)
Having trouble with computer so will send this and try to add more later.
Don.
 

blindpig

Member
Joined
Dec 5, 2013
Messages
123
Location
Nixa,Mo.
Format
Multi Format
Back,hope" puter "will behave.
Eric the reason for the distance from the lens to negative in my enlarger is to allow for proper light coverage needed to copy the reflective original(actually this is a small copy camera layout). The ideal would be for the center of the light sources be aimed toward the opposite edge of the original being copied so the center would be illuminated by the falloff from the center of the light beams. The optimum angle for this light path would be 45 degrees to prevent reflections at 90 degrees,which the lens is using.I'm attaching a crude drawing showing this setup.


As you can see the lens is protected from direct light and so is unused areas in the box.Hope this helps some.
Don
 

Bob Carnie

Subscriber
Joined
Apr 18, 2004
Messages
7,735
Location
toronto
Format
Med. Format RF
I knew Don (blindpig) in a previous life, when I was doing photcomp and we were both using a very unique camera system..


I know his capabilities... so for the uninformed . ME. what are the advantages of a paper negative enlargers???
 

Andrew O'Neill

Moderator
Moderator
Joined
Jan 16, 2004
Messages
11,956
Location
Coquitlam,BC Canada
Format
Multi Format
The main advantage is that you can make an enlarged print from a paper negative without having to print through its paper fibres. Probably a bright projected image for faster printing… I really would like to see a print, say up to 16x20!
 

blindpig

Member
Joined
Dec 5, 2013
Messages
123
Location
Nixa,Mo.
Format
Multi Format
Hey Bob,
Andrew is right about enlarging without the paper texture showing.You might consider it a copy camera set up because basically that's what it is.
As for making clear enlargements it will depend on the lens and lighting setup.
Andrew you might consider that all color separations for offset and lithographic printing were made with copy cameras before scanners came along and were capable of sharp enlargements as well as reductions.I'm not claiming my little prototype is capable of what those precise instruments were but the idea is the same so !6X20 prints aren't out of the question,IMHO.
Eric keep on working with your set up and you will be surprised at the results......
Don
 
OP
OP
bergytone

bergytone

Member
Joined
Sep 8, 2014
Messages
168
Location
Grand Haven,
Format
Multi Format
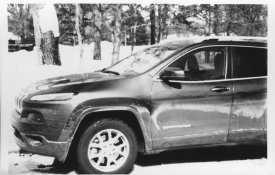
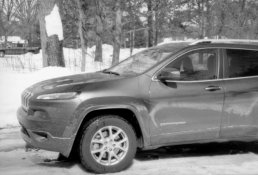
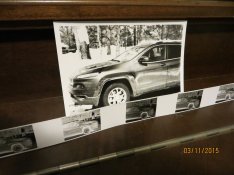
As an update, I ran some tests the other night. I first needed some good paper negatives to start with, so I shot a series of pictures of my Jeep in the snowy driveway... I figured since the jeep is kind of slate colored it was like a giant grey card. This was also an interesting way to shoot paper negatives. I cut up a strip of paper about 30" long and 1.1 inches wide and rolled it into a re-usable 35mm fim can. I put it in the Nikon FM and shot some bracketed exposures. Same subject, repeated with various F stops so I could get a range of negative densities. I used ilford MGiV pre-flashed.

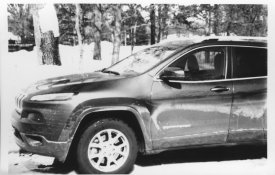
The resulting negatives turned out good. I could see a some sharp detail, but the highlights were still a little blown out. Obviously too small to contact print. So I made a 35mm sized mask for my new enlarger, and ran a test print at 4x6" size. Here's my result: (click on it to make it bigger)

jeep 4x6.jpg

The print is very contrasty, and was also printed on Ilford MGiv paper. There is a notable lack of detail in the shadow areas, and a scan of the negative shows this. (look at the rear window reflections) :
attachment.php


An examination of the projected image on the easel shows that these details are there, I just lost them in the printing. It is not at all an effect of my enlarger. Being that I have no means of putting a multigrade filter over the two light sources, I may have to resort to graded paper to get the contrast in line. Unless someone wants to give me some larger sized pieces of filter gel that I could put in the lamp housings. I wish I had one of you guys that have been printing for many years in the darkroom with me to help with taming the contrast shrew.

Here's a shot of the negative next to the enlargement to show the degree of enlargement, and the paper negative strip technique. That's a story in itself, how to advance the paper negative without sprockets. Keep in mind, this is the first pass at this... hopefully it will get better as I learn how to print with this contraption.

attachment.php
 

Attachments

  • jeep 4x6.jpg
    jeep 4x6.jpg
    380.5 KB · Views: 522
  • jeep neg.jpg
    jeep neg.jpg
    118.6 KB · Views: 745
  • IMG_0949.JPG
    IMG_0949.JPG
    468.1 KB · Views: 768
Last edited by a moderator:
Photrio.com contains affiliate links to products. We may receive a commission for purchases made through these links.
To read our full affiliate disclosure statement please click Here.

PHOTRIO PARTNERS EQUALLY FUNDING OUR COMMUNITY:


Ilford ADOX Freestyle Photographic Stearman Press Weldon Color Lab Blue Moon Camera & Machine
Top Bottom