OM4T Top Plate Removal Help

3 Columns

A
3 Columns

  • 6
  • 6
  • 121
Couples

A
Couples

  • 4
  • 0
  • 97
Exhibition Card

A
Exhibition Card

  • 6
  • 4
  • 138
Flying Lady

A
Flying Lady

  • 7
  • 2
  • 149

Recent Classifieds

Forum statistics

Threads
199,056
Messages
2,785,528
Members
99,792
Latest member
sepd123
Recent bookmarks
0
Joined
Mar 30, 2011
Messages
2,147
Location
NYC
Format
Multi Format
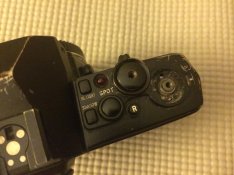
So I dropped my black om4t and it landed on the film rewind crank, and broke off the flip out handle, which is not a big deal and can be swapped out easily. But what is a bigger deal is that it broke the film door release mechanism. I popped the bottom plate off and the side leatherette and and saw that the release and spring still works, and the door still locks shut fine, but the linkage between pulling up on the film rewind lever and the door lock is broken. Now I am having a problem with the removal of the top plate to get under that section to see whats up.

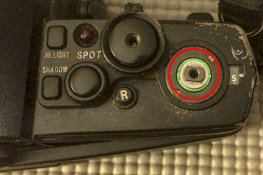
I removed everything in the service manual, except a retaining ring under the wind lever. I am not sure what section to take off. The black outer ring has two larger holes that had a ball bearing in each. Within that larger ring, is a center ring, that also has two indentations for a spanner. Neither budge. In the exploded diagram both seem to come off, but I am totally baffled and I marred the larger black ring too trying to really crank it which sucks. Not sure what to do now.

Any help is appreciated.

edit: ive attached an image of where im stuck, Ive tried removing both that are outlined in red in green, and both do not budge.

1.jpg
2.jpg
 
Last edited by a moderator:

Bill Burk

Subscriber
Joined
Feb 9, 2010
Messages
9,323
Format
4x5 Format
That's a finely-crafted Japanese Puzzle Box for you.

If it's any consolation, I can't get past that point either.
 
OP
OP
Newt_on_Swings
Joined
Mar 30, 2011
Messages
2,147
Location
NYC
Format
Multi Format
The black outer ring has seats for 2 small bearings. But looking at images for the removal of the top plate from an OM1 the spanner is slotted into that larger ring. Both are super tight.
 
OP
OP
Newt_on_Swings
Joined
Mar 30, 2011
Messages
2,147
Location
NYC
Format
Multi Format
That's a finely-crafted Japanese Puzzle Box for you.

If it's any consolation, I can't get past that point either.

It's not even really that complicated (atleast the mechanical part compared to electronics) vs some of the other cameras I've taken apart and fixed but it really is just jammed on. What did you end up doing? I just hope I don't need a special tool.
 

Bill Burk

Subscriber
Joined
Feb 9, 2010
Messages
9,323
Format
4x5 Format
It's not even really that complicated (atleast the mechanical part compared to electronics) vs some of the other cameras I've taken apart and fixed but it really is just jammed on. What did you end up doing? I just hope I don't need a special tool.

I put it back together, waiting for a proper CLA or maybe another body...
 
OP
OP
Newt_on_Swings
Joined
Mar 30, 2011
Messages
2,147
Location
NYC
Format
Multi Format
Search engine Google; key word/search term om4t service manual ; top results: http://olympus.dementix.org/Hardware/
DUH

Yes I am actually working off of those exploded diagrams and the top plate removal order from section C of that manual. I have it printed out in front of me, but I am asking as I have hit a road block and was hoping someone has a solution. If I really can't get it off, I may just rig up something to pull on the latch lock from the left side under the leatherette as an ugly fix.
 

shutterfinger

Member
Joined
Feb 25, 2013
Messages
5,020
Location
San Jose, Ca.
Format
4x5 Format
The OM4 pdf4 section H shows a special wrench for the wind lever nut CE564800 with a note that it does not work on the early production models.
The OM4Ti supplement pdf page 37 may be of help also.
If it will not budge with a narrow tip spanner then put a small amount of acetone (standard nail polish remover) between CED564900, pdf 1 page 6, and shaft CE5222000 pdf 1 page 9 to loosen the thread locker/thread glue.

This spanner http://www.ebay.com/itm/Profession-...202?pt=LH_DefaultDomain_0&hash=item3ce4fad3b2 with the center pair of tips should be perfect for this nut.

Further down the OM repair manual site is a tutorial on removing top cover lever from a OM1/OM2. It shows the nut in question to simply unscrew with a spanner.

I recently used the nail polish remover on a Cambo Legend standard guide set screws that had some sort of glue/thread locker that prevented them from moving. The head would strip off without the screw turning and the screws turned easily a couple minutes after applying the acetone. Use Sparingly!
 
Last edited by a moderator:
OP
OP
Newt_on_Swings
Joined
Mar 30, 2011
Messages
2,147
Location
NYC
Format
Multi Format
Ok finally its fixed, note, dont repair cameras late at night and when your wired only on caffeine... The write up follows below for whoever may need help with this in the future.

Part CE564800 was the retaining ring that needed to be removed, which I outlined before in green. I dont know why I was trying to remove part CE564500 with the spanner, it was a brain fart, as the holes for the bearings looked like it would fit a spanner. Doh...

I followed shutterfingers's advice and used a bit a solvent, I used naphtha instead as I was weary of acetone coming into contact with the circuits and plastic board under the cover. Just a squirt around the gap outside that lever nut and I let it sit a bit, and with a spanner it loosened up. Finally the top could be removed as I had everything else off.

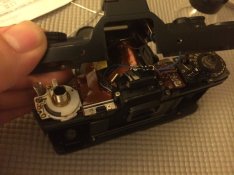
With the top off you have to be very gentle as its connected to a circuit ribbon and two other wires. But with it all turned slightly, it was enough space for me to diagnose what was up with the film door latch release.

The rewind column, part CE596700 has a small flange/collar at the base, when lifted that flange contacts part CE565400, a circular collar that is supposed to connect with part ZC452000 the locking door latch. What keeps it all locked down with pressure is spring part number CE557200.

So when the camera dropped, it jarred part ZC452000 out so that it was resting below part CE565400, so when you pulled up on the rewind column (part CS596700) there was nothing to catch to pull up the door lock (part ZC452000).

So the correct order is ZC452000, which rests on CE565400, which is ultimately pulled up by CS596700 which opens the door. I had to peel back the leatherette to get access to part CE558000 which actually keeps the door lock in place so I could take it out and rearrange it. note: there are two tiny washers (under CE558000) part CA871900, make sure you dont lose them.

Other notes:
Part CE59400 is just a plastic cap that is glued onto the top of the wind lever, just pry it off with an exacto.

Under that, when you remove the wind lever are two very tiny ball bearings, Part B 1/16, very easy to lose

Set the dipoter correction to 0, or centered before removing the screw that holds it in place, it will make it easier later on reassembly.

When removing the dials for film speed and exposure compensation, there is a tiny little brass pin and even tinnier spring, parts CE568600, CE568700, move them with tweezers and keep them safe.

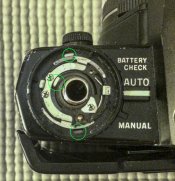
Make note of your filmspeed, and zero out your exposure compensation before removing dials, as you have to align 3 white plastic prongs Part CE596100 through the top plate when closing it all up. This was a headache, just getting everything in line so the top could slide down and the dials function. the exacto knife helped with final positioning.

The film rewind button, part CE561200 and spring part CE561300 should also be removed when working as they are small and easy to lose, when you put the top plate back you must align them with the cutout to fit, depressing the button helps it sit better when doing this.

Dont over tighten Part CE568300, which is the locking ring for the film speed and exposure compensation dials, if you do it will actually turn the compensation dial a bit and create an off centered mark alignment.

Dont forget parts CE568600, and its spring, that gives the film speed dial its clicking sound. I forgot this in my sleepiness and had to take it apart to redo.

Thats about it, I swapped the broken flip out rewind top part ZJ185600 with another working body I dont use as often and all is now fixed up and ready to shoot. I checked the meter , dials, and button functions with a new set of SR44 batteries and everything works. I can finally take a nap now. whew.

Also if anyone has a spare part ZJ185600 (the flip out rewind lever) I could use a replacement! =]

3.jpg
4.jpg Those green circles indicate the plastic prongs that you have to align and thread through the top place when reassembling the camera. My bottom prong seems to have broken off slightly but doesnt affect the camera, I never found the broken off part in the camera housing.
5.jpg you can see the rewind button and spring just sits in a wobbly state, when you depress it, it sits flatter and is easier to reassemble.
6.jpg
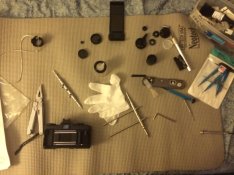
I was working on a soft padded mat, its designed for instrument and gun cleaning, and helps keep everything visible and stuff like bearings from bouncing around. each section of parts that was disassembled went into its own holding cup.
 
Photrio.com contains affiliate links to products. We may receive a commission for purchases made through these links.
To read our full affiliate disclosure statement please click Here.

PHOTRIO PARTNERS EQUALLY FUNDING OUR COMMUNITY:


Ilford ADOX Freestyle Photographic Stearman Press Weldon Color Lab Blue Moon Camera & Machine
Top Bottom