now for my cyanotype difficulties

Cliché

D
Cliché

  • 0
  • 0
  • 31
Leaving Kefalonia

H
Leaving Kefalonia

  • 0
  • 0
  • 91
Lightning Strike

A
Lightning Strike

  • 2
  • 2
  • 116

Forum statistics

Threads
199,086
Messages
2,786,023
Members
99,803
Latest member
Charlie Methley
Recent bookmarks
0

eddie gunks

Member
Joined
Dec 14, 2005
Messages
1,156
Location
Saugerties,
Format
Large Format
i know i am all over the place....1st with VDB and now cynaotypes but i have the chemicals and it is fun to try this stuff.

i mixed up
* Solution A: 25 grams Ferric ammonium citrate (green) and 100 ml. water.
* Solution B: 10 grams Potassium ferricyanide and 100 ml. water.

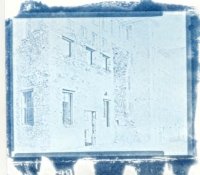
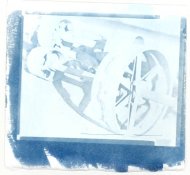
added equal parts of A&B, coated the paper and exposed them for 15 min outside. the prints are very light. am i only having exposure difficulties or chemical problems? i exposed the same negs today with VDB in 15-20 min. is cyanotype that much slower?

thanks for the help. the sun is gone so i am done for today.

eddie
 

Attachments

  • cyanotype 1st try0001.jpg
    cyanotype 1st try0001.jpg
    49.2 KB · Views: 231
  • cyanotype 1st try0002.jpg
    cyanotype 1st try0002.jpg
    44.8 KB · Views: 195

smieglitz

Member
Joined
Oct 18, 2002
Messages
1,950
Location
Climax, Michigan
Format
Large Format
Eddie,

Did the prints solarize with the exposure you gave them? The proper exposure (assuming a good negative for the cyanotype process) will print out with the deepest shadows solarized and tending to powder blue. This effect will disappear during processing.

A hydrogen peroxide final rinse (a couple drops of 3% H2O2 in enough water to cover the print) will accelerate the oxidation of the print and produce a deeper blue color immediately. The print would shift to this state in a couple weeks by itself, but the H2O2 lets you see it right away.

Try adding some acid (a splash of stop bath, vinegar, citric acid, etc.) to the rinse water. Cyanotypes bleach in alkaline solutions. A sign of alkaline bleaching is the tendency for the image to look lavender instead of blue.

Joe
 

Akki14

Member
Joined
Feb 2, 2007
Messages
1,874
Location
London, UK
Format
4x5 Format
You have a bit of fogging on the first one. Try dunking that specific paper in vinegar and letting it air dry then coating. Try double coating. You should be exposing until the clear parts of your negatives have gone a powder-dark-blue colour. It'll go blue then it'll go powderblue. when the darkest bit of the image has that powderblue, then you can wash it. Otherwise it will be underexposed.
Also don't feel it necessary to wash for 5 minutes or whatever people claim. Soaking in a tray or sink for 2-3 minutes is enough to clear the unexposed yellow stuff from the paper usually and it's less harsh.
 

winger

Subscriber
Joined
Jan 13, 2005
Messages
3,975
Location
southwest PA
Format
Multi Format
It also looks to me like your negatives are dense enough to need some more exposure (the outer area is darker than the image). In NY in winter, 15 minutes may not be enough. In MA in summer, I was getting good results at 20 minutes with sun close to noon. Some experimentation may be helpful.
 

nick mulder

Member
Joined
May 15, 2005
Messages
1,212
Format
8x10 Format
Yip - I reckon longer exposure... Hydrogen Peroxide or further post wash exposure in my experience works like an immediate contrast boost and will bleach a weak image like this into nothing (Its very fun to watch once your cyanotype is ready for it, fizzz!) - its what would happen over time anyway as was suggested...
 
OP
OP

eddie gunks

Member
Joined
Dec 14, 2005
Messages
1,156
Location
Saugerties,
Format
Large Format
thanks everyone! that helps.

i used a 3% citric acid wash. i thought the cyanotypes were a bit faster than the van dykes. i guess not. i iwll give it another go in a few days. stay tuned!

thanks again.

eddie
 

nawagi

Member
Joined
Mar 29, 2006
Messages
87
Location
Connecticut
Format
Large Format
Get yourself a Stouffer 21 step tablet.
Standardize your paper and sensitizer.
Develop an unexposed sheet of your preferred negative stock.
Print this "base plus fog" negative with the step tablet on top onto your coated c-type.
Develop the c-type and let dry.

Examine the step tablet - the "0" step is your darkest step. If the negative next to, but not beneath the tablet is darker than "0", adjust your exposure time longer until "0" is the darkest (d-max) blue your chemistry can print. This is your standard printing time.

Now print an existing image negative at the standard printing time.
Develop and dry.
How's the contrast? Probably flat, unless you've got a bullet-proof negative.
Adjust the development of your negative (or Photoshop curve on your digital image) and print again.

Repeat as needed. The step tablet is pretty nerdy (to some) but it really dials in alternative processing as long as you keep your materials standardized!

NWG
 

smieglitz

Member
Joined
Oct 18, 2002
Messages
1,950
Location
Climax, Michigan
Format
Large Format
The attachment shows what Nate and I are talking about. The left hand tests show the cyanotype exposure before processing. Note that the first 2 steps solarized with the 200 unit exposure. Once processed, that sheet was a bit to light.

The exposure was increased to 280 units in the example at right. Note that the 1st step there now matches the maximum tone through the film base. (The step tablet was above a film stock when the exposure was made.) Thus, 280 units (on a NuArc 26-1K exposure unit) is the Normal exposure for the second emulsion/film/paper/UV source combo. (The second example is actually on a different paper stock than the first.) Note the range of steps exposed from solarized to barely visible as marked is different between the two sheets - 2 through 18 vs 3 through 15. That indicates the two papers have different contrast ranges.

Joe
 

Attachments

  • cyanotype_exposure.jpg
    cyanotype_exposure.jpg
    85.9 KB · Views: 223
OP
OP

eddie gunks

Member
Joined
Dec 14, 2005
Messages
1,156
Location
Saugerties,
Format
Large Format
i do not see where the 15 matches up on the attachment. what am i doing wrong? i see that the blue sheet matches the 3 on the 2nd sheet, but where does the 15 info come from?

i looked at the stouffer site. which step tablet do i want? i might as well get one for C type, VDB, and kallitype while i am there.

thanks for the help.

eddie
 

smieglitz

Member
Joined
Oct 18, 2002
Messages
1,950
Location
Climax, Michigan
Format
Large Format
i do not see where the 15 matches up on the attachment. what am i doing wrong? i see that the blue sheet matches the 3 on the 2nd sheet, but where does the 15 info come from?

Eddie,

Could be the contrast of your monitor is off. The 1st step, not the 3rd, on the rightmost sheet blends with the blue background.

Step 18 on the left sheet shows a hint of tone just darker than the area from 19 - 21 which remains underexposed and paper base. On the right sheet, I marked the same threshold at step 15. So the second sheet received more exposure (280 vs 200 units), but printed out with fewer steps.

The pencil mark at 15 (i.e., "280" noting the exposure given) notes the extent the emulsion printed to. (On the left sheet I would have noted "200" between steps 19 & 20.)

You can no longer see the threshold exposure on the right sheet since processing has caused a loss in density and moved the lightest tone back to around step 12. At the same time, that 3-step loss got rid of the solarization and made step 1 the deepest tone.

Because the tone of step 1 also matches the deepest background tone (exposed only through film base) I know the exposure is correct. Any longer exposure only makes step 2, etc., the deepest tone. It does not increase the total range of tones printed. It only shifts them up the scale. OTOH, less exposure produces a range that won't include the deepest blue.

i looked at the stouffer site. which step tablet do i want? i might as well get one for C type, VDB, and kallitype while i am there.

thanks for the help.

eddie

I think the thin strip is T2115. It has 21 steps and increases in 1/2 stops. In other words, 2 steps equal 1 stop. Each step value is approximately .15 density units.

The step wedges also come in 1/3 stop per step varieties where each step is .10 density units. Either will work with the processes listed, but the 21-step tablets are more common. Uncalibrated tablets are fine and much less expensive than calibrated ones.
 
Photrio.com contains affiliate links to products. We may receive a commission for purchases made through these links.
To read our full affiliate disclosure statement please click Here.

PHOTRIO PARTNERS EQUALLY FUNDING OUR COMMUNITY:


Ilford ADOX Freestyle Photographic Stearman Press Weldon Color Lab Blue Moon Camera & Machine
Top Bottom