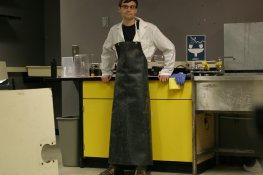
cpeterson
Member
Greetings all,
I've been so busy with school that I've not had any time to do more than lurk on APUG, but I've got some free time this Sunday morning.
I spent the majority of yesterday in the darkroom making the "simple photographic emulsion" as it appears on UnblinkingEye.com's front page, which I've heard is either an adaptation of or is practically the same thing as Kodak's publication AJ-12. The characteristics of this emulsion are its low speed, blue sensitivity, medium contrast, and simple formula, which consists of only four ingredients, or five if you include water.
I started at about noon, took a break at 2:30 to allow the emulsion to set, came back at 5:30, and was out the door just after 8:00 PM. So while it took about five hours of lab work, I was basically tied up for the whole day. I figured it would take this long, but I hadn't counted on some of the steps being so stubborn. Who knew dissolving gelatin could take 20 minutes of stirring? But I'm getting ahead of myself.
Here are my notes from the process, alongside a summary of the steps.
I made a half-batch. I had pre-measured my chems into ziploc baggies a few days prior, which I then cut open when it was time to pour. Instead of working with granular potassium iodide, I used a 5% solution. My gelatin was from the Photographer's Formulary, with a BI of 250. Also, there's a distillery on campus from which I filled three large water jugs with 27 liters of DI water, which was just a little more than enough. ALL my water, save for that in the water bath, came from this supply.
I could not find any cheesecloth. Where does one buy cheesecloth? (And why would anybody make their own cheese in these modern times!?) Instead, after some deliberation, I went to the hardware store and got some fiberglass window screen, which smelled like vinyl. Concerned about contaminants, I washed the material in several changes of hot water until the vinyl smell went away, then gave it a final rinse in distilled water.
Lastly, I'm not a chem student, I just pretend to be one on the weekends, so my amateur technique might induce cringes to those of you who know what you are doing. Feel free to suggest refinements, I'll take all the help I can get!
Steps:
1. Dissolve initial gelatin in warm distilled water.
Took forever, even as I warmed the beaker and water bath apparatus, a glass pyrex bowl.
2. Add KBr and KI to gelatin solution and stir until dissolved.
Simple. Since I was working with a 5% solution of KI I accounted for this extra volume (8ml) when I measured out the initial distilled water for step 1.
3. Heat the solution to 130F / 55C and hold it there.
Okay.
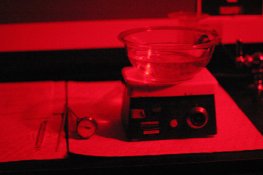
4. Lights out.
Okay.
5. Make a solution of silver nitrate.
Sure.
6. Add silver nitrate solution to gelatin mixture, slowly.
This is the most dramatic step. The whole solution turns white and opaque, not unlike coconut milk. I added ~10ml every 30 seconds for 10 minutes, stirring constantly. Note to self: next time, ask for a hot plate with magnetic stirring device.
Question: the silver nitrate solution was at 16 degrees celsius, while the gelatin mixture was at 55. Even as slowly as I did this step, the temperature of the resulting mixture dropped with every pour cycle and the final product had to be brought back up to temperature before I could proceed with step 7. Should step 5b be, "bring solution of silver nitrate up to temperature?"
7. Ripen the mixture - hold it at 130F / 55C for 10 minutes, then allow to slowly cool to 104F / 40C.
Difficult, even with a fairly adjustable hot plate. My impatience here caused the temperature to swing more than I would have liked, all the way to 58 degrees celsius before I pulled the beaker out of the bath to prevent it from overheating. I'm aware that the temperature at this step is crucial, so I'm a little bummed about this.
8. Swell additional gelatin.
Wasn't sure how much water to swell the gelatin with, so I put 20 grams at the bottom of a 300ml graduate and filled it with water.
At this point, while the emulsion cooled and gelatin swelled, I took a break for a quick bite to eat. When I returned about a half hour later, the gelatin filled almost the entire graduate. My silver halide mixture was almost exactly 104 degrees.
9. Combine solutions (emulsification), mix thoroughly, allow to set for 2-4 hours.
Okay, so I poured the excess water out from the newly swollen gelatin and dumped it into my "reaction vessel," which I then stirred for awhile. I put the water bath back on the burner to help dissolve the new gelatin. When it seemed the mixture was homogeneous, I pulled the beaker out of the water bath and put it in a lightproof cabinet to set.
The time was about 2:30.
Trying to visualize the next few steps I became concerned that my water wouldn't be cool enough to do the wash step properly. I took two jugs of water home with me and let them sit in the fridge for three hours while I did stuff around the house.
I returned at 5:30.
The emulsion had set, it shook around like white jell-o.
10. Strain the emulsion through cheesecloth.
This is where things started to get very dicey indeed. I put my freshly rinsed screen material over a plastic 1-gallon beaker and tried to dump the emulsion into it. It wouldn't come out, it was stuck in the beaker. Hmm.
Plan "A" was to get the water bath hot and put the emulsion beaker in it just long enough to melt it free. I put the burner on "HI" and put the water bath on top.
Abruptly, the pyrex bowl cracked in half.
Ha ha! I thought. Funny joke! But it really was leaking, the water was seeping through the crack and hissing on the burner. Quick, time for a plan B.
Plan B: rinse a thermometer in distilled water, then use it to separate the emulsion from the sides of the beaker. This actually worked, the emulsion broke free and I gathered up the screen and squeezed the lump into the beaker.
What has been described as the "spaghetti" stage would have been more aptly described as the "ricotta cheese" stage, in this instance.
11. Leech out excess silver salts by pouring three liters of cold water onto the emulsion. Allow it to sit and settle for 2.5 minutes, then pour off 2 liters of water and add 2 more.
Okay.
12. Repeat this five times.
Okay. Did it six times, for good measure.
13. Melt and after-ripen, heat to 130F / 55C and hold for 15 minutes.
There's an important step missing between 12 and 13. Once you've spaghettified the emulsion and dumped water on it, the sludge doubles in size, even after you've poured off as much excess water as possible. What had been about 550 ml of emulsion had turned into 1 full liter. The missing step is to re-strain the emulsion to get the excess water out of it. I did this, then put it back into the beaker by squeezing it through my screen material. This was wasteful and represented yet another risk of contamination, but I had little choice.
At this point I left the room to get a stainless steel bowl to replace my ruined pyrex.
For the final melt and after-ripen, I was much more cautious with the temperature, and melted it slowly. I managed to hold it at temp for 15 minutes, with good accuracy. I saved the final product in a black bottle and put it into a light-proof bag for good measure.
----
I haven't had time to test the emulsion yet but I feel fairly confident that none of my mishaps were drastic enough to ruin it. Today I'll see about getting an ersatz plate holder working (I'm trying to make one from an old graflex film pack magazine). With any luck, I should be shooting plates by the end of next week. If that doesn't work, well, I can always coat paper negatives...
Please send me your suggestions, comments, or questions.
--Conor Peterson
I've been so busy with school that I've not had any time to do more than lurk on APUG, but I've got some free time this Sunday morning.
I spent the majority of yesterday in the darkroom making the "simple photographic emulsion" as it appears on UnblinkingEye.com's front page, which I've heard is either an adaptation of or is practically the same thing as Kodak's publication AJ-12. The characteristics of this emulsion are its low speed, blue sensitivity, medium contrast, and simple formula, which consists of only four ingredients, or five if you include water.
I started at about noon, took a break at 2:30 to allow the emulsion to set, came back at 5:30, and was out the door just after 8:00 PM. So while it took about five hours of lab work, I was basically tied up for the whole day. I figured it would take this long, but I hadn't counted on some of the steps being so stubborn. Who knew dissolving gelatin could take 20 minutes of stirring? But I'm getting ahead of myself.
Here are my notes from the process, alongside a summary of the steps.
I made a half-batch. I had pre-measured my chems into ziploc baggies a few days prior, which I then cut open when it was time to pour. Instead of working with granular potassium iodide, I used a 5% solution. My gelatin was from the Photographer's Formulary, with a BI of 250. Also, there's a distillery on campus from which I filled three large water jugs with 27 liters of DI water, which was just a little more than enough. ALL my water, save for that in the water bath, came from this supply.
I could not find any cheesecloth. Where does one buy cheesecloth? (And why would anybody make their own cheese in these modern times!?) Instead, after some deliberation, I went to the hardware store and got some fiberglass window screen, which smelled like vinyl. Concerned about contaminants, I washed the material in several changes of hot water until the vinyl smell went away, then gave it a final rinse in distilled water.
Lastly, I'm not a chem student, I just pretend to be one on the weekends, so my amateur technique might induce cringes to those of you who know what you are doing. Feel free to suggest refinements, I'll take all the help I can get!
Steps:
1. Dissolve initial gelatin in warm distilled water.
Took forever, even as I warmed the beaker and water bath apparatus, a glass pyrex bowl.
2. Add KBr and KI to gelatin solution and stir until dissolved.
Simple. Since I was working with a 5% solution of KI I accounted for this extra volume (8ml) when I measured out the initial distilled water for step 1.
3. Heat the solution to 130F / 55C and hold it there.
Okay.
4. Lights out.
Okay.
5. Make a solution of silver nitrate.
Sure.
6. Add silver nitrate solution to gelatin mixture, slowly.
This is the most dramatic step. The whole solution turns white and opaque, not unlike coconut milk. I added ~10ml every 30 seconds for 10 minutes, stirring constantly. Note to self: next time, ask for a hot plate with magnetic stirring device.
Question: the silver nitrate solution was at 16 degrees celsius, while the gelatin mixture was at 55. Even as slowly as I did this step, the temperature of the resulting mixture dropped with every pour cycle and the final product had to be brought back up to temperature before I could proceed with step 7. Should step 5b be, "bring solution of silver nitrate up to temperature?"
7. Ripen the mixture - hold it at 130F / 55C for 10 minutes, then allow to slowly cool to 104F / 40C.
Difficult, even with a fairly adjustable hot plate. My impatience here caused the temperature to swing more than I would have liked, all the way to 58 degrees celsius before I pulled the beaker out of the bath to prevent it from overheating. I'm aware that the temperature at this step is crucial, so I'm a little bummed about this.
8. Swell additional gelatin.
Wasn't sure how much water to swell the gelatin with, so I put 20 grams at the bottom of a 300ml graduate and filled it with water.
At this point, while the emulsion cooled and gelatin swelled, I took a break for a quick bite to eat. When I returned about a half hour later, the gelatin filled almost the entire graduate. My silver halide mixture was almost exactly 104 degrees.
9. Combine solutions (emulsification), mix thoroughly, allow to set for 2-4 hours.
Okay, so I poured the excess water out from the newly swollen gelatin and dumped it into my "reaction vessel," which I then stirred for awhile. I put the water bath back on the burner to help dissolve the new gelatin. When it seemed the mixture was homogeneous, I pulled the beaker out of the water bath and put it in a lightproof cabinet to set.
The time was about 2:30.
Trying to visualize the next few steps I became concerned that my water wouldn't be cool enough to do the wash step properly. I took two jugs of water home with me and let them sit in the fridge for three hours while I did stuff around the house.
I returned at 5:30.
The emulsion had set, it shook around like white jell-o.
10. Strain the emulsion through cheesecloth.
This is where things started to get very dicey indeed. I put my freshly rinsed screen material over a plastic 1-gallon beaker and tried to dump the emulsion into it. It wouldn't come out, it was stuck in the beaker. Hmm.
Plan "A" was to get the water bath hot and put the emulsion beaker in it just long enough to melt it free. I put the burner on "HI" and put the water bath on top.
Abruptly, the pyrex bowl cracked in half.
Ha ha! I thought. Funny joke! But it really was leaking, the water was seeping through the crack and hissing on the burner. Quick, time for a plan B.
Plan B: rinse a thermometer in distilled water, then use it to separate the emulsion from the sides of the beaker. This actually worked, the emulsion broke free and I gathered up the screen and squeezed the lump into the beaker.
What has been described as the "spaghetti" stage would have been more aptly described as the "ricotta cheese" stage, in this instance.
11. Leech out excess silver salts by pouring three liters of cold water onto the emulsion. Allow it to sit and settle for 2.5 minutes, then pour off 2 liters of water and add 2 more.
Okay.
12. Repeat this five times.
Okay. Did it six times, for good measure.
13. Melt and after-ripen, heat to 130F / 55C and hold for 15 minutes.
There's an important step missing between 12 and 13. Once you've spaghettified the emulsion and dumped water on it, the sludge doubles in size, even after you've poured off as much excess water as possible. What had been about 550 ml of emulsion had turned into 1 full liter. The missing step is to re-strain the emulsion to get the excess water out of it. I did this, then put it back into the beaker by squeezing it through my screen material. This was wasteful and represented yet another risk of contamination, but I had little choice.
At this point I left the room to get a stainless steel bowl to replace my ruined pyrex.
For the final melt and after-ripen, I was much more cautious with the temperature, and melted it slowly. I managed to hold it at temp for 15 minutes, with good accuracy. I saved the final product in a black bottle and put it into a light-proof bag for good measure.
----
I haven't had time to test the emulsion yet but I feel fairly confident that none of my mishaps were drastic enough to ruin it. Today I'll see about getting an ersatz plate holder working (I'm trying to make one from an old graflex film pack magazine). With any luck, I should be shooting plates by the end of next week. If that doesn't work, well, I can always coat paper negatives...
Please send me your suggestions, comments, or questions.
--Conor Peterson