Robin Guymer
Member
I eBay purchased an old beat up F2 for less than a carton of beer. It was jammed, the Finder dismantled, shutter crinkled, rusty, dusty, no power to the finder - basically a basket case. So a good project to see if I could get it working again, which I did and successfully. Unable to find much info on the Net beforehand, I have documented how I went about this and what repairs I undertook so that other DIY camera collectors will see that this is not such a daunting job. My hope is that other collectors will contribute, suggest, guide and correct, so that these fantastic old cameras can keep on keeping on long after the few remaining experienced service people have closed shop.
I will add some more to this thread as there is the DP-1 Finder to put back together and the advance lever to extend a new end onto. Looking forward to reading future contributions from other APUG members.
Robin.

Nikon F2 Front End Removal & Reinstall
Check the photos as they have information written on them as well.
Top Plate Removal - Only the Film Advance Side required
A/ Remove the DP- Finder
B/ On the film advance side carefully pull back the leatherette till the first 2 screws can be accessed. I use a partially blunt craft knife to carefully cut away the glue. On the rewind side completely remove the leatherette.

C/ Remove the 4 screws on the Lens Mount cover and lift off.
D/ Remove the top circular cover on the film advance lever by placing a piece of soft rubber on it, then holding the lever against the camera, press down hard on the lever circle at the same time turning anti clockwise. The small round cover should now spin off. My black F2 has 2 pin holes for a lens tool but the silver one does not so the method above does work.
Remove the 4 screws then the round plate. Use a small tool to push the round lock nut anti clockwise. If you press down on the camera body at the same time this may reduce the friction and help to spin it off.
E/ Down inside the shutter button is another circular nut. Either use very thin pointy pliers or like a single prong dentist pick to spin the nut anti clockwise. Lift out the nut & spring and lift off the shutter lock dial and the half cone under it.
F/ Three very small fine screws hold the speed dial in place. Careful to use a good fitting screw driver and unscrew them but only enough so the speed dial lifts off.
G/ Remove the single rear screw on the cover plate and it can be carefully prised off.

Front End & Mirror Box Removal
A/ Lift up the foam at the back of the Mirror Box and remove the two screws.
B/ Remove two screws under the leatherette on the film advance side and the single screw on the rewind side.
C/ Remove four screws around the lens mount.
D/ With some careful prising the front end and Mirror box should be carefully pulled out of the camera body. Take note of the levers that lock into each other on the advance side of the mirror box and camera body.
There are only two screws on top that attach the Mirror Box to the Front end lens mount.


Reinstalling the Front into the Camera Body
A/ Attach the Mirror Box to the Front lens mount with the two screws.
B/ Check the boomerang lever on the Timer is set in the middle position.
C/ Check the connecting lever just below the speed dial is out and parallel forward so it can accept the corresponding lever on the Mirror Box which needs to slip between it and the body.
D/ Ease the Front onto the camera body. It may need a jiggle but it should drop into place.
E/ Replace a few screws. Then temporarily attach the film advance lever so you can crank a few advances and fire off the shutter. Test it with different speeds by turning the speed dial. Also test the Timer is working.
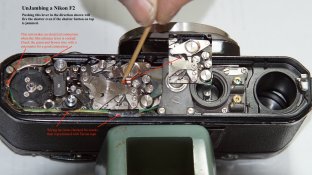
F/ If the camera jams it means a lever somewhere was not in the right position. Remove the bottom panel and trip the shutter with a toothpick on the lever shown in the photo. Then check that all the levers in the camera body and on the side of the Mirror Box are moving freely. Realign them and try installing again. It may take a couple of goes but it will drop into place when all the levers are lined up. After all someone on the production line could do this first time every time back in ’72.


Repairs I Undertook whilst apart
Wiring Short Circuit
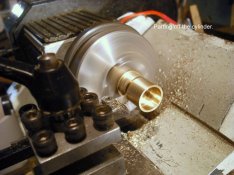
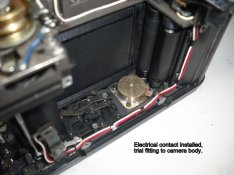
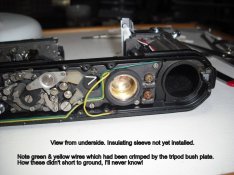
There was a short at the terminals for the Finder but the micrometer showed clean power at all the terminals on the bottom. I pulled the wires from the camera body and checked for cracks and shorts to the body. I cleaned all the terminals and checked for a clean connection. The underneath terminal of the battery compartment was broken and floating around. This was glued in place and some Tarzan tape placed over to help strengthen it.
I eventually found that the connector under the finder connection on the rewind side was touching the Mirror Box. Adjusting this fixed the short circuit and I had a clean 3v getting through to the Finder.

Dampener on Mirror Shock Absorber
On the rewind side of the Mirror Box there is a shock absorber spring. From the marks left it looked like there used to be a foam pad under the spring. I fitted a piece of light seal foam and this made a big difference to the metallic ping sound when the camera was fired.

C L A
Forget the Adjust part (I know not what I do) but the Clean and Lube was essential to getting this old camera working again. Using toothpicks, cotton buds and various condiments I cleaned up the moving parts and then Lubed them with droplets of the old Singer Sewing Machine oil from the toothpick.
Shutter Curtain Slider
At the back of the Mirror Box are two strips of felt that sit against the top and bottom of the shutter curtain. The top felt was damaged and this had caused the shutter curtain to snag it and then crinkle (by previous owner). I removed the bad felt and replaced it with new.
Timer
Of course this was not working. Made the mistake of spraying it with Dry PTFE. This did get it running freely but it would not lock in position. Then made the mistake of trying to bend the small levers into the right position to get it to work. Took me a few hours to get the lever back into the original position. Finally figured out how it all worked under a magnifier. The locking bar does not like any lubricant as it maybe grabs the shaft by friction. So a few drops of lighter fluid got rid of any oil and the small lever started to grab the shaft and lock it in position. Lets call this the friction bar and this grabs the shaft in the first instance as the external arm is in the red line zone. Then other locks seem to work with this to catch the timer at the 2 to 10 second intervals.
It pays to check you have the timer working perfectly before putting the camera back together and check it in different camera positions like vertical and inverted etc as gravity can let it work one way but not work another if the friction lock is a bit iffy.


Light Seals & Bumpers & Clean
The rear door light seals were removed - well there was only the remnant dust actually. Replaced with new. The upper mirror bumper and side foams were replaced. The mirror came up like new using a digital APS-C sensor swab and carefully picking out the dust spots under a magnifier brought the split prism glass into quite an acceptable state.
Final Result
Back together with the leatherette glued back on, the old black beast still looks pretty rough (I’ll keep it that way as it shows it’s got some history) but mechanically it now feels better than the collectable silver one. A film test to follow to see how the shutter speeds are holding up but they all seem pretty good. It has been a fun project with a great outcome. Hope you’ve gained some insight and use it to kick an old F2 back into life. Enjoy.
I will add some more to this thread as there is the DP-1 Finder to put back together and the advance lever to extend a new end onto. Looking forward to reading future contributions from other APUG members.
Robin.
Nikon F2 Front End Removal & Reinstall
Check the photos as they have information written on them as well.
Top Plate Removal - Only the Film Advance Side required
A/ Remove the DP- Finder
B/ On the film advance side carefully pull back the leatherette till the first 2 screws can be accessed. I use a partially blunt craft knife to carefully cut away the glue. On the rewind side completely remove the leatherette.
C/ Remove the 4 screws on the Lens Mount cover and lift off.
D/ Remove the top circular cover on the film advance lever by placing a piece of soft rubber on it, then holding the lever against the camera, press down hard on the lever circle at the same time turning anti clockwise. The small round cover should now spin off. My black F2 has 2 pin holes for a lens tool but the silver one does not so the method above does work.
Remove the 4 screws then the round plate. Use a small tool to push the round lock nut anti clockwise. If you press down on the camera body at the same time this may reduce the friction and help to spin it off.
E/ Down inside the shutter button is another circular nut. Either use very thin pointy pliers or like a single prong dentist pick to spin the nut anti clockwise. Lift out the nut & spring and lift off the shutter lock dial and the half cone under it.
F/ Three very small fine screws hold the speed dial in place. Careful to use a good fitting screw driver and unscrew them but only enough so the speed dial lifts off.
G/ Remove the single rear screw on the cover plate and it can be carefully prised off.
Front End & Mirror Box Removal
A/ Lift up the foam at the back of the Mirror Box and remove the two screws.
B/ Remove two screws under the leatherette on the film advance side and the single screw on the rewind side.
C/ Remove four screws around the lens mount.
D/ With some careful prising the front end and Mirror box should be carefully pulled out of the camera body. Take note of the levers that lock into each other on the advance side of the mirror box and camera body.
There are only two screws on top that attach the Mirror Box to the Front end lens mount.
Reinstalling the Front into the Camera Body
A/ Attach the Mirror Box to the Front lens mount with the two screws.
B/ Check the boomerang lever on the Timer is set in the middle position.
C/ Check the connecting lever just below the speed dial is out and parallel forward so it can accept the corresponding lever on the Mirror Box which needs to slip between it and the body.
D/ Ease the Front onto the camera body. It may need a jiggle but it should drop into place.
E/ Replace a few screws. Then temporarily attach the film advance lever so you can crank a few advances and fire off the shutter. Test it with different speeds by turning the speed dial. Also test the Timer is working.
F/ If the camera jams it means a lever somewhere was not in the right position. Remove the bottom panel and trip the shutter with a toothpick on the lever shown in the photo. Then check that all the levers in the camera body and on the side of the Mirror Box are moving freely. Realign them and try installing again. It may take a couple of goes but it will drop into place when all the levers are lined up. After all someone on the production line could do this first time every time back in ’72.
Repairs I Undertook whilst apart
Wiring Short Circuit
There was a short at the terminals for the Finder but the micrometer showed clean power at all the terminals on the bottom. I pulled the wires from the camera body and checked for cracks and shorts to the body. I cleaned all the terminals and checked for a clean connection. The underneath terminal of the battery compartment was broken and floating around. This was glued in place and some Tarzan tape placed over to help strengthen it.
I eventually found that the connector under the finder connection on the rewind side was touching the Mirror Box. Adjusting this fixed the short circuit and I had a clean 3v getting through to the Finder.
Dampener on Mirror Shock Absorber
On the rewind side of the Mirror Box there is a shock absorber spring. From the marks left it looked like there used to be a foam pad under the spring. I fitted a piece of light seal foam and this made a big difference to the metallic ping sound when the camera was fired.
C L A
Forget the Adjust part (I know not what I do) but the Clean and Lube was essential to getting this old camera working again. Using toothpicks, cotton buds and various condiments I cleaned up the moving parts and then Lubed them with droplets of the old Singer Sewing Machine oil from the toothpick.
Shutter Curtain Slider
At the back of the Mirror Box are two strips of felt that sit against the top and bottom of the shutter curtain. The top felt was damaged and this had caused the shutter curtain to snag it and then crinkle (by previous owner). I removed the bad felt and replaced it with new.
Timer
Of course this was not working. Made the mistake of spraying it with Dry PTFE. This did get it running freely but it would not lock in position. Then made the mistake of trying to bend the small levers into the right position to get it to work. Took me a few hours to get the lever back into the original position. Finally figured out how it all worked under a magnifier. The locking bar does not like any lubricant as it maybe grabs the shaft by friction. So a few drops of lighter fluid got rid of any oil and the small lever started to grab the shaft and lock it in position. Lets call this the friction bar and this grabs the shaft in the first instance as the external arm is in the red line zone. Then other locks seem to work with this to catch the timer at the 2 to 10 second intervals.
It pays to check you have the timer working perfectly before putting the camera back together and check it in different camera positions like vertical and inverted etc as gravity can let it work one way but not work another if the friction lock is a bit iffy.
Light Seals & Bumpers & Clean
The rear door light seals were removed - well there was only the remnant dust actually. Replaced with new. The upper mirror bumper and side foams were replaced. The mirror came up like new using a digital APS-C sensor swab and carefully picking out the dust spots under a magnifier brought the split prism glass into quite an acceptable state.
Final Result
Back together with the leatherette glued back on, the old black beast still looks pretty rough (I’ll keep it that way as it shows it’s got some history) but mechanically it now feels better than the collectable silver one. A film test to follow to see how the shutter speeds are holding up but they all seem pretty good. It has been a fun project with a great outcome. Hope you’ve gained some insight and use it to kick an old F2 back into life. Enjoy.