Thanks for the replies
An Old Style of Printing with a twist for young and old printers.
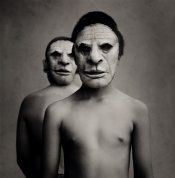
I want to point out how this image is made as I believe this is an example of old school portrait burn that every young printer should know how to make.. All custom labs in NA for Weddings and Portaits had at least one printer on board who knows how to make this print, at least in colour , using an enlarger.
It dosen't get much more basic than this one.
Do not let my split print technique be considered the style of print.. as split printing is just a way for me to print silver.
There is a little trick at the end that works well with this type of print.
The STYLE IS HOW YOU USE dodging and burning with your hands and a simple dodging tool and burning hole ... ducks ass and ducks bill is the secret and using your hands with a dodging tool to hold back areas.
so lets start.
Step one- establish a good filter to give great skin tone and expose for this tone.
Step two - burn the bottom with ducks ass, a bit wider burn think about Freddy Mercury and his song fat bottom girls, this may help. Do this for one complete stop or one hit of the timer.
Step three - burn the top with ducks bill, cup your hand narrower and come in really close to the bodies and then move away,> Do this for one complete stop or one hit of the timer.
Step four- with burning card burn in skin or any hot spot on bodies, not the boys masks masks. one complete hit of the timer
Step five- Change filters to grade 5> give one complete hit of the timer.
Step six- with burning card burn in masks, one complete hit of timer for both masks
Here is the trick to bring attention to the bodies.
Grade 5 hit the timer and use your hands to dodge as much of the background and not touch the body, this will give a complete natural bump to the middle area where you want attention. This allows the background from not going too dark as the first lower filter defined the density.
Also for all new printers... did you notice I did not once change the apeture,or touch the timer dials.
I call this Percentage Burning- I am not sure if any other printer works this way but I will say this... not changing the timer, using different filters, using your hands for dodging and burning is the only way to make this work well.
All my enlarger printing is done this way now and I would never consider touching the enlarger time dials during a print cycle ever again.
I also do not use test strips as I find them and enourmous waste of time and energy.
I cut my teeth for 5 years with this STYLE of print printing wedding portraits.
This is an adaptation of the old newspaper style of burning the corners and edges to center ones eye to the area of attention.