Newbie pinhole / 4x5 tray development issue

Thirsty

D
Thirsty

  • 0
  • 0
  • 382
Cowboying up in Kiowa.

Cowboying up in Kiowa.

  • 2
  • 0
  • 481
Cowboying up in Kiowa.

Cowboying up in Kiowa.

  • 3
  • 1
  • 472
Cowboying up in Kiowa.

Cowboying up in Kiowa.

  • 1
  • 0
  • 461
Cowboying up in Kiowa.

Cowboying up in Kiowa.

  • 1
  • 0
  • 470

Forum statistics

Threads
199,380
Messages
2,790,601
Members
99,888
Latest member
MainCharacter
Recent bookmarks
0

jimlindstrom

Member
Joined
Jan 20, 2025
Messages
5
Location
Chicago, IL
Format
Digital
Hi - I'm an avid digital photographer dipping my toes into film (shooting and development). I made a pair of simple pinhole cameras. I'm shooting Ilford FP4+ 4x5 B/W. I'm trying to develop them at home in trays, using the shuffle method.

After 4 pairs of shots, one camera seems like a lost cause, but with the other I can consistently get a BARELY-detectable hint of an image and lots of weird development artifacts. With each pair of shots, I have learned and fixed a few prior mistakes, but I'm still nowhere close to a recognizable negative of my scene. (E.g., I initially wasn't controlling the temp well enough, I don't think I was agitating enough, I didn't expose even close to the right time, etc.)

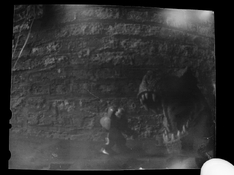
Can anyone diagnose what I'm doing wrong from this last negative? Here's the developed sheet, held against a lightbox (my thumb in bottom right), snapped with iPhone:

IMG_5430.jpeg


I am using Ilford DD-X to develop, and stop and rapid fix. (No pre-wash.) I did 12:00 of development for two sheets, emulsion side up. First half shuffling continuously, swapping sheets every ~5 seconds slowing down to every ~10 seconds. In the second half, I swapped sheets every 30 seconds. I shuffled bottom to top and attempted to very gently place the new top sheet down without much pressure. I rotated 90 degrees periodically. My bath is pretty shallow, JUST barely covering the stack. I temp controlled, starting about 21.0C and dropping to 19.0C throughout. (My basement is cold.)

The "camera" I built holds the 4x5 in place with some strips of cardboard, and you can see on the bottom and right of this frame, the white areas are where that cardboard masked the image slightly. (Yes, it was loaded crooked.) The top left faint gray rectangle is where the film saw light and was exposed, though I see no trace of the image there that I hoped to register.

Here's an overhead shot of my setup. The camera on the right in this image is the one you're seeing the negative from. (It's fairly dark, as you can see, but not yet "night photography" conditions. This exposure was for 10 minutes.)

IMG_5424.jpeg
 

koraks

Moderator
Moderator
Joined
Nov 29, 2018
Messages
23,716
Location
Europe
Format
Multi Format
Hi, welcome to Photrio @jimlindstrom !

Are you sure the film isn't being exposed to any other light besides the light in the pinhole camera itself? You're not using some kind of 'safelight' for film loading and processing, correct? To be clear: there's no safelight for panchromatic film.

The artefacts your film sheet shows don't ring a bell with me; it's not a problem I've come across so far.
In any case, I'd start by processing just ONE sheet at a time if you're doing tray development.
 

awty

Subscriber
Joined
Jul 24, 2016
Messages
3,661
Location
Australia
Format
Multi Format
What's the distance from lens to film plain?
What size is the lens hole?
There are calculations to get the correct lens hole to focal plain for film coverage and angle.
Then you need to calculate exposure times.

Try photographing something further away, like a house In full sun.
 
Last edited:
OP
OP
jimlindstrom

jimlindstrom

Member
Joined
Jan 20, 2025
Messages
5
Location
Chicago, IL
Format
Digital
Okay, total rookie mistake. Thank you for your patience and trying to offer suggestions!

I don't know what happened in processing that sheet, but the bigger issue is ... drum roll ... I loaded the film backwards! (for 5 consecutive pairs of shots!) I fell victim to thinking "notch in the upper right" meant "when holding the sheet in landscape mode (so on the top of the right), rather than portrait (on the right of the top)."

Here's the latest shot (digitally inverted and stretched for increased contrast). Still some things to work on, but the first shot I've gotten where there's actually an image visible to the naked eye.

(I may be back for some finer points of development now that I have something working. But this feels like success, after a few hours of work with nothing to show for it until now!)
 

Attachments

  • IMG_5437_small.jpeg
    IMG_5437_small.jpeg
    215 KB · Views: 28
Joined
Jan 28, 2023
Messages
1,269
Location
Wilammette Valley, Oregon
Format
35mm RF
Okay, total rookie mistake. Thank you for your patience and trying to offer suggestions!

I don't know what happened in processing that sheet, but the bigger issue is ... drum roll ... I loaded the film backwards! (for 5 consecutive pairs of shots!) I fell victim to thinking "notch in the upper right" meant "when holding the sheet in landscape mode (so on the top of the right), rather than portrait (on the right of the top)."

Here's the latest shot (digitally inverted and stretched for increased contrast). Still some things to work on, but the first shot I've gotten where there's actually an image visible to the naked eye.

(I may be back for some finer points of development now that I have something working. But this feels like success, after a few hours of work with nothing to show for it until now!)

That's progress, for sure.
Do you use an iPhone? There's a fantastic iOS app for pinhole photography called Pinhole Assist. It works as a light meter, exposure calculator, and even a countdown time. I've been using it for a decade and wouldn't think about making a pinhole photo without it!
 
OP
OP
jimlindstrom

jimlindstrom

Member
Joined
Jan 20, 2025
Messages
5
Location
Chicago, IL
Format
Digital
Well, that's an easy fix!
The marks on the first sheet you showed us are still odd though. Did you find an explanation for those?
View attachment 388517
Not sure! Here are my hypotheses:

1. In that camera the film is held in a little pocket, where the back of the film (and the sides/bottom of the front) slides against the pocket when I push it into the slot. Since I was loading the film backwards, maybe I smudged the emulsion in some way?
2. That camera is subject to light leaks, I don't think that's what happened here, but it's a constant struggle.
3. I thought I was developing emulsion-up, so I wasn't especially precious with the side of the film (the emulsion) facing down. Maybe I rubbed/scraped it on the bottom of my tray?
4. In retrospect, I think when I shuffled my two slides, I had been removing and inserting in a way that was possibly too vigorous/sudden and might have been causing turbulence/eddies?
 
OP
OP
jimlindstrom

jimlindstrom

Member
Joined
Jan 20, 2025
Messages
5
Location
Chicago, IL
Format
Digital
That's progress, for sure.
Do you use an iPhone? There's a fantastic iOS app for pinhole photography called Pinhole Assist. It works as a light meter, exposure calculator, and even a countdown time. I've been using it for a decade and wouldn't think about making a pinhole photo without it!

I do use an iPhone. I had tried out the "Ligtme" app, for this same purpose, but I found it unreliable. (It was quoting me multi-hour exposures for what I now know I can do in 5-15 mins.) I'll check out this one you recommend. Thanks!
 
Joined
Jan 28, 2023
Messages
1,269
Location
Wilammette Valley, Oregon
Format
35mm RF
I do use an iPhone. I had tried out the "Ligtme" app, for this same purpose, but I found it unreliable. (It was quoting me multi-hour exposures for what I now know I can do in 5-15 mins.) I'll check out this one you recommend. Thanks!

if you are working with an indoor tabletop setup like what you showed us a few posts back, using only a couple of lamps for lighting, it's entirely within reason to expect the exposure to be in hours, not minutes.
 

koraks

Moderator
Moderator
Joined
Nov 29, 2018
Messages
23,716
Location
Europe
Format
Multi Format
Not sure! Here are my hypotheses:

1. In that camera the film is held in a little pocket, where the back of the film (and the sides/bottom of the front) slides against the pocket when I push it into the slot. Since I was loading the film backwards, maybe I smudged the emulsion in some way?
2. That camera is subject to light leaks, I don't think that's what happened here, but it's a constant struggle.
3. I thought I was developing emulsion-up, so I wasn't especially precious with the side of the film (the emulsion) facing down. Maybe I rubbed/scraped it on the bottom of my tray?
4. In retrospect, I think when I shuffled my two slides, I had been removing and inserting in a way that was possibly too vigorous/sudden and might have been causing turbulence/eddies?

OK, good thinking, quite systematic, but none of that sounds like a very plausible cause of the surprisingly geometric shapes you ended up with. Anyway, for now, I'd just forget about it unless it pops up again at a later stage!
 
Photrio.com contains affiliate links to products. We may receive a commission for purchases made through these links.
To read our full affiliate disclosure statement please click Here.

PHOTRIO PARTNERS EQUALLY FUNDING OUR COMMUNITY:


Ilford ADOX Freestyle Photographic Stearman Press Weldon Color Lab Blue Moon Camera & Machine
Top Bottom