New to the Forum, have a frustrating issue in the darkroom today...any help is great!

A window to art

D
A window to art

  • 0
  • 0
  • 12
Bushland Stairway

Bushland Stairway

  • 4
  • 1
  • 60
Rouse st

A
Rouse st

  • 6
  • 3
  • 101
Do-Over Decor

A
Do-Over Decor

  • 1
  • 1
  • 113

Recent Classifieds

Forum statistics

Threads
199,236
Messages
2,788,364
Members
99,840
Latest member
roshanm
Recent bookmarks
1
Joined
Jul 22, 2015
Messages
13
Format
Medium Format
So I've been basement developing/printing for about a year now (and lurking in the shadows at apug for tips and tricks) and this is the first time I've ever had this issue, considering I have a fairly cheap Omega B600 condenser enlarger.
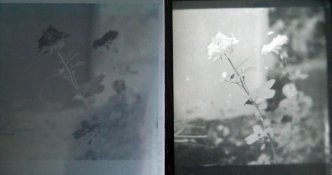
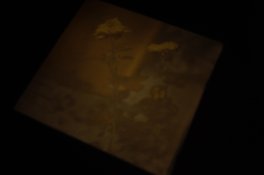
I'm trying to print 120mm negatives and keep getting the positive shown on the easel. It's frustrating. 35mm film negs show up fine as does an older roll of 120mm I'd shot a few months ago. The only thing I've done differently is developed with Rodinal. I've never used it before, so I couldn't decide if there's something in Rodinal that could be reflecting the light somehow? (I know that sounds like a stretch, but when the enlarger appears in working order, I had to factor in anything new to my process.)

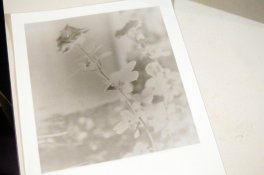
The film is PanF+, and the negs look fantastic, but I just can't get them to print correctly. Has anyone ever had this issue?

Any advice would be great, seeing how it's my first of 3 consecutive days off work and all I had planned was to make prints :smile:

Thanks, and hopefully this post will also get me out of the shadows and participating with film discussions here more!
 

Trask

Subscriber
Joined
Oct 23, 2005
Messages
1,930
Location
Virginia (northern)
Format
35mm RF
Just to clarify what you mean when you say you "keep getting the positive shown on the easel." Does that mean rather than seeing a negative image, where the shadows are light and the highlights are dark, you're seeing the image as if it were a finished b/w print, with dark shadows and bright highlights?
 
OP
OP
Joined
Jul 22, 2015
Messages
13
Format
Medium Format
Exactly right. So somehow the negative is being reversed and shown as a positive when I lay my easel and paper down, resulting in the exact opposite of what it should be doing. (It's strange to try to explain, I'm sorry) :/
 

Trask

Subscriber
Joined
Oct 23, 2005
Messages
1,930
Location
Virginia (northern)
Format
35mm RF
Perhaps it was somehow solarized if it wasn't fixed properly, i.e., if you fixer was weaker than you think, then the film was exposed to light. Or was somehow put through an inadvertent reversal process. I'm sure others who solarize or reverse on purpose will have additional thoughts.
 
OP
OP
Joined
Jul 22, 2015
Messages
13
Format
Medium Format
Would the negative show that? The negative looks like a normal negative. I'll have to mix up a new fix to make sure next time.
 

removed account4

Subscriber
Joined
Jun 21, 2003
Messages
29,832
Format
Hybrid
sorry to ask you to do this
but could you put your negatives under a piece of glass
and white paper ( in room light ) ...
and make a cellphone or quick snapshot of them ?
and ... have you made a contact sheet of your negatives ?
if so, how did they look ? ( reversed? )

i have a long run of under exposed/processed thin film
that if you tilt it to the side it looks positive .. never seen
negatives that project as a positive before !

thanks !
john
 

Rick A

Subscriber
Joined
Mar 31, 2009
Messages
9,956
Location
Laurel Highlands
Format
8x10 Format
Perhaps it was somehow solarized if it wasn't fixed properly, i.e., if you fixer was weaker than you think, then the film was exposed to light. Or was somehow put through an inadvertent reversal process. I'm sure others who solarize or reverse on purpose will have additional thoughts.

I'm thinking the same thing. Somebody must have either opened the tank before fixing or incomplete fixing and exposure to daylight.
 
OP
OP
Joined
Jul 22, 2015
Messages
13
Format
Medium Format
attachment.php

This might not be big enough to tell...The negative on the left (my reflection off the glass in the middle--sorry) and the contact print on the right. I guess if it were an exhausted fix, would I be able to tell in the negative? To me the negs look normal, though this one isn't great, I thought with the whiteness of the flower, I could at least be able to compare the negative to the positive of the contact print.

--After my darkroom session earlier, I dumped the fix just in case. Will make a new one next chance I get to develop.
Thanks everyone for the input. Just a rather bizarre moment I had. :smile:
 

Attachments

  • Negative.jpg
    Negative.jpg
    396.2 KB · Views: 289
OP
OP
Joined
Jul 22, 2015
Messages
13
Format
Medium Format
Ah, and the lovely smudges of chems on the glass as well, just near the flower. I become a bit of a mess when darkrooming...
 

Rick A

Subscriber
Joined
Mar 31, 2009
Messages
9,956
Location
Laurel Highlands
Format
8x10 Format
attachment.php

This might not be big enough to tell...The negative on the left (my reflection off the glass in the middle--sorry) and the contact print on the right. I guess if it were an exhausted fix, would I be able to tell in the negative? To me the negs look normal, though this one isn't great, I thought with the whiteness of the flower, I could at least be able to compare the negative to the positive of the contact print.

--After my darkroom session earlier, I dumped the fix just in case. Will make a new one next chance I get to develop.
Thanks everyone for the input. Just a rather bizarre moment I had. :smile:

So..the photo on the left is the negative, and on the right is a print? If this is correct, you have no problem. The negative does appear to be a bit cloudy though. No offense intended here, but you need to clean up your act and develop some proper methods and good house keeping. I can't stress enough how important cleanliness and a solid method is when "darkrooming". The only place where I am "OCD" is my darkroom.
 
OP
OP
Joined
Jul 22, 2015
Messages
13
Format
Medium Format
The one on the right is from the contact print. When lying down on the sheet of paper, the negative is fine and creates a positive for the contact sheet. When the negative is placed in the negative holder and placed in my enlarger, the negative then creates a positive resulting in a negative full sized print. So, instead of having the negative image on my easel for the enlargement print, it shows the positive, allowing the light to expose opposite of what it should be doing for a regular print.
 
OP
OP
Joined
Jul 22, 2015
Messages
13
Format
Medium Format
For the record, my darkroom is quite clean. A bit of sarcasm and making light of an odd situation is my way of dealing with the frustration of it all... (though I can understand humor being lost via typing and not sensing a tone of one's voice) :smile:

Anyway, if anyone can sense a problem with the enlarger or maybe the film iteself, I'll definitely look into it. I've messed with this all morning and can't figure it out. *If the fixer is the reason, I'll be able to tell the next time I develop film.

Thanks again everyone!
 

mooseontheloose

Moderator
Joined
Sep 20, 2007
Messages
4,110
Location
Kyoto, Japan
Format
Multi Format
Hi Jillian,

I've never experienced the problem you are having, but do you have a scan of the "negative" print that you made? That might help us out in helping you out. Your neg looks like a neg so I don't think it's the fixer. In any event, it's an interesting riddle.

Oh, and welcome to APUG!
 

removed account4

Subscriber
Joined
Jun 21, 2003
Messages
29,832
Format
Hybrid
attachment.php

This might not be big enough to tell...The negative on the left (my reflection off the glass in the middle--sorry) and the contact print on the right. I guess if it were an exhausted fix, would I be able to tell in the negative? To me the negs look normal, though this one isn't great, I thought with the whiteness of the flower, I could at least be able to compare the negative to the positive of the contact print.

--After my darkroom session earlier, I dumped the fix just in case. Will make a new one next chance I get to develop.
Thanks everyone for the input. Just a rather bizarre moment I had. :smile:

hi, thanks for the uploads !

hmmm

you might put your film in fresh fix and agitate and rewash them.
it looks ( maybe i am misreading your film ? ) like your negatives might
not be completely cleared .. if that is the case re-fixing and rewashing might help you ...

not sure how you monitor your fixer to see if it is still fresh, or what "brand" of fix you use
or if you mix your own tsp of thiosulfate and water ... or the dilution ...
but a good indicator can be the age old "clip test"

matt explains it here ... (there was a url link here which no longer exists)

also, not sure if you agitate your film in your fixer or let it sit ... but you are supposed to agitate it the same way you agitate in developer ...


good luck !
john
 
OP
OP
Joined
Jul 22, 2015
Messages
13
Format
Medium Format
Yes, thanks Moose! I'm hoping having this problem will make post here more instead of just lurking :smile:

attachment.php
attachment.php


So, on the left is the print I get when placing the negative in the holder and into the enlarger (earlier I had posted a photo of just the contact print of that negative, which would lie on the paper with glass on top; this look fine). The right is my attempt at trying to show how the negative is in fact a positive through the light of the enlarger. Both aren't the best :smile: but the negative was posted previously and appears to be okay, but here is what I get when placed in the enlarger. It's a condenser head with two condensers just bellow the lamp. It's the Omega B600. It makes me wonder if I'm supposed to be adjusting the condensers, but I feel I'd have light issues around the corners of the 6x6 neg, which I haven't. *I also would have found any instructions in the manual, but it never mentions adjusting condensers.
I use a 75mm lens as well, which, again, covers the medium format negative.
I've gone through my methods, and actually just put through a roll of 120mm film developed months ago that appeared fine through the enlarger.
The two rolls of film that give a positive through the enlarger are PanF+ and FP4+, both developed in Rodinal (which I used for the first time when developing these rolls).
There must be something I'm missing...
 

Attachments

  • Print.jpg
    Print.jpg
    356.1 KB · Views: 240
  • Via enlarger.jpg
    Via enlarger.jpg
    159.1 KB · Views: 229
OP
OP
Joined
Jul 22, 2015
Messages
13
Format
Medium Format
Thanks, John! I think I'll do as you suggest and re-fix and wash. I do agitate fix just as I do developer, so I'm thinking the fix has been exhausted (as am I after spending my day off with this problem) :smile:

I really do appreciate everyone's help!
 

MattKing

Moderator
Moderator
Joined
Apr 24, 2005
Messages
53,272
Location
Delta, BC Canada
Format
Medium Format
What enlarging paper are you using?
What paper developer are you using?
 
OP
OP
Joined
Jul 22, 2015
Messages
13
Format
Medium Format
@Matt, I have Ilford brand papers; FB for printing, but RC for contact prints. All are multigrade. Dektol 1:2 for developing, sometimes I do 1:3, but today was 1:2.
 

pdeeh

Member
Joined
Jun 8, 2012
Messages
4,765
Location
UK
Format
Multi Format
In the picture of the image on the enlarging easel, it looks coloured ... is that an artefact of the digital photograph or are you trying to enlarge a colour negative onto b&w paper?
 
OP
OP
Joined
Jul 22, 2015
Messages
13
Format
Medium Format
@Trask and @John, verdict is in, just re-fixed and washed a bit of the roll in new fresh fix and the image is back to normal in the enlarger! Thank you for the help! I can't believe that using exhausted fix would actually cause the image in invert...what a strange day it has been.

Thanks to all who replied, kindly! Makes me want to keep posting and conversing with you smart lot. :smile: (of course, I know you're all smart because you still shoot film.)
 
OP
OP
Joined
Jul 22, 2015
Messages
13
Format
Medium Format
--Pdeeh, I believe it's from the digital image. I also used no filters so it would be a little more clear.
 

pdeeh

Member
Joined
Jun 8, 2012
Messages
4,765
Location
UK
Format
Multi Format
I can't believe that using exhausted fix would actually cause the image in invert)

well, if you give it a bit of thought, fixer removes the remaining unexposed silver halides in a film. If your fixer is "exhausted" it won;t do that properly, so some of the remaining latent image will be there, and may have fogged over time. Hence you could end up with a partially reversed image.
 

removed account4

Subscriber
Joined
Jun 21, 2003
Messages
29,832
Format
Hybrid
well, if you give it a bit of thought, fixer removes the remaining unexposed silver halides in a film. If your fixer is "exhausted" it won;t do that properly, so some of the remaining latent image will be there, and may have fogged over time. Hence you could end up with a partially reversed image.

YES !!!

i can't wait to do this with paper negatives, it will save me the effort of printing them :smile:

- john

ps. OP great to hear you figured it out !
 

pdeeh

Member
Joined
Jun 8, 2012
Messages
4,765
Location
UK
Format
Multi Format
Or you could fix them in a half-arsed way and then leave them for 50 years until they silver out a bit :smile:

(I saw some prints from the 1930s recently that had done this, and I thought them raaather beautiful!_
 
OP
OP
Joined
Jul 22, 2015
Messages
13
Format
Medium Format
Thanks, pdeeh! I understood fixer's main goal, but just couldn't process how it'd give me the positive image that it did through the enlarger. It does make sense now that I've had the issue and really had to think it through :smile: usually my mistakes are easy fixes, or at least easy to figure out. :smile: I think film as hobby means patience, practice, and learning at all times!
Thanks!
 
Photrio.com contains affiliate links to products. We may receive a commission for purchases made through these links.
To read our full affiliate disclosure statement please click Here.

PHOTRIO PARTNERS EQUALLY FUNDING OUR COMMUNITY:


Ilford ADOX Freestyle Photographic Stearman Press Weldon Color Lab Blue Moon Camera & Machine
Top Bottom