New Print Washer

Sunlit veranda

A
Sunlit veranda

  • 4
  • 1
  • 37
Free!

D
Free!

  • 4
  • 0
  • 27
Near my home.jpg

A
Near my home.jpg

  • 7
  • 2
  • 103
Woodland Shoppers

A
Woodland Shoppers

  • 1
  • 0
  • 65
On The Mound

A
On The Mound

  • 1
  • 3
  • 78

Recent Classifieds

Forum statistics

Threads
198,470
Messages
2,775,725
Members
99,626
Latest member
Vburtsev
Recent bookmarks
0

shicks5319

Member
Joined
Apr 6, 2004
Messages
108
Location
Sandia Park,
Format
4x5 Format
I have been washing my prints in a fish tank which has limited my washing capacity to 11X14.

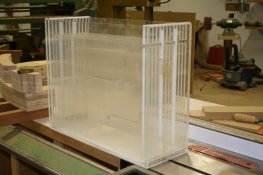
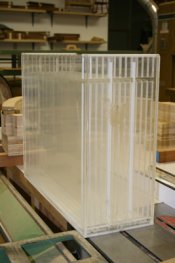
While in the local photog store here in Alb. NM, I was introduced to a used 16X20 print washer out in the back room. After a little haggle this washer found itself in the back of my truck on the home.

I have no idea what kind this is or how to operate it. There was no plumbing with it and no directions.

I am wondering if any of you folks can recognize what brand this might be and if anybody has experience with this style.

I have attached some photos (hopefully).

There appears to be two small threaded (3/8") input holes one on each end. Additionally, there is a third threaded hole on one side which I am assuming is the drain.

Thanks for any comments you folks might have on this washer.
 

Attachments

  • printwasher1.jpg
    printwasher1.jpg
    25.9 KB · Views: 183
  • printwasher2.jpg
    printwasher2.jpg
    97.9 KB · Views: 191

hortense

Member
Joined
Jun 17, 2004
Messages
611
Location
Riverside, C
Format
Large Format
Perhaps, stating the obvious, the washer shown in your photo is a vertical washer. However, to function properly, this type of washer requires putting water in at the bottom and extracting it at the top. In theory, this take the fixer that is heavier than water up and out the top. If, in fact, there is such a design arrangement, I can't see in your photo. However, you could modify this easily enough yourself.
 

lee

Member
Joined
Nov 23, 2002
Messages
2,911
Location
Fort Worth T
Format
8x10 Format
looks a lot like my Oriental washer that I am sure is re-badged from some other unknown maker. Sorry I cannot be of futher assistance.


lee\c
 
Last edited by a moderator:

Michel Hardy-Vallée

Membership Council
Subscriber
Joined
Apr 2, 2005
Messages
4,793
Location
Montréal, QC
Format
Multi Format
hortense said:
Perhaps, stating the obvious, the washer shown in your photo is a vertical washer. However, to function properly, this type of washer requires putting water in at the bottom and extracting it at the top. In theory, this take the fixer that is heavier than water up and out the top. If, in fact, there is such a design arrangement, I can't see in your photo. However, you could modify this easily enough yourself.


Shouldn't this be instead: water coming from the top and leaving at the bottom? The heavier residues will fall naturally at the bottom of the washer, so that they will drain away with the water by gravity.
 

Bruce Osgood

Membership Council
Member
Joined
Sep 9, 2002
Messages
2,642
Location
Brooklyn, N.Y.
Format
Multi Format
mhv said:
Shouldn't this be instead: water coming from the top and leaving at the bottom? The heavier residues will fall naturally at the bottom of the washer, so that they will drain away with the water by gravity.
Nope, don't work that way. Fred Picker thought so too and sold a lot of washers that didn't wash.

Water enters from the bottom and lifts the chemistry by friction, naturally carrying it to the top (like water & oil - oil is lighter, so is photochemistry) and out over the top. Once your washer is filled, a simple syphon will keep the movement going or it may be designed to simply over flow in a sink. It takes the same amount of water to do one print as it does 10 prints, depending on how many the washer can accommodate. It is wasting water to do just a few prints. May be less wasteful to do the maximum number but will still be expensive if you pay for water. But it sure will clean fiber prints in a short amount of time.

My $.02
 

djklmnop

Member
Joined
Jan 28, 2004
Messages
230
Format
4x5 Format
My washer is similar to the one you have, with thicker walls and flaps for carrying the tank. The water goes in from the bottom. The dual tubes on the sides sucks in air to create bubbles which will help agitate the print as they are being cleaned. The washer doesnt have an exit tube and is basically a spill-over washer. I have problems with this since I don't have a darkroom sink and end up having the print washer sit in the bathtub when washing my prints.

Oh, and the brand I have is East Street Gallery Print Washer.

Andy
 

resummerfield

Subscriber
Joined
Jan 28, 2005
Messages
1,467
Location
Alaska
Format
Multi Format
Agreed, pure fixer is heavier than water. But in the washer they mix and diffuse. So the only function of the washer is to introduce clean water, mix with the fixer, and let the contaminated water exit. It should make no difference if the clean water is introduced at the top or bottom, as long as the clean water mixes and diffuses throughout the tank before it exits.

What does make a difference, is to expose as much of the paper to the water as possible. That is, there should be some method of separating the sheets, to keep them from touching one another.
 

photobackpacker

Advertiser
Advertiser
Joined
Mar 21, 2005
Messages
430
Location
Minnesota
Format
4x5 Format
I am unfamiliar with the pictured washer but have designed an built several of these and am well familiar with the general principle. Forget the heavier than water discussions. That would only be applicable in a totally stagnant environment.

You are exposing the paper to a leaching process in which water soluble chemicals are being drawn out of the gelatin emulsion and are going into solution in the wash water. The important factors in washer design is to introduce a flow that will create a slight current to all parts of the washer. Most designs will create an inlet pressure box that introduces 2 or more jets into each paper slot. The beauty of this design is that you can achieve a good wash with relatively low levels of flow.

You are correct in identifying the three holes. One will be a supply inlet for fresh wash water, one will be a discharge for "used" wash water (usually at the top of the unit) and the last will be a drain for emptying the unit at the conclusion of the wash session.

As an aside, I plumbed my washer so that the discharge water flows into my print holding tray, providing a slow "double-duty" supply of water for prints awaiting their turn in the final wash.
 
Last edited by a moderator:
OP
OP
shicks5319

shicks5319

Member
Joined
Apr 6, 2004
Messages
108
Location
Sandia Park,
Format
4x5 Format
Print Washer - More info

I am really glad I asked you folks this question. The guy at the camera store was convinced this should be operated with an inflow at both ends.

I have attached a drawing of this washer (which I should have done with the pictures).

I can see now after reading your comments that the water should be coming into the washer from the Left side small opening. It then enters the divided chamber holding the prints, fills to the level of the spillway on the right side and the exits through the large opening on the right. The lower smaller opening on the right is probably a drain to be used at the conclusion of the wash cycle (as blaughn has suggested, thanks).
 
Last edited by a moderator:
OP
OP
shicks5319

shicks5319

Member
Joined
Apr 6, 2004
Messages
108
Location
Sandia Park,
Format
4x5 Format
drawing for printwasher

For some reason, I could not attach the jpg drawing in my previous reply.
 

dancqu

Member
Joined
Sep 7, 2002
Messages
3,649
Location
Willamette V
Format
Medium Format
resummerfield said:
... as long as the clean water mixes and diffuses throughout
the tank before it exits.

What does make a difference, is to expose as much of the
paper to the water as possible. That is, there should be
some method of separating the sheets, to keep them
from touching one another.

Some picture some paint. From a few posts made I can
just see the fixer flowing from the paper then settling
at the bottom as would a pool of mercury.

In a few words, after a short rinse the surface fix is
removed. The little left, molecule by molecule, diffuses
to the paper surface and mixes with molecules of water.

I avoid the whole matter of proper flow and bubble
trouble by using the still water diffusion method. Two trays
are used. I've incorporated hydrophobic separator sheets
to keep prints "from touching one another". Dan
 

Peter Schrager

Subscriber
Joined
Jul 19, 2004
Messages
4,133
Location
fairfield co
Format
Large Format
washer

I've also found that a fairly good wash for 30 minutes with some HCA added then a rest for several hours accomplishes about the same results as washing continuously.I do this for my proofing. For a good workflow on final washing check out the AZO web site.
Best, Peter
 
Photrio.com contains affiliate links to products. We may receive a commission for purchases made through these links.
To read our full affiliate disclosure statement please click Here.

PHOTRIO PARTNERS EQUALLY FUNDING OUR COMMUNITY:


Ilford ADOX Freestyle Photographic Stearman Press Weldon Color Lab Blue Moon Camera & Machine
Top Bottom