negs seem a bit pink

Recent Classifieds

Forum statistics

Threads
199,133
Messages
2,786,773
Members
99,820
Latest member
Sara783210
Recent bookmarks
0

jbl

Member
Joined
Dec 4, 2009
Messages
93
Location
California,
Format
35mm RF
Hi,

I just tried my first roll of C-41. I've done B&W for a few years, but this is my first foray into color.

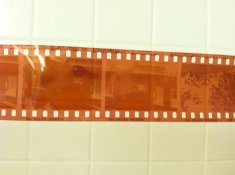
I shot a test roll of Ektar 100 out in front of my house and developed it in the Rollei Kit. The roll is still drying, but the negatives look pinker than what I've gotten from the lab.

The instructions with the chemicals say that a magenta cast with higher density near the sprocket holes means the developer was too warm or the agitation was too much. I think I'm seeing a magenta cast, but the density of the negatives is consistent. If anything, they look a little thin, but it's hard to tell for sure because they're hanging in my shower.

Does it sound like I over agitated or had the developer too warm?

Thanks,

Jonathan
 

Gerald C Koch

Member
Joined
Jul 12, 2010
Messages
8,131
Location
Southern USA
Format
Multi Format
Have you used this film before? Not all color negative films look the same.

I am not familiar with the Rollei kit. Does it use a stop bath after the developer and before the bleach. I have found that the developing agent left in the emulsion will cause a magenta stain when exposed to the bleach. An acid stop bath will help remove most of it and reduce any magenta cast.
 
Last edited by a moderator:
OP
OP
jbl

jbl

Member
Joined
Dec 4, 2009
Messages
93
Location
California,
Format
35mm RF
Sorry, I should have been clearer on that. I was comparing it to a roll of Ektar I got back from a lab recently, so it's the same.

I'm guessing I can easily correct for this when I scan (I know....), but I was concerned I was doing something wrong.

-jbl
 

Gerald C Koch

Member
Joined
Jul 12, 2010
Messages
8,131
Location
Southern USA
Format
Multi Format
A lab may not use standard C-41 chemistry other than the developer.
 
OP
OP
jbl

jbl

Member
Joined
Dec 4, 2009
Messages
93
Location
California,
Format
35mm RF
It does not use a stop before the bleach, though people seem to say that's ok in this kit, but recommend adding a wash step before and after fixing. I did add the washes.
 
OP
OP
jbl

jbl

Member
Joined
Dec 4, 2009
Messages
93
Location
California,
Format
35mm RF
Sounding like maybe I didn't mess it up :smile:
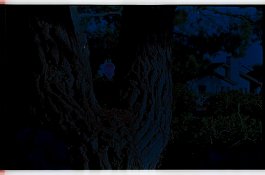
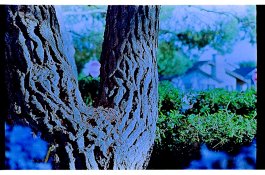
. I guess if the images look good, it hardly marters. Still, a little amazed this was that straightforward.

Jonathan
 

Gerald C Koch

Member
Joined
Jul 12, 2010
Messages
8,131
Location
Southern USA
Format
Multi Format
C41 looks very strange and milky when it's wet. Don't bother looking at it until it's dry.

You may be thinking of the older C-22 films which were very hard to evaluate until they were dry. In C-22 emulsions the dye couplers were contained in microscopic resin beads. This prevented the couplers from migrating during development. Agfa used a different system where the couplers had long side chains to prevent migration. Sort of like a boat dragging an anchor. When exposed to water the beads become opaque. With C-41 films Kodak adopted the Agfa method which does not have the milkiness problem.
 
Last edited by a moderator:

polyglot

Member
Joined
Jun 12, 2009
Messages
3,467
Location
South Australia
Format
Medium Format
You may be thinking of the older C-22 films which were very hard to evaluate until they were dry. In C-22 emulsions the dye couplers were contained in microscopic resin beads. This prevented the couplers from migrating during development. Agfa used a different system where the couplers had long side chains to prevent migration. Sort of like a boat dragging an anchor. When exposed to water the beads become opaque. With C-41 films Kodak adopted the Agfa method which does not have the milkiness problem.

No, I'm talking about C-41, which I develop at home. I've never seen a C-22 film, let alone wet.

If you're used to B&W, a wet C-41 film looks a bit underfixed. Some moreso than others.
 

GeorgK

Member
Joined
Aug 26, 2005
Messages
91
Format
35mm
If one goes directly from the developer into the bleach (also minilabs do this), the film mask may come out a little darker. This is because the colour developer reacts with the bleach (don't ask me for details; i guess the developer is oxidised by the bleach and then reacts with the dye couplers to form dyes). A stop bath after development (wash only would prolong development and cause streaks) omits the effect by removing the developer first and leads to a clearer base, which usually looks more "pinkish" (compared to the otherwise "brownish" results).

Georg
 

Photo Engineer

Subscriber
Joined
Apr 19, 2005
Messages
29,018
Location
Rochester, NY
Format
Multi Format
You may be thinking of the older C-22 films which were very hard to evaluate until they were dry. In C-22 emulsions the dye couplers were contained in microscopic resin beads. This prevented the couplers from migrating during development. Agfa used a different system where the couplers had long side chains to prevent migration. Sort of like a boat dragging an anchor. When exposed to water the beads become opaque. With C-41 films Kodak adopted the Agfa method which does not have the milkiness problem.

Kodak did NOT adopt the Agfa method. Agfa adopted the Kodak method!!!

C-41 films are still pinker and slightly translucent than they are when dry. They are similar to C-22 films in this regard.

PE
 

Gerald C Koch

Member
Joined
Jul 12, 2010
Messages
8,131
Location
Southern USA
Format
Multi Format
OP
OP
jbl

jbl

Member
Joined
Dec 4, 2009
Messages
93
Location
California,
Format
35mm RF
It looks like I did mess up the processing. The scans from the negatives are very cyan, I have to pump the WB to 50,000k and skew the tint way towards the magenta range in order to get the colors to look remotely normal. The grain looks okay in comparison to what I've seen before. Is there any way to tell if it's over agitation or too-warm developer?

-jbl
 
OP
OP
jbl

jbl

Member
Joined
Dec 4, 2009
Messages
93
Location
California,
Format
35mm RF
I checked my thermometers before developing and calibrated everything. I waited until the developer hit 100 before I started, but I think my water bath may have been around 102. I'll recheck my thermometers and try again with the next test roll and see how it goes.

Thanks for the help!

-jbl
 
OP
OP
jbl

jbl

Member
Joined
Dec 4, 2009
Messages
93
Location
California,
Format
35mm RF
I did a ~3 minute wash after bleach and after the fix. On each wash, I filled the tank with tempered water, agitated for 15 seconds, then a few times at each minute, dumping the water once around half way through. I wasn't quite sure on the wash procedure for this, so I just guessed.

I bleached for 4 minutes which is on the high end of what the Rollei instructions say (though the Kodak instructions say 6.5 minutes). I fixed for 5 minutes.

-jbl
 

Photo Engineer

Subscriber
Joined
Apr 19, 2005
Messages
29,018
Location
Rochester, NY
Format
Multi Format
There should be a good WASH after the bleach and after the fix. In addition to carryover which can affect the color and capacity of the solutions, the blix is oxidized to some extent in the fix and causes many problems. If you do it wrong, the fix becomes colored like the bleach, and the stabilizer even takes on that color if you severely underdo the washes.

PE
 
OP
OP
jbl

jbl

Member
Joined
Dec 4, 2009
Messages
93
Location
California,
Format
35mm RF
What's your preferred way of washing?

Also, I just read the Kodak Z-131 documents on processing and they describe an agitation technique I'm not familiar with:

Immerse the rack fully into the developer. Rapidly tap it on the bottom of the tank to dislodge any air bubbles. Raise the rack until the bottom is out of the developer; then reimmerse it. Do this once. This requires 4 to 5 seconds.

After the initial agitation, let the rack sit for 10 seconds. Then lift it straight up until the bottom is just out of the developer solution. Reimmerse it without draining. Do this with an even, uniform motion, taking 2 to 3 seconds to complete it. Repeat this procedure once every 10 seconds (6 times per minute).

Ten seconds before the end of the development time, raise the rack, tilt it about 30 degrees toward one corner, and drain it for 10 seconds. Then move the rack into the bleach.

Am I reading this right? It seems to be saying that you lift the tank up out of the water bath and put it back down. There's not an inversion step. There's also a part about nitrogen-based solutions, but that's outside of my capabilities at home :smile:.

Thanks again,

-jbl
 
OP
OP
jbl

jbl

Member
Joined
Dec 4, 2009
Messages
93
Location
California,
Format
35mm RF
still too magenta

I tried another roll today and was much more careful about the temperature. I also extend the bleach and fix times to 6.5 minutes and did a full wash under running water for 3:15 before and after the fix.

The results appear to be much the same. I'm attaching a photo below if that helps at all. Is it possible I mixed the chemicals improperly or something? I don't know how vigorous you need to mix the different parts of the color developer in the Rollei kit. I wasn't crazy about it.
 

Attachments

  • photo.jpg
    photo.jpg
    546.7 KB · Views: 107

Photo Engineer

Subscriber
Joined
Apr 19, 2005
Messages
29,018
Location
Rochester, NY
Format
Multi Format
Of course it is difficult to say for sure, but I happen to have a recent roll of Ektar here, and by comparison of the edge markings, yours looks underdeveloped to me rather than underexposed.

PE
 
OP
OP
jbl

jbl

Member
Joined
Dec 4, 2009
Messages
93
Location
California,
Format
35mm RF
Thanks, PE, I've been wondering that too.

I did the scans and I'm definitely doing something wrong. My process this time was to do development for 3:15, dumping the developer at 3:05 as I had read to try.

I'm attaching three images here. The first is the normal exposure metered off the tree using an incident meter. The second is a bracketed exposure, plus 2 stops from the original metering. The third is that second exposure, with 4 stops added to the raw file from the scan. The thing I noticed about that one is that the colors are beginning to look more normal, there's still the blue cast, but there are other colors.

In terms of other settings, I used my normal scanning workflow, so I don't think that's an issue.

I'd appreciate any suggestions of what to try next :smile:.

Jonathan
 

Attachments

  • base.jpg
    base.jpg
    298.6 KB · Views: 69
  • plus-2.jpg
    plus-2.jpg
    368.2 KB · Views: 68
  • plus-2-plus-4.jpg
    plus-2-plus-4.jpg
    767 KB · Views: 64
OP
OP
jbl

jbl

Member
Joined
Dec 4, 2009
Messages
93
Location
California,
Format
35mm RF
What do you mean "metered off the tree using an incident meter"? If you are using the white dome for incident metering you shouldn't be metering from the tree, but rather pointing the dome towards the camera lens. Did I misunderstand what you are doing?

Sorry, I was unclear. I meant that I held the incident meter on the tree, facing where the camera was going to be: I took the incident reading from where the sun hit the tree.

-jbl
 

Photo Engineer

Subscriber
Joined
Apr 19, 2005
Messages
29,018
Location
Rochester, NY
Format
Multi Format
The lack of cyan dye, that is the pinkish look, reminds me of drastic underdevelopment rather than an exposure aproblem. The picture examples that you posted remind me of the same thing. This looks like severe crossover. But, I stress again that it is hard to say for sure.

Photograph a color chart or something bright red and see how it looks compared to the surrounds of "regular" colors.

PE
 

Ian C

Member
Joined
Feb 8, 2009
Messages
1,257
Format
Large Format
It looks like underdevelopment to me too. I base this on the thin appearance of the lettering. That’s exposed through a stencil onto the film during manufacture. The lettering of normally developed film is dense and quite distinct. Yours appears thin. This is usually a good indication of underdevelopment: not enough time, too low temperature, weak chemistry, or some combination of these.

The images also look thin as well. All of the above factors should be checked.

Metering should be based on a gray card reading if you’re using the camera’s built-in reflected-light meter or aimed at the light source—usually the sun or sunlit sky in outdoor photography—if you’re using an incident meter.
 
Photrio.com contains affiliate links to products. We may receive a commission for purchases made through these links.
To read our full affiliate disclosure statement please click Here.

PHOTRIO PARTNERS EQUALLY FUNDING OUR COMMUNITY:


Ilford ADOX Freestyle Photographic Stearman Press Weldon Color Lab Blue Moon Camera & Machine
Top Bottom