Negative issues using hybrid workflow.

Tyndall Bruce

A
Tyndall Bruce

  • 0
  • 0
  • 25
TEXTURES

A
TEXTURES

  • 4
  • 0
  • 51
Small Craft Club

A
Small Craft Club

  • 2
  • 0
  • 49
RED FILTER

A
RED FILTER

  • 1
  • 0
  • 41
The Small Craft Club

A
The Small Craft Club

  • 3
  • 0
  • 47

Recent Classifieds

Forum statistics

Threads
198,903
Messages
2,782,782
Members
99,742
Latest member
stephenswood
Recent bookmarks
0

Skiver101

Member
Joined
Jan 4, 2017
Messages
122
Location
Scotland
Format
4x5 Format
My hybrid workflow at present is a loved hobby only - I shoot and develop 4x5 b+w film, and then scan using a cheap 5.1mp point-and-shoot DSCP100 - followed by tweeks and adjustments to the file using ''camera raw'' and CS3 photoshop. If I like an image enough, I will pay for a large file of the negative by drum-scan, and then re-adjust; and print using the bigger file size. I have plans for contact printing in the months to come.
The thing is....that when I look at my negatives after development, I instinctually think that I have mis-calculated in my exposure settings or that I have not developed properly, and also that I may be developing in a less than ''ideal'' developer solution for the specific film type. They just look ''poor''...
However, my final results, post-process; don't seem to be that bad, relatively speaking. And I'm happy enough about the outcomes most of the time.
My insecurity regarding the negatives' exposures is compounded by the amount of ''slide'' that I have to apply in the post-negative adjustment options.
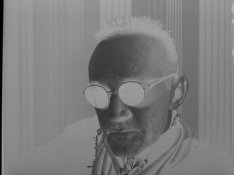
I have added my latest inverted and otherwise untouched negative image shot on the light table, with the adjusted end-image; to highlight my issue - HP5+ in D76 1+1 10mins @68F...


Am I fretting needlessly - am I missing a trick - or am I unconsciously exposing correctly for the workflow process that I have adopted ? Things seem to work out okay, but the inverted negative images really do look scarily wanting.
I remember making adjustments in the darkroom when printing , but I don't have that luxury anymore so I can'tcompare the results from the different processes.
Just curious to know how others deal with these hybrid-workflow circumstances.

JP
 

Attachments

  • DSC01186a.jpg
    DSC01186a.jpg
    696.7 KB · Views: 147
  • DSC01184a---..jpg
    DSC01184a---..jpg
    378.5 KB · Views: 129

Kino

Subscriber
Joined
Jan 20, 2006
Messages
7,763
Location
Orange, Virginia
Format
Multi Format
Results are the king here. If you are happy with the end result, you are doing fine.

Remember, you are "scanning" your negatives with a digital device using raw files. Raw files are just that, raw data off a chip that is inherently LINEAR; it and the scanner encodes in a arithmetic fashion, BUT your negatives are inherently logarithmic. Your scan looks right for a log image encoded in a linear fashion.

If you impose a logarithmic lookup table (LUT) on the image, it should look more like a film image; which is what you are doing when you make "tweaks and adjustments" to the Raw files.

The subject is confusing to discuss because there are SO many potential "Gotchas" in the imaging chain when you start trying to evaluate images encoded in different value systems, but happily you can ignore that and just keep working...
 

Bob Carnie

Subscriber
Joined
Apr 18, 2004
Messages
7,735
Location
toronto
Format
Med. Format RF
JP - one rule of thumb I work with... If it looks like a duck , walks like a duck and quacks like a duck then its probably a duck..... So when making negatives for alt process , and I do a few, I always want to establish a decent negative that I would be comfortable with for silver gelatin printing. some processes like Carbon and PT Pd like a more contrasty negatives, and Gum well gum you can pretty much control contrast with the end water process.

So if you are from a silver negative to silver print background , start by making your negs that you were happy with and 90% of the time with PS and scanning you can create a digital enlarged negative that will suit your needs for any print process.

Bob
 

TheFlyingCamera

Membership Council
Advertiser
Joined
May 24, 2005
Messages
11,546
Location
Washington DC
Format
Multi Format
Do be mindful that images exposed and developed for scanning are flatter than those optimized for native silver enlarging and/or alternative processes. If you want to make inkjet prints from your scans and/or output digitally enlarged negatives for alt-process printing, a flat negative is a good starting point.
 

MattKing

Moderator
Moderator
Joined
Apr 24, 2005
Messages
53,003
Location
Delta, BC Canada
Format
Medium Format
You are showing us inverted scans. Can you show us a backlit photo of the negatives itself?
If you have negatives that scan well, they will generally print well optically. And if you have negatives that print well optically, they will generally scan well.
I find this link useful when discussing how to assess negatives: https://www.ephotozine.com/article/assessing-negatives-4682
The illustrations in that link aren't perfect, but I do believe they are helpful.
 
OP
OP

Skiver101

Member
Joined
Jan 4, 2017
Messages
122
Location
Scotland
Format
4x5 Format
Thanks for the feedback guys. Food for thought there.
Here's the image you asked about Matt - smaller due to file upload limitation...


JP
 

Attachments

  • 500.jpg
    500.jpg
    29.8 KB · Views: 115

MattKing

Moderator
Moderator
Joined
Apr 24, 2005
Messages
53,003
Location
Delta, BC Canada
Format
Medium Format
Thanks for the feedback guys. Food for thought there.
Here's the image you asked about Matt - smaller due to file upload limitation...


JP
Looks like an eminently printable negative to me. I'm assuming the lighting for the scene was fairly even and of moderate contrast.
You might want to try experimenting with more exposure, and then separately with more development, but that would be for the purpose of trying for a (subjectively) slightly different result.
 

Wallendo

Subscriber
Joined
Mar 23, 2013
Messages
1,409
Location
North Carolina
Format
35mm
The issue here appears to be incorrect exposure by the digital camera.
A scanner and/or its software can set the black point and white point of the image. This will preserve, and frequently enhance, the contrast.
When photographing with a digital camera, especially a point-and-shoot, the camera calculates the exposure by whatever method is built-in and does little to nothing to enhance contrast. I suspect your initial images are overexposed by the digital camera (too dark) and the reversal images therefore are too light.
If your camera supports it, try adjusting the exposure compensation to see if you get better results.
 
Joined
Dec 10, 2009
Messages
6,297
Format
Multi Format
If the camera is on a stand, maybe take 3 shots. One shadow, one midtone and one highlight then combine them into an HDR neg?
 
OP
OP

Skiver101

Member
Joined
Jan 4, 2017
Messages
122
Location
Scotland
Format
4x5 Format
The issue here appears to be incorrect exposure by the digital camera.
A scanner and/or its software can set the black point and white point of the image. This will preserve, and frequently enhance, the contrast.
When photographing with a digital camera, especially a point-and-shoot, the camera calculates the exposure by whatever method is built-in and does little to nothing to enhance contrast. I suspect your initial images are overexposed by the digital camera (too dark) and the reversal images therefore are too light.
If your camera supports it, try adjusting the exposure compensation to see if you get better results.

Wallendo - This could well be the thing that I have been overlooking. The negatives are fine; but the issue is in the scanning procedures.
On the bright side... this restores some confidence in my abilities and my understandings of the camera/film side of things, and I now realise that my journey into the hybrid realm needs more study and contemplation as per the digital 'flow'.
Thanks again, great contributions everyone. I feel much more at ease about the issue now :surprised:)

JP
 

faberryman

Member
Joined
Jun 4, 2016
Messages
6,048
Location
Wherever
Format
Multi Format
I am just guessing without looking at the actual negative, but the first image looks fogged to me. Are you using fresh film and developer? Are you loading you film holders in absolute darkness? Are your bellows light-tight?
 
OP
OP

Skiver101

Member
Joined
Jan 4, 2017
Messages
122
Location
Scotland
Format
4x5 Format
Looks like an eminently printable negative to me. I'm assuming the lighting for the scene was fairly even and of moderate contrast.
You might want to try experimenting with more exposure, and then separately with more development, but that would be for the purpose of trying for a (subjectively) slightly different result.

More details here if required Matt...

https://www.flickr.com/photos/41090909@N08/26912842309/

JP
 
OP
OP

Skiver101

Member
Joined
Jan 4, 2017
Messages
122
Location
Scotland
Format
4x5 Format
I am just guessing without looking at the actual negative, but the first image looks fogged to me. Are you using fresh film and developer?

That was one of my initial fears faberryman.
There could well be 'freshness' issues involved, but nothing ridiculous. I do see this even when using fresh solution.
I make my own D76 from raw, and this was the last use of a recent (6 weeks at most) stock.
And the HP5+ film is 12-16 months old. I have one sheet left.
The dark-bag and the bellows are tested and are dead on.

JP
 
Last edited:

Kino

Subscriber
Joined
Jan 20, 2006
Messages
7,763
Location
Orange, Virginia
Format
Multi Format
It's not fogged. Look at the notches in the scan.
 

faberryman

Member
Joined
Jun 4, 2016
Messages
6,048
Location
Wherever
Format
Multi Format
It's not fogged. Look at the notches in the scan.
The notches are just that, an absence of film. Why are they grey in the scan? The notched areas should be white in the negative or black in the positive. The scan is extremely low contrast, more so than the typical flat negative you would expect from a scan. I suspect the OP had to add a lot of contrast/clarity to get his print, which looks pretty good, except for an absence of detail in the shadows. It is difficult to say anything definitive without looking at the actual negative, but I think the OP's instinct is correct that there is something no quite right with the negative. If it is not fogged, it is certainly veiled. It could also be underdevelopment, which would explain the lack of shadow detail and contrast. Ilford calls for HP5 Plus at ISO 400 to be developed in D76 1+1 for 11 minutes at 68F. OP only developed for 10 minutes. What is the OP's agitation regimen? Has OP done any testing for a personal exposure index for this film/developer/agitation routine?
 
Last edited:

winger

Subscriber
Joined
Jan 13, 2005
Messages
3,975
Location
southwest PA
Format
Multi Format
I think the neg might be slightly underexposed based on the lack of detail in the shoulder on the left. BUT, if you like the amount of detail once you've done your post-processing, then it might be fine for you. Shooting for scanning is a little different than shooting for optical printing. I've had negs that I couldn't get a good print from in the darkroom that were easy to correct in PS and vice versa. If you're going to be sticking with the hybrid methods, then get negatives that work for your workflow. Just figure out what you like and don't like about your process.
 
OP
OP

Skiver101

Member
Joined
Jan 4, 2017
Messages
122
Location
Scotland
Format
4x5 Format
It could also be underdevelopment, which would explain the lack of shadow detail and contrast. Ilford calls for HP5 Plus at ISO 400 to be developed in D76 1+1 for 11 minutes at 68F. OP only developed for 10 minutes. What is the OP's agitation regimen? Has OP done any testing for a personal exposure index for this film/developer/agitation?

The missing minute was only to guard against runaway highlights.
My regular agitation regimen is a gentle figure of eight roll (10 turns left, 10 turns right) for the first minute (side tap-bottom rap), then same 5 turns both ways every 2 mins approx. with a standing last minute.
The flickr link I gave has the set-up details for the shot and is testimony to the mental gymnastics that I had to compute.
I'm new to metering for the strobes, (the bounce distance, the honeycomb grid, and the full-power/half-power differences at play.
And adding to that the filter factor and bellows extension compensation made for a fun-filled half-hour.

Ashamedly, I have never yet done any specific bespoke testing of the materials that I use; which are always the same materials - either FP4+ or HP5+ in D76. I just assumed that with constant use of the same film type and developer solution, that I would naturally determine an understanding over time...evidently not...although I don't think I'm too wayward either. :wondering:
Maybe I should bite the bullet and do some tests...we'll see.

JP
 

Saganich

Subscriber
Joined
Nov 21, 2004
Messages
1,274
Location
Brooklyn
Format
35mm RF
I slept on this one, but am happy to see all the responses I was ready to make. I agree that the digital capture of the negative could use some improvement, but, to capture all the information in the scan for post processing is a worthy goal. I personally test film exposure and development periodically by shooting some known Zones (I, V, VIII) so I know I'm not too far from a Grade 2 traditional print contrast wise, getting as much shadow and highlight detail as I see fit for the composition. Over the years working in more hybrid situations I've moved towards less contrast development for scanning negatives and then scanning without throwing out any information, which can result in odd looking original scans not that different from your example BUT the negatives on a light box look good to the eye. This may best be described as looking like a RAW file but I'm not a digital shooter so my experience with camera RAW B&W is limited. My advice is to look at negs on light box if they look off then exposure/development issues may be worth looking into as that would improve the final scan. It may be worth noting that when all this works correctly I find post processing to be minimal, not much more than a good working print, in other words I'm not moving those "sliders" around too much for compositions that have a full range of tones. I hope I added something to the discussion.
 
OP
OP

Skiver101

Member
Joined
Jan 4, 2017
Messages
122
Location
Scotland
Format
4x5 Format
Thanks Chris,
My goal at the analogue end of things has been like you said - to include as much detail across as many 'zones' as possible. Then later, in the digital work, I will have optimum choice in variance.
I think a bit more specific consideration to the initial subject exposure placement and the development choices will reduce the amount of 'sliding' needed later; to a certain degree. I could be wrong but, I feel that I am somehow degrading the final image if adjustment levels in PS are too removed from the Tiff file that my drum-scanning contact sends me...I'm still learning.

N.B.
Don't quote me on this but, my little point-and-shoot DSC P100 only shoots jpeg - I think !

JP
 
Photrio.com contains affiliate links to products. We may receive a commission for purchases made through these links.
To read our full affiliate disclosure statement please click Here.

PHOTRIO PARTNERS EQUALLY FUNDING OUR COMMUNITY:


Ilford ADOX Freestyle Photographic Stearman Press Weldon Color Lab Blue Moon Camera & Machine
Top Bottom