Often on older cameras or cameras which see heavy use, the shutter speed dial no longer is visible. Other dials and switches may suffer the same fate. Often on lenses, the ring registers are gone or in some cases they're a mis-match to that lens. Well, if you have access to an inkjet or laser printer, you can repair them. It isn't expensive, it is fun, you can be imaginative and a little of this goes a long way. What am I talking about? Printable waterslide decal paper. You can buy it on Etsy (will be less expensive than eBay now that eBay is establishing pricing for sellers in order to pad their greedy pockets), and you can get it in clear or white. Please note: your printer can not print in white unless you have a yee-haw crazy expensive one. But you can print on white decal paper and accomplish the same result. One of the examples I'll show at the end was on clear (the Ebel watch) and one on white (the speedometer dial).
Here are a few tips:
1. work on your layout, etc first and practice printing for size. You can use many free programs (like Gimp) and if I can figure them out, so can you. There are scads of free print fonts out there. Contribute to the maker if you wish. I prefer to save my image as a jpeg file and copy/paste and print the final image in Word or the Open Office alternative. It is easy to scale it that way.
2. don't forget you can make custom colors. You may need these in some applications (if you look around, you may find things all over your house needing refreshing...microwave knob, stove knob, refrigerator trim, radio dials, kids toys...etc).
3. really important point---if you're using an inkjet printer, print your image onto the decal paper and then coat it with Krylon or Rustoleum clear before you do anything with it. I prefer the satin type. Otherwise, the ink will just dissolve in the water when you dip the decal piece in.
4. cut out the decal shape before you immerse in water. If you need to cut out a window, do so after the decal has been applied and has dried. Use an X-Acto or other hobby type knife and cut carefully.
5. the sellers of waterslide paper will give you some directions. Those are worth following.
6. I said a little of this goes a long way. How does that work? Well, if you have only a small area to print, first print it onto a plain piece of paper and get the exact size you need. Then cut out the size of decal you need (allowing extra for trimming, etc) and use a wee bit of tape on a couple of corners to hold it over the printed image on that piece of paper. Re-insert the page oriented the same way and print again. You'll be able to use an 8.5" x 11" piece for all kinds of things. IMPORTANT NOTE: set your printer for special photo paper or glossy or whatever your printer uses to designate paper other than plain paper.
7. If you want, after you've finished you can coat the item you're repairing with clear, but you don't have to.
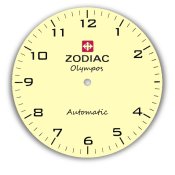
8. Examples...please see the attached images. One is a common stainless steel military watch on which the dial was nearly totally shot from exposure to the sun and age and partly damaged by a broken crystal at some point in life. You can see the dial looks brand new now. One is an antique speedometer being converted to an electronic speedometer (with leds included for turn signal and high beam indicators). I wanted to retain as much of the original appearance as possible. And I will also try to attach a jpg doc file showing a another very damaged dial I'm redoing in yellow for a more sporty look. Again, on this watch details of the original dial were mostly gone, leaving me to improvise.
Good luck! If questions, please send me an email. Also if you need to make a large decal, it will be more consistent on a laser printer. For these, consider using FedEx/Kinko's. They've got good equipment and they don't charge much if you have your own paper.


Here are a few tips:
1. work on your layout, etc first and practice printing for size. You can use many free programs (like Gimp) and if I can figure them out, so can you. There are scads of free print fonts out there. Contribute to the maker if you wish. I prefer to save my image as a jpeg file and copy/paste and print the final image in Word or the Open Office alternative. It is easy to scale it that way.
2. don't forget you can make custom colors. You may need these in some applications (if you look around, you may find things all over your house needing refreshing...microwave knob, stove knob, refrigerator trim, radio dials, kids toys...etc).
3. really important point---if you're using an inkjet printer, print your image onto the decal paper and then coat it with Krylon or Rustoleum clear before you do anything with it. I prefer the satin type. Otherwise, the ink will just dissolve in the water when you dip the decal piece in.
4. cut out the decal shape before you immerse in water. If you need to cut out a window, do so after the decal has been applied and has dried. Use an X-Acto or other hobby type knife and cut carefully.
5. the sellers of waterslide paper will give you some directions. Those are worth following.
6. I said a little of this goes a long way. How does that work? Well, if you have only a small area to print, first print it onto a plain piece of paper and get the exact size you need. Then cut out the size of decal you need (allowing extra for trimming, etc) and use a wee bit of tape on a couple of corners to hold it over the printed image on that piece of paper. Re-insert the page oriented the same way and print again. You'll be able to use an 8.5" x 11" piece for all kinds of things. IMPORTANT NOTE: set your printer for special photo paper or glossy or whatever your printer uses to designate paper other than plain paper.
7. If you want, after you've finished you can coat the item you're repairing with clear, but you don't have to.
8. Examples...please see the attached images. One is a common stainless steel military watch on which the dial was nearly totally shot from exposure to the sun and age and partly damaged by a broken crystal at some point in life. You can see the dial looks brand new now. One is an antique speedometer being converted to an electronic speedometer (with leds included for turn signal and high beam indicators). I wanted to retain as much of the original appearance as possible. And I will also try to attach a jpg doc file showing a another very damaged dial I'm redoing in yellow for a more sporty look. Again, on this watch details of the original dial were mostly gone, leaving me to improvise.
Good luck! If questions, please send me an email. Also if you need to make a large decal, it will be more consistent on a laser printer. For these, consider using FedEx/Kinko's. They've got good equipment and they don't charge much if you have your own paper.