Modifying the lend of a Holga

about to extinct

D
about to extinct

  • 0
  • 0
  • 17
Fantasyland!

D
Fantasyland!

  • 9
  • 2
  • 94
perfect cirkel

D
perfect cirkel

  • 2
  • 1
  • 121
Thomas J Walls cafe.

A
Thomas J Walls cafe.

  • 4
  • 6
  • 277

Recent Classifieds

Forum statistics

Threads
198,745
Messages
2,780,269
Members
99,692
Latest member
jglong
Recent bookmarks
0

fabulousrice

Member
Joined
Mar 19, 2020
Messages
449
Location
Los Angeles
Format
35mm
I'm trying to remove the front part of a Holga lens to replace it with a faster and more interesting lens.

Has anyone done it before? How would I remove the plastic cylinder and the lens but without damaging the shutter which I'll use?
 

Denverdad

Member
Joined
Apr 20, 2009
Messages
316
Location
Superior, Co
Format
Medium Format
I wasn't sure whether you meant removing the lens assembly from the camera, or if you meant removing the lens itself from that assembly (i.e., taking the lens out of the barrel). It doesn't really matter though because you have to do the former first in order to do the latter, so I'll start with the process of removing the lens assembly. This is actually a very straightforward procedure as it's just a matter of loosening a stop peg inside the camera so that the lens assembly can screw all the way off. The purpose of that peg is to keep people from unscrewing the lens so far that it can fall off the camera - but of course that's exactly what you want to do in this case! Anyway, you can find a pretty clear description for this, including pictures, at this site. As you can see, removing the lens from the camera doesn't impact the shutter mechanism at all, so no worries there.

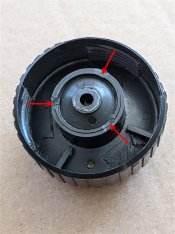
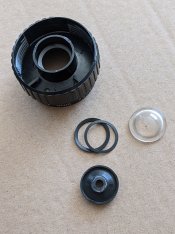
After that, if you did want to remove the lens itself from the barrel, that's not too hard to do either. To be honest I wasn't sure about this but I just went and tried it, and it turns out to be easier than you might think. With the lens assembly in hand and looking into the back (i.e., from the camera side), you will see there are three plastic welds that hold a lens retaining ring to the barrel. I found that I could simply slip a craft knife (a razor blade could work too) between the retainer and the barrel at each of those 3 welds, to separate the retainer from the barrel allowing it to pop out. At that point you can flip the barrel over and the lens and two shims will just slide right out. Now if you ever intended to replace that lens, you might want to take note of the orientation of the lens itself and also which side the shims went. But other than that there's really no alignment procedure or anything else to worry about - the parts are just stacked into the barrel with the retaining ring holding it all together.

Hope that helps.

Jeff
 

Sirius Glass

Subscriber
Joined
Jan 18, 2007
Messages
50,356
Location
Southern California
Format
Multi Format
You might want to fix the typo on the title. That might attract more readers.
 
OP
OP
fabulousrice

fabulousrice

Member
Joined
Mar 19, 2020
Messages
449
Location
Los Angeles
Format
35mm
I wasn't sure whether you meant removing the lens assembly from the camera, or if you meant removing the lens itself from that assembly (i.e., taking the lens out of the barrel). It doesn't really matter though because you have to do the former first in order to do the latter, so I'll start with the process of removing the lens assembly. This is actually a very straightforward procedure as it's just a matter of loosening a stop peg inside the camera so that the lens assembly can screw all the way off. The purpose of that peg is to keep people from unscrewing the lens so far that it can fall off the camera - but of course that's exactly what you want to do in this case! Anyway, you can find a pretty clear description for this, including pictures, at this site. As you can see, removing the lens from the camera doesn't impact the shutter mechanism at all, so no worries there.

After that, if you did want to remove the lens itself from the barrel, that's not too hard to do either. To be honest I wasn't sure about this but I just went and tried it, and it turns out to be easier than you might think. With the lens assembly in hand and looking into the back (i.e., from the camera side), you will see there are three plastic welds that hold a lens retaining ring to the barrel. I found that I could simply slip a craft knife (a razor blade could work too) between the retainer and the barrel at each of those 3 welds, to separate the retainer from the barrel allowing it to pop out. At that point you can flip the barrel over and the lens and two shims will just slide right out. Now if you ever intended to replace that lens, you might want to take note of the orientation of the lens itself and also which side the shims went. But other than that there's really no alignment procedure or anything else to worry about - the parts are just stacked into the barrel with the retaining ring holding it all together.

Hope that helps.

Jeff


Jeff that's a great answer thank you very much.
Do you have a picture of the welds that you can share with me?
I'm not sure I'm seeing what you mean.
Much appreciated.
 

Denverdad

Member
Joined
Apr 20, 2009
Messages
316
Location
Superior, Co
Format
Medium Format
One of the pictures in the link I gave above shows them, but in case it's unclear exactly the welds I'm talking about, here is a picture of my own lens assembly with the red arrows pointing to the welds in question. Also, I added another picture to show what it looks like completely disassembled.
welds annotated.jpg disassembled reduced.jpg
 

awty

Subscriber
Joined
Jul 24, 2016
Messages
3,643
Location
Australia
Format
Multi Format
Are you replacing just the lens element and reusing the helicoid or replacing the helicoid as well? You could remove the shutter and fit a new helicoid and a lens with a leaf shutter.
 

John Phive

Member
Joined
Sep 19, 2021
Messages
61
Location
North Eastern USA
Format
Digital
@awty if you're asking me, I'm going to replace the lens with something better. But most of the images I'm getting now from the modified Holga, actually look very good. I may end up buying 2 or 3 more Holga's to complete my modifications. I may also get the shop involved as they have a 3D printer setup.
 
Photrio.com contains affiliate links to products. We may receive a commission for purchases made through these links.
To read our full affiliate disclosure statement please click Here.

PHOTRIO PARTNERS EQUALLY FUNDING OUR COMMUNITY:


Ilford ADOX Freestyle Photographic Stearman Press Weldon Color Lab Blue Moon Camera & Machine
Top Bottom