Minolta Autocord misplaced screws

Musician

A
Musician

  • 1
  • 0
  • 33
Your face (in it)

H
Your face (in it)

  • 0
  • 0
  • 48
A window to art

D
A window to art

  • 3
  • 0
  • 51
Bushland Stairway

Bushland Stairway

  • 4
  • 1
  • 111

Recent Classifieds

Forum statistics

Threads
199,250
Messages
2,788,559
Members
99,842
Latest member
Phileas
Recent bookmarks
0

ergosyn

Member
Joined
Aug 10, 2015
Messages
2
Format
Sub 35mm
I recently acquired a Minolta Autocord tlr from a yard sale, it's the first film camera I have ever used. Unfortunately after shooting a couple rolls of film through it I realized that the shutter was stuck at 400 and an aperture blade was mis-aligned, so I completely disassembled the camera and cleaned it. It took about three days to do the whole thing. Now it is all reassembled and seems to be working perfectly.
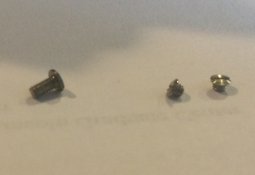
The only problem is I ended up with two tiny screws that I cannot figure out where they came from. I have re taken it apart again and cannot figure out where they came from so I’m hoping maybe somebody familiar with this camera may know. I’ve attached a photo, the two screws are on the right and a screw from the body on the left for size comparison.

attachment.php
 

Attachments

  • IMG_2484.JPG
    IMG_2484.JPG
    282.6 KB · Views: 199

AgX

Member
Joined
Apr 5, 2007
Messages
29,973
Location
Germany
Format
Multi Format
Just a guess, as I do not know the Autocord: the smaller ones look like being intended for thin sheet metal like a cover, scale etc.
 

Gerald C Koch

Member
Joined
Jul 12, 2010
Messages
8,131
Location
Southern USA
Format
Multi Format
Not of any use now but this points out the importance of keeping detailed notes when disassembling things. Diagrams are especially useful. Use a muffin tin to hold small parts as they are removed. Note what cup contains each part. Don't rely on memory.
 

Xmas

Member
Joined
Sep 4, 2006
Messages
6,398
Location
UK
Format
35mm RF
Double sided pressure sensitive tape and notes on paper stuck to bottom of print tray in addition to notes and photos.
 

AgX

Member
Joined
Apr 5, 2007
Messages
29,973
Location
Germany
Format
Multi Format
Use a muffin tin to hold small parts as they are removed. Note what cup contains each part.

I have several small-parts magazines made from Polystyrol and Polypropylene, with swing cover and partially even with adjustable spacers. I put parts or groups of parts in sepersate sections of the magazine in chronological order and stick notes at the appropriate parts of the cover.


Another issue is avoiding parts to roll off the desk. (I'm still working on a most-practicle solution.)

I once lost a srew from a Minox (of a size one only finds inside watches...) in a loop-pile carpet under my desk.

I guess the final solution would be to build a kind of white, smoth bassin to put desk and chair in...
 
Last edited by a moderator:
OP
OP

ergosyn

Member
Joined
Aug 10, 2015
Messages
2
Format
Sub 35mm
Thanks for the advice everybody. Looks like it’s time to dive in again. A nice big white basin would be nice to work in, maybe with a magnetic bottom!
 

DWThomas

Subscriber
Joined
Jun 13, 2006
Messages
4,606
Location
SE Pennsylvania
Format
Multi Format
I would tend to avoid magnets, as magnetizing small parts (like shutter blades!) more strongly might cause additional problems. When working on tiny assemblies I like to do it over a layer of light colored soft cloth. It does mean being careful not to pick up fuzz on reassembly, but microscopic parts dropping onto cloth tend to just plonk and settle where they are, versus bouncing and rolling on hard (plastic, laminate, etc.) surfaces.
 

MattKing

Moderator
Moderator
Joined
Apr 24, 2005
Messages
53,277
Location
Delta, BC Canada
Format
Medium Format
Thanks for the advice everybody. Looks like it’s time to dive in again. A nice big white basin would be nice to work in, maybe with a magnetic bottom!

Darkroom printing trays work well.
 

hsandler

Subscriber
Joined
Oct 2, 2010
Messages
472
Location
Ottawa, Canada
Format
Multi Format
I own an autocord and had it repaired by Karl Bryen, in Beaverton OR. He's considered the expert on Autocords and I found him very friendly and helpful. If you email him, perhaps he may be able to tell you where those screws go.

oops, that's Karl Bryan, not Bryen
 

John Koehrer

Subscriber
Joined
Apr 3, 2004
Messages
8,277
Location
Aurora, Il
Format
Multi Format
"big screws"? They look to be about 1mm long by2-3mm across the head. Something to hold sheet metal together but not mechanical.
 
Photrio.com contains affiliate links to products. We may receive a commission for purchases made through these links.
To read our full affiliate disclosure statement please click Here.

PHOTRIO PARTNERS EQUALLY FUNDING OUR COMMUNITY:


Ilford ADOX Freestyle Photographic Stearman Press Weldon Color Lab Blue Moon Camera & Machine
Top Bottom