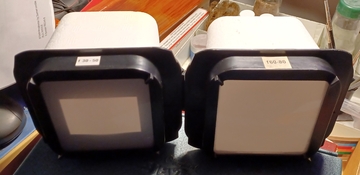
Hi! Yesterday I got my first enlarger - Meopta Ophemus 6 with the Color 3 color head. The enlarger came with both the 50mm and 80mm lens and an adjustable negative holder. Since I do both 35 and 120 film that's great. But what I didn't know at the time of the purchase is that you need a different mixing chamber for each lens. The included chamber is meant for 35mm negatives - which is very clear once you put a 6x4.5 negative in - parts of the image are cut off because of a metallic mask inside the chamber (since no light goes through).
Now, I can't find an appropriate mixing chamber on ebay and I kind of doubt that one will pop up. However I could find a Color 3 head with the correct chamber. So that is an option.
But I was thinking of a more hacky solution... the glue holding the styrofoam chamber on to the plastic frame has long since let go so the thing is very easy to disassemble. And by doing that I can remove the metallic mask that is inside (see pictures). The mask is just a piece of metal and that's it. And from the test pictures (with the negative carrier installed) you can actually see how it kind off acts a bit weird when installed. I have a feeling that when the stryofoam was glued it was pushing the mask totally against the plastic "lens" and now it isn't anymore so there is a bit of space there which probably causes more light to "leak out". Using RGB meter and just poking around the image the values at the top seem to match the values at the center. I've tested with a more "straight down image" and it looks nice and even. Of course that's checking on the image, but even to my eyes it looks very uniform.
What do you guys think... will this "hack" be ok or is it better if I try and source a different head with the correct chamber? I plan on doing some test prints during the weekend when I hopefully set everything up.