Masking well defined areas

Recent Classifieds

Forum statistics

Threads
199,246
Messages
2,788,511
Members
99,841
Latest member
Neilnewby
Recent bookmarks
0

lauffray

Member
Joined
Nov 6, 2015
Messages
214
Location
Montreal
Format
35mm
I've come across this problem a few times. I have a well defined area (outline that's not a straight line, has lots of detail, has a specific shape etc) on the print I need to dodge, nothing I can mask straightforwardly with my hands. So I cut out the shape I need to dodge from a previous print and use that. Except the edges are often hard to hide, in the sense that they become much more pronounced, which I understand to be the whole point behind unsharp masks for example (not what I'm trying to do).

I understand this is tricky to answer without any negatives at hand but is there a way to dodge areas with such precisely defined shapes without causing their edges to sharpen?
 

MattKing

Moderator
Moderator
Joined
Apr 24, 2005
Messages
53,277
Location
Delta, BC Canada
Format
Medium Format
Make a smaller print and cut out the shape from that.
Then use that smaller print as a dodging mask. You need to hold it at the right position above the easel, and keep it moving constantly, with much of the movement being up and down, rather than sideways.
The trick is to make the transition gradual.
And be prepared to make good use of the paper waste bin!
Good luck
 

bdial

Subscriber
Joined
Jan 2, 2005
Messages
7,474
Location
North East U.S.
Format
Multi Format
You can also put a piece of plain paper (or a scrap print, upside down) on the easel then trace the outline of the region you need to mask, cut it out and proceed as Matt suggests. The key, as Matt says is to keep the mask moving the entire time it's in the light path.
 

M Carter

Member
Joined
Jan 23, 2013
Messages
2,147
Location
Dallas, TX
Format
Medium Format
There's a much more accurate way - I often do the "trace on a paper higher in the enlarger path", but this gives halos for extreme changes.

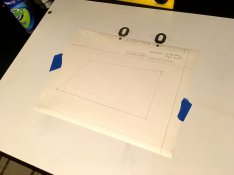
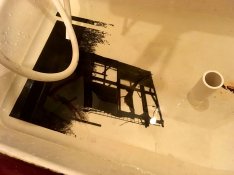
I got some register pins that are the same size as a 3-ring-binder punch. I punch the edge of the paper and register it to the baseboard. (Once you do this, you cannot touch the focus and even changing the iris can knock it all off). Then I punch a sheet of ortho-lith film, expose it, and get a high-contrast positive. I can contact print this to get a negative if needed, and use reducer to clean things up. (You can do all of this on the negative plane if you have a registered negative carrier, something I still need to do).

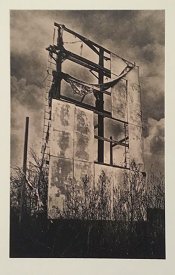
This is a crappy phone shot, but just this week I replaced the sky for this lith print:
board.jpg

This is the paper, registered to the baseboard:
paper.jpg

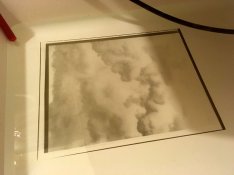
Here's the mask (you can see a register hole) and an 11x14 neg I made by contact printing an RC print onto litho film - I toned this to beef it up, too:

neg.jpg clouds.jpg

So I exposed the paper for x-time with dodging and burning, laid the mask over it with the cloud neg taped to that where I wanted it, and then exposed the clouds with more dodging and burning. Worked well for me, though I'd much rather be doing this all on the film plane - once I take this setup down, it will never be accurate again, but with registered negs for the carrier, I can do it again and again, at any size.
 

Sirius Glass

Subscriber
Joined
Jan 18, 2007
Messages
50,411
Location
Southern California
Format
Multi Format
I make a same size print, cut out the area and hold it close to the paper and constantly moving it while exposing the paper.
 

NJH

Member
Joined
Dec 30, 2013
Messages
702
Location
Dorset
Format
Multi Format
Thanks OP I was going to ask the same question, the answers you got were what I was looking for. Sirius Glass your approach is what I was planning on trying, but of course trying to not knock the easel with the butt of one of my hands (I bet I do that, lol).
 

rpavich

Member
Joined
Aug 24, 2015
Messages
1,520
Location
West virginia, USA
Format
35mm
Make a smaller print and cut out the shape from that.
Then use that smaller print as a dodging mask. You need to hold it at the right position above the easel, and keep it moving constantly, with much of the movement being up and down, rather than sideways.
The trick is to make the transition gradual.
And be prepared to make good use of the paper waste bin!
Good luck
You just solved one problem I've had doing this! For whatever reason, I've been moving "around" with the mask rather than up/down.
 

MartinP

Member
Joined
Jun 23, 2007
Messages
1,569
Location
Netherlands
Format
Medium Format
I've only done this big mask trick with a simple building-and-skyline, but I made a reduced size print by sticking a book in the printing area and putting some RC paper on top of that for the mask. I have been making dragons-teeth snips around the edge of smaller masks to help blend in the edge while moving them horizontally, but hadn't thought of moving the mask only vertically -- that will be tried this weekend! :smile:
 

rwhawkins

Member
Joined
Mar 6, 2009
Messages
24
Location
Oakland, CA
Format
4x5 Format
I'm sold on above negative masks. Lay a sheet of diffusion on top of the negative then a sheet of acetate that you scribble on, paint, make cutouts of various densities etc.
In addition to being very exacting you don't have to redo your work when you make a different size print.
 

M Carter

Member
Joined
Jan 23, 2013
Messages
2,147
Location
Dallas, TX
Format
Medium Format
Here's a better shot of the sky replacement using a paper-plane litho mask. This is probably about as accurate a mask as possible without a registered neg carrier, as far as getting very fine detail to mask out properly. But from here on, I think it's time to ghetto-up a registered film carrier. Don't like all the work that goes into a one-time-only print.

sign-final.jpg
 
Photrio.com contains affiliate links to products. We may receive a commission for purchases made through these links.
To read our full affiliate disclosure statement please click Here.

PHOTRIO PARTNERS EQUALLY FUNDING OUR COMMUNITY:


Ilford ADOX Freestyle Photographic Stearman Press Weldon Color Lab Blue Moon Camera & Machine
Top Bottom