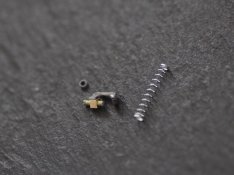
Mamiya 645 lost spring

$12.66

A
$12.66

  • 6
  • 3
  • 122
A street portrait

A
A street portrait

  • 1
  • 0
  • 151
A street portrait

A
A street portrait

  • 2
  • 2
  • 143
img746.jpg

img746.jpg

  • 6
  • 0
  • 111
No Hall

No Hall

  • 1
  • 8
  • 167

Forum statistics

Threads
198,804
Messages
2,781,084
Members
99,708
Latest member
sdharris
Recent bookmarks
1

darxmurf

Member
Joined
Jun 30, 2010
Messages
19
Location
Switzerland
Format
Medium Format
Hi all,

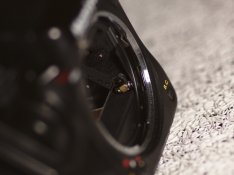
Yesterday my mamiya 645 Pro decided to stop it's mirror in middle position.
http://www.jafaphotography.com/images/eq/MYM645PTK1.jpg

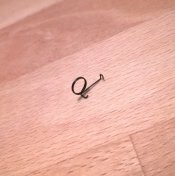
Then I found him

spring.jpg

I had a look on the web and foud this service manual page, which is maching the fact I had a mirror problem and all.
https://flic.kr/p/dhwBR3

Anybody already experienced that with this mamiya and could correct the issue ?

Thanks folks.
 
OP
OP

darxmurf

Member
Joined
Jun 30, 2010
Messages
19
Location
Switzerland
Format
Medium Format
Don't know if somebody is interested in but :

Here is the situation.
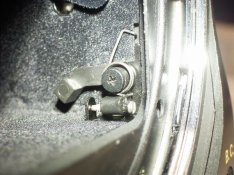
The part #6200-24611 is broken. As it's made of plastic, it's not that strong...
The spring which felt down is keeping it in position.

Originally it's mounted like this
mamiyaspring.jpg

Apparently this part discontinued and honestly I don't think it's super useful to have the possibility to adjust it with a screw...
Anyway, I will try to make a new one from aluminium and let you know if it's ok :smile:
 
OP
OP

darxmurf

Member
Joined
Jun 30, 2010
Messages
19
Location
Switzerland
Format
Medium Format
Hi again,

I could replace the part with a home made one.
Now I have to perform a mirror "calibration" to adjust the focus but what's the best way to do that ?

Thanks in advance !
 

rbultman

Member
Joined
Sep 1, 2012
Messages
411
Location
Louisville,
Format
Multi Format
Here is a totally made-up method which I think should work. I had a similar issue with a 645 Super and essentially used the equipment below to diagnose the problem. I did not fix it but the issue was the mirror stop that you so skillfully replaced.

You will need a tripod, ground glass, some subject to focus on, and a means of adjusting your new mirror stop.
Place the camera on the tripod.
Remove the prism or finder.
Open the rear door of the back and remove the insert. You should see the film rail that the film rests on when the insert is loaded in the back with film. The ground glass should be placed on the film rails with the frosted side towards the lens. If you don't have a ground glass, you can use a "spare" focus screen or a piece of frosted cellophane tape.
Set the shutter speed on B.
Remove the dark slide.
Focus on the subject. Using the focus screen. Use a loupe if necessary. One suitable subject is a ruler which will allow you to check the exact focus point.
Press the shutter button and hold it. Alternatively use a cable release if you have one available.
Check the focus on the ground glass.
Release the shutter button.
Adjust the mirror stop as needed until the image match.

Good luck!
 
OP
OP

darxmurf

Member
Joined
Jun 30, 2010
Messages
19
Location
Switzerland
Format
Medium Format
not only a good detective, but master craftsmen, and a photographer as well - if i wasn't married, (and you could boil water), wow!:tongue:

jvo

Well, I'm quite good in the kitchen too ... :whistling:

Here is a totally made-up method which I think should work. I had a similar issue with a 645 Super and essentially used the equipment below to diagnose the problem. I did not fix it but the issue was the mirror stop that you so skillfully replaced.

You will need a tripod, ground glass, some subject to focus on, and a means of adjusting your new mirror stop.
Place the camera on the tripod.
Remove the prism or finder.
Open the rear door of the back and remove the insert. You should see the film rail that the film rests on when the insert is loaded in the back with film. The ground glass should be placed on the film rails with the frosted side towards the lens. If you don't have a ground glass, you can use a "spare" focus screen or a piece of frosted cellophane tape.
Set the shutter speed on B.
Remove the dark slide.
Focus on the subject. Using the focus screen. Use a loupe if necessary. One suitable subject is a ruler which will allow you to check the exact focus point.
Press the shutter button and hold it. Alternatively use a cable release if you have one available.
Check the focus on the ground glass.
Release the shutter button.
Adjust the mirror stop as needed until the image match.

Good luck!

Cool, it was more/less what I was thinking ! Thanks !
Sweet, I have something to do this Sunday :D

In Switzerland, the Mamiya importer is asking 200$ to do the job ! hu ! :blink:
 

rbultman

Member
Joined
Sep 1, 2012
Messages
411
Location
Louisville,
Format
Multi Format
In Switzerland, the Mamiya importer is asking 200$ to do the job ! hu ! :blink:

I ended up buying a nearly new Pro body for $100. But, I still have the Super and would fix it if the part is not too difficult to make. Can you post some details regarding your repair?

Thanks,
Rob
 
OP
OP

darxmurf

Member
Joined
Jun 30, 2010
Messages
19
Location
Switzerland
Format
Medium Format
Hi all !

And here is the story !

[ THE TOOLS ]

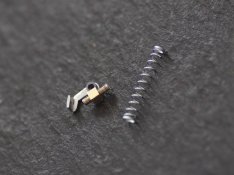
- the "replacement" part -
_MG_7500.jpg

_MG_7503.jpg

Talking about precision, I can say I did it with the softness of a backhoe... but the result is not too bad :D
I just need to fine tune it a bit but it works !

The main part is made from a spare aluminum IKEA part and the brass part is from a computer screw system. I glued them together (it looks ok for the moment but not sure if it will stand for a long time with repetitive mirror shocks.)

- the spring -

As I broke the original spring, I could not use it. At first I wanted to remove it and build a "locked" part but as the mirror is falling quite heavily, I think it's not too bad to have a minimum of shock absorption... the original spring was a bit "complicated" to reproduce (kind of "reverse spring", pulling the part), I decided to make it simple and replace it with a classic spring I borrowed from my pen :D
It works quite well, I can see the part moving and comming back in place when the mirror falls on it.

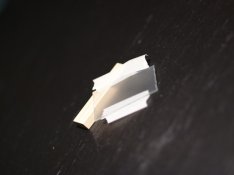
- the focusing glass -
_MG_7506.jpg

Again, thanks ikea for your cheap stuff, I could cut a piece of glass from a photo frame.
I tried first to blur it in my sandblasting machine. Although the result was quite nice, the "grain" was a bit heavy and the projected image on it was a bit like a Pointillism painting :D impossible to focus anything on it :D

So, I did another test using sandpaper... takes more time than the sandblasting but the result is much more fine !

- accessories -
tripod, small screwdrivers, paper tape, cutters, beer

[ THE PROCESS ]

Put the part back in the camera.
_MG_7504.jpg

First, remove the film rolls stuff and tape the focusing screen in the bottom of the back. As there is no film plane mark, I suppose this choice is correct...

focus.jpg

Then the game begins...
Mount your camera on the tripod, it should not move during the procedure, and keep the back open. Choose something to focus, put your camera on "bulb" and shoot. While the curtains are open, you will see the "picture" on your home made focusing screen. Adjust the focus of your lens while you check the sharpness of the image with a good magnifier. When the focus looks ok, release the shutter and check the focus on the top focusing screen. If not good, remove the lens, adjust the baby screw to move the mirror position, put the lens back and check focus... do that until the focus is correct on both focusing screens

I did it yesterday and loaded a film in the camera. I will shoot it today and check if everything is fine :smile:

Thanks for your attention and sorry for my english :munch:
 
OP
OP

darxmurf

Member
Joined
Jun 30, 2010
Messages
19
Location
Switzerland
Format
Medium Format
Yay !
Everything is fine, did shoot some random pics at different apertures and all good !
 

NitroRoo

Member
Joined
Jun 30, 2015
Messages
9
Format
35mm
Just wanted to bump this and say nice work! Wondering if your solution held up over time? I'm about to go down this path myself as my mirror stop just broke in two last night. It was definitely cracking and breaking slowly - I had been having some really inconsistent focus problems.
 
OP
OP

darxmurf

Member
Joined
Jun 30, 2010
Messages
19
Location
Switzerland
Format
Medium Format
Just wanted to bump this and say nice work! Wondering if your solution held up over time? I'm about to go down this path myself as my mirror stop just broke in two last night. It was definitely cracking and breaking slowly - I had been having some really inconsistent focus problems.

Hi there,
2 years after you post :D
Okay, I have again focus issues. I think the spring I used for my dirty fix is not that good anymore.
I'll try to build something different to fix it again. Will keep you informed !
 
Photrio.com contains affiliate links to products. We may receive a commission for purchases made through these links.
To read our full affiliate disclosure statement please click Here.

PHOTRIO PARTNERS EQUALLY FUNDING OUR COMMUNITY:


Ilford ADOX Freestyle Photographic Stearman Press Weldon Color Lab Blue Moon Camera & Machine
Top Bottom