-
Welcome to Photrio!Registration is fast and free. Join today to unlock search, see fewer ads, and access all forum features.Click here to sign up
You are using an out of date browser. It may not display this or other websites correctly.
You should upgrade or use an alternative browser.
You should upgrade or use an alternative browser.
Making a UV projector for alt-process prints
-
H
- Thread starter AndrewBurns
- Start date


Recent Classifieds
-
For Sale Voigtländer Nokton Classic 35mm/1.4 with Leica M-mount
- Started by Klaus Mähring
-
For Sale Voigtländer Bessa R2 Special Edition Olive Green
- Started by Klaus Mähring
-
For Sale FS: Horseman Cable Release
- Started by B.S.Kumar
-
Sold SOLD!
- Started by B.S.Kumar
-
For Sale Synchro-Compur shutter, Ektar 4.7/127 lens
- Started by OAPOli
Forum statistics
AndrewBurns
Member
Here are some bad phone photos of an A3-sized print I just made, will give them a go with coffee toning tomorrow.
Here's the print, using an adjustment curve made with the test print I made earlier today, maybe a little bit on the light side but we'll see how it looks after toning.

For an idea of how sharp the detail is, here's a zoomed up shot of the radio tower (best I could get with my phone camera, but the detail is extremely fine).

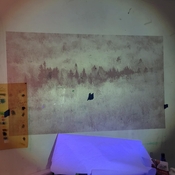
The corners are a little blurry because I literally stuck the paper to my garage door with magnets and rolled the projector into place on a trolley!
Another thing I want to try sometime now that I have a working UV projector is exposing some kind of pigmented emulsion coated onto glass from the rear side of the glass.
Here's the print, using an adjustment curve made with the test print I made earlier today, maybe a little bit on the light side but we'll see how it looks after toning.
For an idea of how sharp the detail is, here's a zoomed up shot of the radio tower (best I could get with my phone camera, but the detail is extremely fine).
The corners are a little blurry because I literally stuck the paper to my garage door with magnets and rolled the projector into place on a trolley!
Another thing I want to try sometime now that I have a working UV projector is exposing some kind of pigmented emulsion coated onto glass from the rear side of the glass.
Ethan Brossard
Member
Digital projector has made its first real print! There are a lot of quality of life improvements to make to it, but for now it's usable.
This is just after washing so it will darken a fair bit as it dries down. Ignore the very rapid tonal transition from blue to white, cyanotype always seems to do this with these LCD screens, I presume it's some combination of the technique having an abrupt tonal transition and the LCD screens having a pretty high contrast ratio.
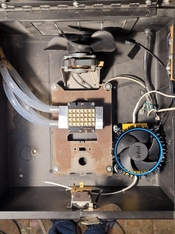
This was a 30 minute exposure at ~350W LED power which is about as high as I want to go. Projected image is about A4 sized (smallest I can project). Focused by eye (through UV laser glasses!) and the image is very sharp and contrasty. There's clearly a slight vignette, which is inverted, so the middle of the frame is darker than the edges, but I should be able to compensate for that easily enough.
What I really need to figure out now is how to hold the paper perfectly square to the projector and keep it flat during exposure. I used a combination of tape and clips to hold this small sheet to a plastic board but during the exposure the paper still bowed slightly, probably from temperature change. Some sort of vacuum frame might be the way to go, but I'm not sure where I could put it as I'm kinda space-constrained.


Very nice! the large amount of white areas make sense. The cyanotype process requires a relatively low contrast negative, and these LCDs are very fairly high contrast compared to a film negative.
AndrewBurns
Member
I had a crack at making the largest print I could fit into my washing tray (58x42cm) and it worked but it was a bit of a dud as I think I under-exposed it by about a stop. I gave it 1 hour 15 minutes but probably more like 2 hours was needed, I had to run the LED at a little less power because at these bigger enlargements the LCD gets a tighter focus of light and I was worried about heating.
Another thing that I'm seeing are concentric rings in the prints from the fresnel condensing lenses, only in the corners of the prints, not really noticeable in the smaller enlargements but getting quite obvious in the big print. I'm not entirely sure why they're showing up as the fresnels should be significantly back from the focal plane of the enlarger lens and so should be quite out of focus, but they're definitely there. I might need to look at some kind of diffusion on the light either between the two fresnels or after the second one to try to get rid of the rings.
Realistically I think the A3 prints are as large as I should be going with classic cyanotype, exposures over an hour are getting a bit silly so if I want to make big prints I either need to look at faster cyanotype formulations or sort out SbQ.
AndrewBurns
Member
As mentioned above I wanted to try some faster cyanotype solutions more suited to enlarging/projecting than classic cyanotype but I didn't want it to get too far from the classic formula because ultimately I still wanted it to be super cheap and easy to do. After looking around a bit I stumbled on the 'blue sheet' formula from here: https://slyka.net/blog/2023/making-better-cyanotypes/
Basically it's just classic cyanotype with the ferricyanide replaced with ferrOcyanide and that's it. The ferrocyanide forms prussian white when exposed but over time that oxidises to prussian blue and it's supposed to be a lot faster to expose. It gets the name 'blue sheet' because when the ferrocyanide and FAC are mixed together a small amount of prussian blue instantly forms, leaving a blue stain on the sheet when brushed on, but this blue stain washes off easily after exposure and doesn't seem to cause any problems.
Here's the 'blue sheet' formula immediately after coating:

Here's the same sheet after exposing in 2 minute steps from 2 to 12 minutes, as you can see there's some latent image (inverted) but nowhere near as much as classic cyanotype due to the formation of prussian white rather than blue:

Full density of blue pigment seems to have been reached after about a day or so from developing, tempted to get some peroxide to speed the process up (the blue sheet exposure is on the left in this photo):

Full density appears to be reached after about 10 to 12 minutes, which for this level of enlargement with the projector would take about 35+ minutes with classic cyanotype, so it's at least 3 times faster which is great.
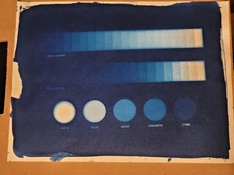
Dmax is maybe slightly lower than I was getting with classic cyanotype, but there's not much in it. Here you can compare the dmax of the border of a classic cyanotype print (bottom) to the blue-sheet formula (left):

I also tried the 'cyanotype rex' system where only the FAC is brushed onto the paper, exposed, and then the ferri/ferrocyanide is brushed onto the paper after exposure. This is supposed to be even faster than the blue-sheet mix however I didn't really find that to be the case. Here's a print I made with this method, the lighter strip was brushed with ferricyanide and the darker strip was brushed with ferrocyanide.

Again exposure was done in steps from 2 to 14 minutes in this case, and full density was reached at around 10 to 12 minutes. So not any faster than the pre-mixed blue-sheet and it stained the highlights where the premix didn't.
Overall pretty happy with the blue-sheet modification to the cyanotype formular, 3X speed increase is nothing to sneeze at. I'm currently drying a sheet I will use for making a calibration test pattern, this time I also included a little surfactant hoping that I can get the mix to absorb into the paper a little more to improve dmax.
Basically it's just classic cyanotype with the ferricyanide replaced with ferrOcyanide and that's it. The ferrocyanide forms prussian white when exposed but over time that oxidises to prussian blue and it's supposed to be a lot faster to expose. It gets the name 'blue sheet' because when the ferrocyanide and FAC are mixed together a small amount of prussian blue instantly forms, leaving a blue stain on the sheet when brushed on, but this blue stain washes off easily after exposure and doesn't seem to cause any problems.
Here's the 'blue sheet' formula immediately after coating:
Here's the same sheet after exposing in 2 minute steps from 2 to 12 minutes, as you can see there's some latent image (inverted) but nowhere near as much as classic cyanotype due to the formation of prussian white rather than blue:
Full density of blue pigment seems to have been reached after about a day or so from developing, tempted to get some peroxide to speed the process up (the blue sheet exposure is on the left in this photo):
Full density appears to be reached after about 10 to 12 minutes, which for this level of enlargement with the projector would take about 35+ minutes with classic cyanotype, so it's at least 3 times faster which is great.
Dmax is maybe slightly lower than I was getting with classic cyanotype, but there's not much in it. Here you can compare the dmax of the border of a classic cyanotype print (bottom) to the blue-sheet formula (left):
I also tried the 'cyanotype rex' system where only the FAC is brushed onto the paper, exposed, and then the ferri/ferrocyanide is brushed onto the paper after exposure. This is supposed to be even faster than the blue-sheet mix however I didn't really find that to be the case. Here's a print I made with this method, the lighter strip was brushed with ferricyanide and the darker strip was brushed with ferrocyanide.
Again exposure was done in steps from 2 to 14 minutes in this case, and full density was reached at around 10 to 12 minutes. So not any faster than the pre-mixed blue-sheet and it stained the highlights where the premix didn't.
Overall pretty happy with the blue-sheet modification to the cyanotype formular, 3X speed increase is nothing to sneeze at. I'm currently drying a sheet I will use for making a calibration test pattern, this time I also included a little surfactant hoping that I can get the mix to absorb into the paper a little more to improve dmax.
Neither looks very dense, though. Surely, you've gotten much higher dmax from cyanotype using regular contact exposure methods?Dmax is maybe slightly lower than I was getting with classic cyanotype, but there's not much in it. Here you can compare the dmax of the border of a classic cyanotype print (bottom) to the blue-sheet formula (left):
AndrewBurns
Member
Neither looks very dense, though. Surely, you've gotten much higher dmax from cyanotype using regular contact exposure methods?
The edge of the small strip in the second to last picture is about as dense as I get with my contact printing setup (as that's how I made that strip). Maybe the lighting makes it seem brighter? In person the shadow densities seem fine to me, particularly after toning, but I haven't really compared them to anybody elses prints.
calebarchie
Subscriber
Might be time to invest in a cheap reflection densitometer?
AndrewBurns
Member
I have a Colormunki photo spectro that I use with Argyll CMS so I can easily take spot readings to compare dmax between prints.
No photos currently but I've been trying a few things to see what I can do about dmax and it mostly seems to be limited by paper coating rather than exposure, my paper isn't very absorbent and so it's not easy to load more chemistry into it. I've tried adding some surfactant and it might help but when I added too much it caused some pretty bad paper staining (along with a very decent dmax).
Another thing I've noticed is the tonal range of the blue-sheet formula is much longer than classic cyanotype, it will be interesting to see how the curves compare when I measure everything.
the tonal range of the blue-sheet formula is much longer than classic cyanotype
This doesn't surprise me; other cyanotype formulas like Simple Cyanotype also feature a much longer tonal scale than the original.
Your dmax issue sounds mostly like a suboptimal paper choice?
AndrewBurns
Member
Actually here's a photo I just took. Classic cyanotype left, blue-sheet middle and right. Middle was one drop of 10% polysorbate 20 in 6mL sensitiser and right was no surfactant. Also the classic cyanotype was on Hahnemuhle harmony watercolour paper while the middle and right are on Fluid brand watercolour paper. All were exposed with the projector but classic was 30 minutes (at a slightly smaller enlargement) while the two blue-sheets were 12 minutes. They were all exposed with the same image, and you can see the difference in tonal range.

I expect the blue sheets to get slightly darker as they've only been oxidising for a few hours, but not significantly so. The classic one is definitely darker but I think that's not due to the chemistry but something about how the paper was coated as that print was unusually dark for what I normally get, the two blue-sheet ones are closer to my normal exposure density.
I need to get some more of the Hahnemuhle harmony paper which I have run out of as I think it's better than the Fluid stuff in terms of sizing. I also have a roll of Hahnemuhle platinum rag I could use to check as a bit of a 'control' test.
AndrewBurns
Member
Here's a calibration curve I generated for the bluesheet chemistry vs. two I've made for classic cyanotype on two different papers, as you can see much more linear through the midtones.

AndrewBurns
Member
Got a reasonable result making the biggest print I can currently develop (based on my biggest washing tray, about 22x17") using the blue sheet formula. Density is pretty low, I've had trouble getting chemistry to soak into this paper, but the tonality is much better than classic cyanotype in my opinion, and it exposed in what I'd consider a reasonable time for such a large print with my projector (about 1/3rd of the time classic cyanotype would have needed).

Something I want to try is toning before the print dries after developing. Because the blue sheet formula initially makes prussian white, which oxidises to prussian blue over time, I wonder if I can just tone immediately after developing and before the pigment oxidises. I would assume that would be similar to bleaching prior to toning, except without having to do the bleach step.
Something I want to try is toning before the print dries after developing. Because the blue sheet formula initially makes prussian white, which oxidises to prussian blue over time, I wonder if I can just tone immediately after developing and before the pigment oxidises. I would assume that would be similar to bleaching prior to toning, except without having to do the bleach step.
Great looking print @AndrewBurns !
I confess though I look at it and expect to find a group led by a Wizard, followed by an elf, a man, a dwarf and a couple of hobbits ......
I confess though I look at it and expect to find a group led by a Wizard, followed by an elf, a man, a dwarf and a couple of hobbits ......
I wonder if I can just tone immediately after developing and before the pigment oxidises
I'd expect so, since as you said, the regular toning process seems to essentially do the same. Easy enough to try on a scrap?
Beautiful print! How long was the exposure on that one?
AndrewBurns
Member
I'd expect so, since as you said, the regular toning process seems to essentially do the same. Easy enough to try on a scrap?
Beautiful print! How long was the exposure on that one?
Thanks! 45 minutes for that one. And I've just finished my attempt at toning a print immediately after developing, looks good so far but will have to see how it dries. I'm going to be showing a number of these prints at an analogue/film/darkroom/alt-process printing festival here in November so I don't have too long to settle on a technique!
AndrewBurns
Member
Ok so it seems like toning immediately after developing works, and actually I think it works even better than what I was doing previously (waiting a day for the print to dry and oxidise, re-wetting the paper and brush toning without bleaching). Presumably it's more effective because the pigment is effectively partially bleached already which is a step I never did. I feel like it does lose a bit of the split-tone effect I was getting before because the shadows are more effectively toned and lose a bit of the blue cast they had, but I should possibly get that back by toning for less time.

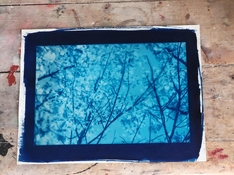
This is an A3 sized piece of paper, image area itself is slightly larger than 8x10" and it was a 15 minute exposure, which probably could have been dropped to 12 minutes or so. The detail is pretty incredible, I can get my face as close to the print as I can focus my eyes and not reach a limit to the detail in the tree trunks.
This is an A3 sized piece of paper, image area itself is slightly larger than 8x10" and it was a 15 minute exposure, which probably could have been dropped to 12 minutes or so. The detail is pretty incredible, I can get my face as close to the print as I can focus my eyes and not reach a limit to the detail in the tree trunks.
AndrewBurns
Member
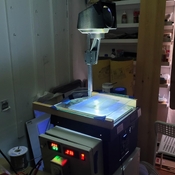
I've made myself an easel/rail system for holding the projector and paper in alignment. The projector sits on horizontal rails which let me slide it towards/away from the paper for different enlargements, while the paper is held flat and perpendicular to the projector.


Currently holding the paper to the board with magnets but I laser-cut a large number of holes into it and I'll eventually build a vacuum system to suck the paper flat onto the board. I'll also mount a row of registration pins along the top edge for when I need to do multiple layers.

It's amazing what fluoresces under UV light! Obviously any 'fluro' material but also lots of white things like plastics or textiles that must have optical brighteners in them.

I'm still struggling with concentric rings from the fresnels in larger prints right now. I tried using the diffusing film I currently have in my contact printing setup but whatever material it's made from must strongly absorb shorter wavelengths because it resulted in a massive reduction in light getting through the system. I'll play with moving the condenser lenses around to see if changing their position relative to the LED or projection lens can make a difference.
Currently holding the paper to the board with magnets but I laser-cut a large number of holes into it and I'll eventually build a vacuum system to suck the paper flat onto the board. I'll also mount a row of registration pins along the top edge for when I need to do multiple layers.
It's amazing what fluoresces under UV light! Obviously any 'fluro' material but also lots of white things like plastics or textiles that must have optical brighteners in them.
I'm still struggling with concentric rings from the fresnels in larger prints right now. I tried using the diffusing film I currently have in my contact printing setup but whatever material it's made from must strongly absorb shorter wavelengths because it resulted in a massive reduction in light getting through the system. I'll play with moving the condenser lenses around to see if changing their position relative to the LED or projection lens can make a difference.
AndrewBurns
Member
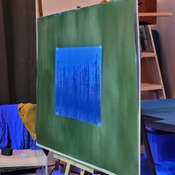
Managed to solve the concentric ring problem by spacing the first condenser lens 6mm closer to the LED. I have no idea how this works and don't really care, so long as the rings are gone (and it doesn't seem to have changed the efficiency of the system noticeably).
Here's the first condenser lens being held 6mm off from where it originally was with some spacers I 3D printed.

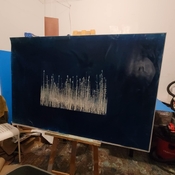
Here's the biggest print I've made so far, no evidence of concentric rings in the corners at all. This was printed with the 'blue sheet' cyanotype formula and coffee toned immediately after developing but before the print had dried and oxidised. Still wet and I think a bit of the warmth will go away as it dries down, but I'm quite pleased with it.

Here's the first condenser lens being held 6mm off from where it originally was with some spacers I 3D printed.
Here's the biggest print I've made so far, no evidence of concentric rings in the corners at all. This was printed with the 'blue sheet' cyanotype formula and coffee toned immediately after developing but before the print had dried and oxidised. Still wet and I think a bit of the warmth will go away as it dries down, but I'm quite pleased with it.
AndrewBurns
Member
Fun fact, post-it notes make a really good focusing aid for a UV projector! The paper I use doesn't have much/any optical brightener and so it can be very hard to adjust focus even in a dark room with 380nm light. But post-it notes are full of fluorescent dye which glow beautifully under UV and show the image focus very easily and sharply. This way you can focus while still wearing protective glasses.

AndrewBurns
Member
I'm not 100% sure about my measurements, but I suspect that my projector's UV output has dropped by between 20% and 30% since it was new. I'm not sure where the power has gone as I don't have any real baseline measurements for each of the components, but I figure it could be from the LEDs degrading, the LCD or lenses becoming more UV-opaque or some combination of both. Either way kinda concerning as I don't think it would have run for even 50 hours yet and if I had to replace any of those components it wouldn't be cheap.
I saw that one monochrome LCD screen supplier has started offering a design that uses a yellow polarising film specifically designed for UV transmission, compared to the standard options that are actually designed for visible light despite being sold for UV use. I kinda suspect that it's the LCD screen degrading as it absorbs by far the majority of the UV energy and so has the higher chance of getting damaged, so if it does seem to be the case and it gets significantly worse I might try to replace it with the yellow-film type screen in the hopes that it might be more resistant to degradation.
If indeed the system is degrading rapidly, presumably due to the enormous UV intensity flying around in there, it gives me even more reason to focus on the PVA-SbQ type printing, which is literally 100 times faster than classic cyanotype.
ErikLevesque
Member
Hello Andrew. This project of yours is very cool!
I am working on something somewhat similar, though mine looks quite more on the gerry-rigged side of things.
I too got the itch for building a UV large format enlarger, and spent a couple of months last year trying many ways to get there.
Mono LCDs large enough were out of range budget wise, so I bought a couple of old overhead projectors and went to town.
Yes, high power UV LED cobs are very scary to tinker with, so I built myself a couple of safety features along the way.
The COB I chose is similar to the one you use, but I chose the 365nm range, and the LED has a narrower array configuration (7x4), totalling 280W.
It had to be water cooled too, not as elegantly done as your setup: double stacked budget aluminum blocks and a 150L blue barrel. The water pump is high flow, so I added a low voltage electric relay switch to cut me main power of the entire enlarger if water hits the floor. I didn't want to risk flooding the downstair neighbours.
To avoid any accidental overrun of the COB, I added a thermo regulator via an electronic thermostat, set to cut the power to the COB if temperature hits 50°C. The probe is fixed to the COB with thermal paste.
Adding an ammeter seemed necessary, to monitor and maximise V to W ratio, without compromising the LEDs lifespan.
My main challenge was, and still is, collimation:
the fresnels kept melting, and I can't justify investing in glass collimation lens for 8x10 negatives, so my temporary solution is to stick with the contact negative option.
I am nothing close to being an engineer, and focusing the light array is a real pita. I tried mirrors, anamorphic lenses, fresnels…
I also thought about trying the reflection chamber option, but there would be too much radiation loss.
My goal is to print large cyanotypes (and other alt print methods) of about 60" wide, ideally.
With the 280W COB, using contact negatives, I believe the light might be usable for even wider prints exposed in a reasonable amount of time (within an hour), as long as the heat is controlled.
I planned to use my vintage nikon 305mm large format enlarger lens… and with everything I tried yet, I still didn't manage to collimate enough light to make a print through it. But I was able to project an image 74" wide from a 8x10 negative.
Using contact negatives, I can properly expose tabloid format prints within a 5min exposure.
As radiation is inversely exponential to the distance, a 60" wide print takes about 20min.
Starting this project with a very low budget in mind, I still ended up spending over $1500 in parts (new and used), chemicals, paper, eye protection… Hehe, another rabbit hole, but I'm hooked!
I recently moved and had to box everything related to art projects, and I can't wait to have the permanent darkroom setup again.
Cheers!
Attachments
-
 ab624e34-26f7-4c57-90bb-2be211f0cac7.jpeg144.3 KB · Views: 94
 -
 1658ce40-82bd-4e2f-90d2-aa685fa484c1.jpeg245.4 KB · Views: 90
 -
 f840348e-f3cc-424d-bd24-ed0b44903bc9.jpeg165 KB · Views: 98
 -
 ed56cfa8-8c9d-49a6-921c-6fb46901a3f9.jpeg178.5 KB · Views: 84
 -
 18460b8a-88f1-4306-bdfc-d522047c923d.jpeg266.5 KB · Views: 84
 -
 a49ab8e7-fe3b-479b-9958-782154f16cfe.jpeg157.3 KB · Views: 89
 -
 3066ab58-fdf5-4a07-aae1-f2e203bad028.jpeg184.6 KB · Views: 90
A truly spectacular achievement and great photo looking! A 350W UV LED, wow...
I've done a little work related to DLP UV projection, so I'm curious about that have you tested the cyanotype process for different wavelengths like 405 nm? Increasing the UV wavelength from 365-385 nm to 405 nm means that many devices designed for visible light can operate much better, and sometimes the increased transmission efficiency can compensate for the decrease in photon energy. This article here suggests that the exposure efficiency of 405nm is about half that of 365nm: https://pubs.rsc.org/en/content/getauthorversionpdf/C4PP00166D
I've done a little work related to DLP UV projection, so I'm curious about that have you tested the cyanotype process for different wavelengths like 405 nm? Increasing the UV wavelength from 365-385 nm to 405 nm means that many devices designed for visible light can operate much better, and sometimes the increased transmission efficiency can compensate for the decrease in photon energy. This article here suggests that the exposure efficiency of 405nm is about half that of 365nm: https://pubs.rsc.org/en/content/getauthorversionpdf/C4PP00166D
| Photrio.com contains affiliate links to products. We may receive a commission for purchases made through these links. To read our full affiliate disclosure statement please click Here. |
PHOTRIO PARTNERS EQUALLY FUNDING OUR COMMUNITY:  |