
Im looking to make my own printing frame, If any one has one would you be able to give dimensions of the wood used. many thanks
-
Welcome to Photrio!Registration is fast and free. Join today to unlock search, see fewer ads, and access all forum features.Click here to sign up
You are using an out of date browser. It may not display this or other websites correctly.
You should upgrade or use an alternative browser.
You should upgrade or use an alternative browser.
Making a printing frame
-
A
- Thread starter Gary Hamilton
- Start date

Recent Classifieds
-
For Sale Niko28mm f3.5 PC-Nikkor
- Started by Rayt
-
Want to Buy Rapid Rectilinear lens for 8x10 or larger
- Started by blee1996
-
Free GONE French lens probably early XIXcentury
- Started by Gaston 012
-
Sold Ilford 4x5 FP4+ (Expired June 2023)
- Started by CreationBear
-
Sold Beseler Audible/Repeating Enlarging Timer w/ foot switch
- Started by CreationBear
Forum statistics
Its not really the size of the frame but the dimensions of the wood used im after
If nobody else answers the question, put a bug in my ear with a PM tomorrow and I'll go get out my "antique" frame tomorrow and take some measurements. I think it's about 10x12 or maybe a bit bigger. Of ourse the frame itself is not really a big deal, but rather how you plan to make the spring back. A frame needs to be hinged, and therefore 2 pieces of spring steel will need to be fashioned. The whole thing is so simplistic that cooking one up needn't be complicated. Of course I have a 17" 3D printer. Drawing up one in Freecad and printing one out would be child's play. But you'd sill need some spring steel.
Its not really the size of the frame but the dimensions of the wood used im after
Well, it matters a lot whether you're building a frame for 4x5", 8x10", 11x14"....
Do you have any particular design you're going to build?
But you'd sill need some spring steel.
That's one way of doing it, but the frames I've built don't use spring steel. One reason is that for bigger frames (11x14" and bigger), spring steel isn't such a great option to begin with.
Its not really the size of the frame but the dimensions of the wood used im after
I think you're probably better off finding a place to buy one from....
If nobody else answers the question, put a bug in my ear with a PM tomorrow and I'll go get out my "antique" frame tomorrow and take some measurements. I think it's about 10x12 or maybe a bit bigger. Of ourse the frame itself is not really a big deal, but rather how you plan to make the spring back. A frame needs to be hinged, and therefore 2 pieces of spring steel will need to be fashioned. The whole thing is so simplistic that cooking one up needn't be complicated. Of course I have a 17" 3D printer. Drawing up one in Freecad and printing one out would be child's play. But you'd sill need some spring steel.
Yeah if you could that would be great
Probably A4 size for the time being.Well, it matters a lot whether you're building a frame for 4x5", 8x10", 11x14"....
Do you have any particular design you're going to build?
That's one way of doing it, but the frames I've built don't use spring steel. One reason is that for bigger frames (11x14" and bigger), spring steel isn't such a great option to begin with.
Its not really the size of the frame but the dimensions of the wood used im after
What's the difference and also, what glass are you using? I always heard that plain glass is a UV filter. Isn't that defeating the purpose?
This advertisement gives most dimensions. The 2-inch frame looks like 1x2 stock. The older frames (8x10) I have seem to be about 2x2 wood stock. The smaller ones have daintier wood frames.
But as Ralph suggests, it might not matter too much so long as the frame is stout enough to not flex.
But as Ralph suggests, it might not matter too much so long as the frame is stout enough to not flex.
Darkroom DIY: Making a contact print frame – AlternativePhotography.com
 www.alternativephotography.com
Contact printing frame
Most of you who work with these have probably picked your contact printing frame(s) up second hand or even new. When I was looking for one last year, I couldn't find any for a reasonable price, so I decided to construct one myself. I'm not a carpenter, nor a very proficient DIY-er, and I don't...
www.largeformatphotography.info
Thanks was thinking 2x2This advertisement gives most dimensions. The 2-inch frame looks like 1x2 stock. The older frames (8x10) I have seem to be about 2x2 wood stock. The smaller ones have daintier wood frames.
But as Ralph suggests, it might not matter too much so long as the frame is stout enough to not flex.
Yeah if you could that would be great
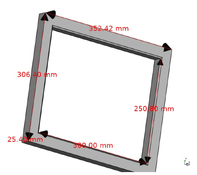
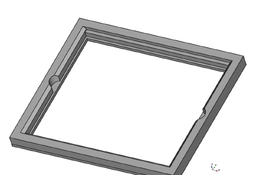
OK I'm drawing up mine exactly in Freecad, as I can do better that way than on paper But as I examine and measure it, I think how laborious it would be to make one in a wood shop. Byt the ime I get through with doing my Freecad on it, it would be a lot easier to just 3D print one than make one in a wood shop. First time I've ever actually examined it. It is stamped CENURY 10X12. I never knew that. This thing could go back to the 1800's for all I know. Stand by. I'll have mechanical drawings directly.
OK I'm drawing up mine exactly in Freecad, as I can do better that way than on paper But as I examine and measure it, I think how laborious it would be to make one in a wood shop. Byt the ime I get through with doing my Freecad on it, it would be a lot easier to just 3D print one than make one in a wood shop. First time I've ever actually examined it. It is stamped CENURY 10X12. I never knew that. This thing could go back to the 1800's for all I know. Stand by. I'll have mechanical drawings directly.
Thank you
Probably A4 size for the time being.
It never hurts to size it generously.
-

- F4U
- Deleted
- Reason: Temporarily deleted for corrections
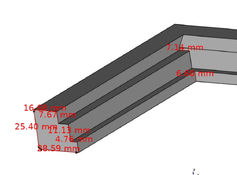
Here is te completed frame, less back. It's late. Ill do the back tomorrow. I set this up for woodworkers or 3D printers. You make your own choice. On a Neptune 4 Max it will take 15hrs, 19m requiring 515g of PETG filament at 50% infil. For woodworkers, here is the plan. Do it however you want. The finger holes are 1 1/4 inch diameter. the glass is 3/32 x 10 x 12. The zipped file is the stl
Attachments
I always heard that plain glass is a UV filter.
That's not really accurate. Plain float glass is perfectly suitable for a UV-sensitive process contact frame. The transmission of a few mm of regular float glass for the relevant UV wavelengths for this purpose is very good, and in fact the best practical choice.
I wonder how well a 3D printed contact frame would work. Have you tried it?I set this up for woodworkers or 3D printers.
From a woodworking perspective, the drawing is nice, but does it take into account commercially available standard sizes? I don't see any construction details.
Probably A4 size for the time being.
The frame I use most often is A4-sized; it uses a glass plate from a cheap picture frame. I made the front of 18x28mm wood with 18x18mm glued to it to make the recess.
The construction concept is far more important to decide on than the size of the wood. The latter follows from the former. A lot depends on how you make the glass fit into the frame, how you will generate and distribute the pressure on the back&print&glass, how you'll want to join the bits of wood etc. Once you've figured that out, the material choices come into play.
That would take 5 minutes to make out of wood. But it's not how I would make it.
The easiest way to get a good, strong frame is to find an aluminum picture frame. It already is made to hold glass, it also is made for clamping the backing into place - although you'd want to use something different. Glass - negative - print - sheet of plywood - some strips of wood that span the plywood and go into the grooves of the frame tensioned by a couple of wedges.
The easiest way to get a good, strong frame is to find an aluminum picture frame. It already is made to hold glass, it also is made for clamping the backing into place - although you'd want to use something different. Glass - negative - print - sheet of plywood - some strips of wood that span the plywood and go into the grooves of the frame tensioned by a couple of wedges.
Most aluminium picture frames I've seen/dealt with so far would not be very fit as contact printing frames. The somewhat wavy, wayward nature of the papers we often use require more pressure than a regular display frame can muster. The result of using regular frames is fuzzy areas in the prints; I'm sure many have gone through this (I sure have).
I'm not talking about a cheap aluminum frame but one you get when a photo is professionally framed. You can exert plenty of pressure on that - more than glass from any cheap photo frame could handle.
With such a frame, you'd also get good glass - thicker than you get from Walmart-or-equivallent frames. Most cheap photo frame glass is around 1mm.
Personally, I'd make one out of wood, just because I would include a clamping method in the construction. If I knew I would only use a certain thickness paper+negative, I'd hinge the back and just have a simple rotating lock to clamp it closed.
If I knew I would only use a certain thickness paper+negative, I'd hinge the back and just have a simple rotating lock to clamp it closed.
That would work quite well. I mostly end up using a pair of wedges that sit between both halves of the hinged back and two crossbars. This is also quick & easy to set up. I've never liked the idea of spring steel snapping into the soft flesh of my hands while releasing the back.
The proper implementation for spring steel would be to have it underneath a rotating rigid bar that slips into locking grooves to put pressure on the back. The steel itself shouldn't be free to rocket out upon release. Another way to similarly use a rotating bar to lock the back would be to set its ends into angled grooves so the more you turn it, the more pressure exerted, and that would require no spring. (All that in a wooden frame)
The aluminum photo frames I mentioned always have a number of steel springs that slip in to press the backing against the matt. Those things can shoot into your eye if you're not careful when removing them.
The aluminum photo frames I mentioned always have a number of steel springs that slip in to press the backing against the matt. Those things can shoot into your eye if you're not careful when removing them.
I've been printing platium/palladium for over 40 years and I have always used two pieces of quarter inch plate glass clamped together with industrial spring clamps. I don't know why anyone wants to use a wooden frame which is hard to get a tight register and often gives slivers of wood. If you are doing print out and need to examine the print you could clamp the top glass to a piece of wood that is in two parts.
| Photrio.com contains affiliate links to products. We may receive a commission for purchases made through these links. To read our full affiliate disclosure statement please click Here. |
PHOTRIO PARTNERS EQUALLY FUNDING OUR COMMUNITY:  |