Gary Hamilton
Member
Im looking to make my own printing frame, If any one has one would you be able to give dimensions of the wood used. many thanks


Its not really the size of the frame but the dimensions of the wood used im after
But you'd sill need some spring steel.
Its not really the size of the frame but the dimensions of the wood used im after
If nobody else answers the question, put a bug in my ear with a PM tomorrow and I'll go get out my "antique" frame tomorrow and take some measurements. I think it's about 10x12 or maybe a bit bigger. Of ourse the frame itself is not really a big deal, but rather how you plan to make the spring back. A frame needs to be hinged, and therefore 2 pieces of spring steel will need to be fashioned. The whole thing is so simplistic that cooking one up needn't be complicated. Of course I have a 17" 3D printer. Drawing up one in Freecad and printing one out would be child's play. But you'd sill need some spring steel.
Probably A4 size for the time being.Well, it matters a lot whether you're building a frame for 4x5", 8x10", 11x14"....
Do you have any particular design you're going to build?
That's one way of doing it, but the frames I've built don't use spring steel. One reason is that for bigger frames (11x14" and bigger), spring steel isn't such a great option to begin with.
Its not really the size of the frame but the dimensions of the wood used im after
 www.alternativephotography.com
Thanks was thinking 2x2This advertisement gives most dimensions. The 2-inch frame looks like 1x2 stock. The older frames (8x10) I have seem to be about 2x2 wood stock. The smaller ones have daintier wood frames.
But as Ralph suggests, it might not matter too much so long as the frame is stout enough to not flex.
Yeah if you could that would be great
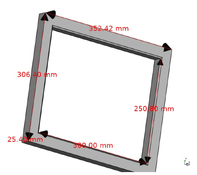
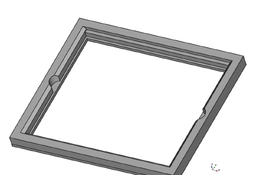
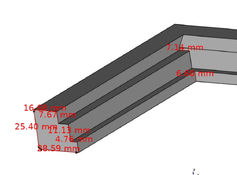
OK I'm drawing up mine exactly in Freecad, as I can do better that way than on paper But as I examine and measure it, I think how laborious it would be to make one in a wood shop. Byt the ime I get through with doing my Freecad on it, it would be a lot easier to just 3D print one than make one in a wood shop. First time I've ever actually examined it. It is stamped CENURY 10X12. I never knew that. This thing could go back to the 1800's for all I know. Stand by. I'll have mechanical drawings directly.
Probably A4 size for the time being.
I always heard that plain glass is a UV filter.
I wonder how well a 3D printed contact frame would work. Have you tried it?I set this up for woodworkers or 3D printers.
Probably A4 size for the time being.
If I knew I would only use a certain thickness paper+negative, I'd hinge the back and just have a simple rotating lock to clamp it closed.
| Photrio.com contains affiliate links to products. We may receive a commission for purchases made through these links. To read our full affiliate disclosure statement please click Here. |
PHOTRIO PARTNERS EQUALLY FUNDING OUR COMMUNITY:  |