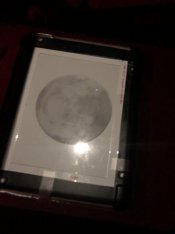
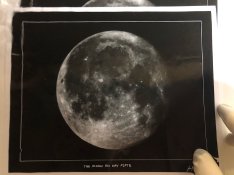
Making a print of low contrast negative

St. Clair Beach Solitude

D
St. Clair Beach Solitude

  • 8
  • 2
  • 101
Reach for the sky

H
Reach for the sky

  • 3
  • 4
  • 140
Agawa Canyon

A
Agawa Canyon

  • 3
  • 2
  • 173

Recent Classifieds

Forum statistics

Threads
198,873
Messages
2,782,390
Members
99,738
Latest member
fergusfan
Recent bookmarks
0

radiant

Member
Joined
Aug 18, 2019
Messages
2,135
Location
Europe
Format
Hybrid
I have few negatives that look good when scanned but when I tried to print those, I just cannot squeeze the dynamic range on paper. Using grade 5 filter I still cannot get highlights and blacks on the same print. Of course I can get one, but then it's either over or under exposed print.

Would flashing help on this one? That would make shadows more dark so then I could shorten the exposure time? Of course I will try to tone the print where highlights are mostly OK but blacks are not blacks. Don't know if that helps..

Or is there something to be done on the filtering; let's dream that I would have full blue light source on the enlarger, could I push the contrast further or is the grade 5 filter the maximum contrast? Is there some "contrast limit" on multigrade papers?

Any tricks, tips on this?
 

Andrew O'Neill

Moderator
Moderator
Joined
Jan 16, 2004
Messages
11,989
Location
Coquitlam,BC Canada
Format
Multi Format
Flashing is usually for high contrast negatives, when it is very difficult to print in say, a sky. The effect of flashing therefore is prominent in the high density areas of the negative, and very very minimal in the low density (shadow areas) of the negative. You could try making a darkish print, and then bring out the high values with selective bleaching. I've done this often, and it can be quite effective.
 

Rudeofus

Member
Joined
Aug 13, 2009
Messages
5,081
Location
EU
Format
Medium Format
I have seen, that whatever an enlarger claims to be "magenta" may or may not be all that magenta. There may be significant green leakage, which then gives you lower than expected gradation. Therefore it could be worth the effort to add a magenta or blue filter, either in some filter drawer, or as a lens filter.

Flashing will darken your shadow regions, but will have relatively much more effect in your highlights.
 
OP
OP
radiant

radiant

Member
Joined
Aug 18, 2019
Messages
2,135
Location
Europe
Format
Hybrid
You could try making a darkish print, and then bring out the high values with selective bleaching. I've done this often, and it can be quite effective.

Ah, that's a good idea. I need to try this!

.. and yes flashing was bad idea since it does just the opposite what I want :smile:

I have seen, that whatever an enlarger claims to be "magenta" may or may not be all that magenta. There may be significant green leakage, which then gives you lower than expected gradation. Therefore it could be worth the effort to add a magenta or blue filter, either in some filter drawer, or as a lens filter.

This is also easy to test. Expose with grade 5 filter and a blue filter and see if there is "more contrast" .
 

MattKing

Moderator
Moderator
Joined
Apr 24, 2005
Messages
52,983
Location
Delta, BC Canada
Format
Medium Format
Before you employ a bunch of tricks to try to increase the range of the tones in the print, it is a really good idea to step back for a moment and ask the question: "should the print have a wide range of tones?"
Some subjects - both high key and low key - ought not to be printed with that wide range.
Assuming that you do want or need more of a range, I would suggest that your approach should vary with the subject.
If the subject has lots of light and mid-tones, try incorporating some split contrast techniques to selectively increase the darkness of your shadowed and dark areas, after printing the rest of the subject to look bright and airy.
If the subject is primarily dark tones, use fairly high contrast and combine dodging and selective bleaching to brighten the highlights. Also don't hesitate to carefully use some split contrast high contrast selective burns to darken to black portions of the shadows that you feel you can dispense with any included detail.
Adding very small areas of deep shadows and brilliant highlights can have a significant effect on the impression created by a print - just be careful not to overdo it.
Can we see a scan of the print?
 

Rudeofus

Member
Joined
Aug 13, 2009
Messages
5,081
Location
EU
Format
Medium Format
I have also noticed, that thorough selenium toning of low contrast negatives gives you a contrast increase equivalent to about 1 paper grade. I once salvaged completely unprintable low-contrast negs by selenium toning the negatives, then going beyond full magenta on my enlarger.
 
Joined
Sep 10, 2002
Messages
3,590
Location
Eugene, Oregon
Format
4x5 Format
Tips for getting more contrast out of a weak negative.

If you're using VC paper, definitely try a #47 blue filter in place of maximum magenta filtration or the #5 filter. I find I can get more than a grade more contrast with the blue filter on my enlargers than with either the magenta or #5 filtration.

As Matt mentions above, judicious dodging and burning can add more contrast to a print. Bleaching highlights to bring them up also gives a print more contrast and works well for some subjects. I use a rehalogenating bleach of potassium ferricyanide and potassium bromide. If you've never selectively bleached before, read up on the techniques and practice on a scrap print first.

Use a high-contrast print developer or tweak your present developer. Straight Dektol/D-72 delivers a bit higher contrast than the standard dilution. Ethol LPD used more concentrated is known to give a bit more contrast. Also, you can add sodium carbonate and benzotriazole/potassium bromide to any standard print developer to up the contrast a bit. Start with 50 to 100 ml per liter of developer of a 6% carbonate solution. This will give the developer more activity. Then to clear the whites add some restrainer, either benzotriazole or potassium bromide. I use a 3.3% solution of bromide and add 50 to 75 ml per liter of developer. Alternately, you can use a 1% solution of benzotriazole, adding 5-20ml per liter of developer. You will have to adjust your exposure time, but the resulting prints will have a bit more snap.

You can intensify your negative with selenium toner if it has not been developed in a staining developer. I use a 1+2 solution of Kodak Rapid Selenium Toner and treat the negative for five minutes. This will add about a grade of contrast. It is the easiest of the intensification methods and low-hanging fruit if your negative was not first developed in a staining developer. If your neg was developed in PMK or other pyro developers, then use the bleach/redevelop method below; the selenium will remove the stain, actually reducing contrast.

You can bleach and redevelop your negative in a staining developer to get more contrast. This makes a permanent change to your negative, but the results can be very gratifying (even adding a bit more shadow detail). First prepare a rehalogenating bleach of 15g potassium ferricyanide and 15g potassium bromide per liter of water (I usually just make half that amount and save it; it keeps forever). The entire procedure can be done with the lights on. Soak the negative in water, then transfer to the bleach solution. Bleach the negative till there is no more visible image, five minutes or so (if the negative was developed using a staining developer to begin with, a faint stain image will remain). Once bleaching is complete, rinse the negative and transfer it to a staining developer like PMK or Pyrocat (I use PMK). Develop till completion, say 8-10 minutes, until you see no more change in the image. Wash and dry the negative, which will now have a layer of stain in addition to the silver image, making it more contrasty.

Hope one of these works for you,

Doremus
 

Andrew O'Neill

Moderator
Moderator
Joined
Jan 16, 2004
Messages
11,989
Location
Coquitlam,BC Canada
Format
Multi Format
I have also noticed, that thorough selenium toning of low contrast negatives gives you a contrast increase equivalent to about 1 paper grade. I once salvaged completely unprintable low-contrast negs by selenium toning the negatives, then going beyond full magenta on my enlarger.

It works but only if you have enough max density to begin with.
 
OP
OP
radiant

radiant

Member
Joined
Aug 18, 2019
Messages
2,135
Location
Europe
Format
Hybrid
Can we see a scan of the print?

Sure, here all I got and a bit more.

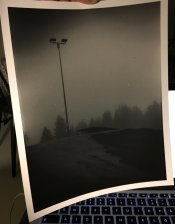
First of all there is my print printed on Ilford MG V Pearl on filter 5. It is pretty hard to photograph with a mobile phone without getting any reflections to lighten up areas. In general the print is really dark and still there isn't Dmax anywhere. The highlight is low-gray in tonality. The blacks are darker in the photo than in reality, otherwise it is pretty same looking on my screen..

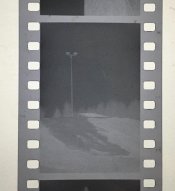
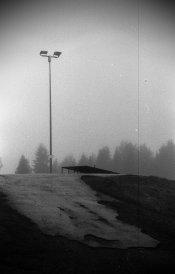
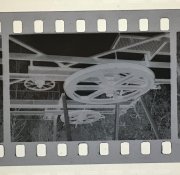
Then there is the negative and a scanned version with the contrast I would like to get the print. Also added another negative (just for reference in contrast).

IMG_4543.jpg IMG_1837 (1).jpg r227_fo400_sumu_431 (1).jpg IMG_0324.jpg

For the other replies (oh man this forum is so great):

- Doding and burning: the lamp post is making this hard. I would like the lamp post to have Dmax and the "sky" next to it pretty white.. So I'm afraid I will get halo if I try to dodge/burn this one.
- Split grade printing: yes maybe, but if I get this kind of print with grade 5 I don't have any playroom for split grade printing, I think

Adding very small areas of deep shadows and brilliant highlights can have a significant effect on the impression created by a print - just be careful not to overdo it.

This is absolutely true. As you might see from the scans etc. I am pretty close.

If you're using VC paper, definitely try a #47 blue filter in place of maximum magenta filtration or the #5 filter. I find I can get more than a grade more contrast with the blue filter on my enlargers than with either the magenta or #5 filtration.

My enlarger is color head enlarger (Fujimoto G2) so I could try it's own filters too. I need to try a blue filter too.

You can intensify your negative with selenium toner if it has not been developed in a staining developer.

This sounds fun, I need to try this! I have some selenium sulphide toner and soon have some Foma's Sepia (2 bath) liquids too. Can I use sepia toner for this?

This evening I picked the "Way beyond monochrome" book once in my hand and after few pages I found a page about intensifying negatives which had the same techniques you have described. Oh man I felt dumb. I have all this information next to me but I haven't just inhaled it. That book is so full of information that one needs to be on correct "level" in film photography to even understand where the information in certain chapter is needed..
 

bedrof

Member
Joined
Mar 1, 2018
Messages
294
Location
Russia, Moscow
Format
Medium Format
And you can add a bit of contrast if you slightly bleach your print (to get highlights where you want them) and then tone in selenium or sulphide.
It's a matter of experiment to understand the reaction of paper in question.
 
Joined
Apr 14, 2016
Messages
814
Location
Bavaria, Germany
Format
Medium Format
I´d bleach the print you show us until the highlights are just right, followed by a wash and a selenium toning to strengthen the shadows again.

You can also try copper toning of the overexposed print. In my experience, copper toning takes away at least one stop and enhances details, but I am not sure if orange would go with that print.

Just a side note on filtering and contrast: we have discussed in an old thread the "real" contrast you can achieve with paper. In particular, there was a complaint about Adox Variotone not reaching anywhere near grade 5. I then tested my stock and my enlarger, and was only able to reach an aprox. "true" Grade 3,5 as maximum, developing the paper as per instructions. We discussed then that the freshness of your paper, the freshness of the filters employed, the amount of stray light during print exposure and how you tweak your [fresh] developer (stronger and higher ph usually give more contrast) are the most important variables which require the least work.
 
OP
OP
radiant

radiant

Member
Joined
Aug 18, 2019
Messages
2,135
Location
Europe
Format
Hybrid
I hate that kind of situations. It is not only low contrast, it looks also it is underexposed?
In any case your print does look ok to me (picture no.1), much nicer to the eye than scanned negative (picture no.3).

Nice to hear that you like no.1 - my fiance also liked it more. Maybe I'm just biased :smile:

And yes the negative is probably underexposed (or underdeveloped if I remember correctly). It doesn't matter; I just want to "master" this kind of scenarios in the future!

I´d bleach the print you show us until the highlights are just right, followed by a wash and a selenium toning to strengthen the shadows again.

Bedrof also suggested this, so I will definely try it out and report back!

Just a side note on filtering and contrast: we have discussed in an old thread the "real" contrast you can achieve with paper. In particular, there was a complaint about Adox Variotone not reaching anywhere near grade 5. I then tested my stock and my enlarger, and was only able to reach an aprox. "true" Grade 3,5 as maximum, developing the paper as per instructions. We discussed then that the freshness of your paper, the freshness of the filters employed, the amount of stray light during print exposure and how you tweak your [fresh] developer (stronger and higher ph usually give more contrast) are the most important variables which require the least work.

The paper should be fine; it is the new Ilford MG V paper. However all the other things are worth noticing. I also found out that my paper developer stock concentrate started to die; this might already be in effect when I made the print. So I need to try it out with fresh stock batch.

So I need to ..
- try blue filter on my enlarger
- learn bleaching & toning - how this affect and can be used in this kind of scenarios
- use the new paper developer
- .. and maybe try printing this on other paper; maybe on Foma 111 fiber based!

So much homework :smile:
 

darkosaric

Member
Joined
Apr 15, 2008
Messages
4,568
Location
Hamburg, DE
Format
Multi Format
"master" this kind of scenarios in the future!

My cure for this is: when in doubt - then overexpose a lot. When not in doubt - then overexpose a little :smile:. And on top when shooting in dark scenes - overdevelop. I really do not like thin negatives.
 
Joined
Sep 10, 2002
Messages
3,590
Location
Eugene, Oregon
Format
4x5 Format
I often print with a tray of weak ferricyanide/bromide bleach in the process line, especially when working with graded paper. I use a heaping 1/8 tsp. each of potassium ferricyanide and potassium bromide per liter to start. I'll strengthen this or dilute it as needed for whatever paper I'm using. Then, if I need more "snap," I'll start with 30 seconds of bleaching after fixing and rinsing for several minutes (the long rinse is important and necessary! Carried-over fixer will activate the bleach more and exhaust it faster as well, so rinse well before bleaching!). If 30 seconds isn't enough, then I'll go longer till I get the effect I want. With a rehalogenating bleach, overbleaching can be compensated for by redeveloping the print in the regular print developer (either in its entirety or locally).

After bleaching, rinse again for two-three minutes and then refix.

I learned this when rescuing a batch of slightly fogged paper. The overall bleaching not only counteracted the fog, but often had a gratifying effect on the highlights and print contrast. This is a regular tool in my printing anymore.

Doremus
 
Joined
Jul 31, 2012
Messages
3,354
Format
35mm RF
You already have a bunch of good suggestions. I'd probably print for the blacks then bleach the print first. If that didn't do it, or the highlights shifted in tone too much, I'd probably intensify the neg. Chromium intensifier IIRC is one that you can use over and over to make the neg denser. It's been a long time since I've used it. Selenium toner and staining developers are a one shot deal. Once you selenium tone the neg, that is the end of it. Those two are good if you need a bit of a bump but they aren't that dramatic. Mercury intensifier used to be the best way to do it, but I wouldn't go down that road if I were you...

You could also intensify the print. Print for the whites then use an intensifier to get the blacks darker. I believe Ian Grant posted a how-to for print intensification here. I am bad at remembering names of things, but IIRC I think it was called Ilford IT-8. Looked it up. Here it is- http://lostlabours.co.uk/photography/formulae/toners/tonerIT8.htm

Another thing I've done in the past is "push" the paper. You could try that assuming you are using fiber base paper. It will give you a slight bump in contrast. You keep the exposure short enough so the highlights barely expose, then develop the print for 8 or 10 minutes. I don't really think that will work in your case since your neg is just flat. Usually it works ok if the neg is anorexic to the point of nothing being on there. Still it is worth a shot...


Hope that helps you some...
 

Hekoru

Member
Joined
Sep 30, 2015
Messages
36
Format
Medium Format
I’ve had very good results by printing a bit darker, then bleaching the highlights, and redeveloping on Lith developer
 

Nodda Duma

Member
Joined
Jan 22, 2013
Messages
2,685
Location
Batesville, Arkansas
Format
Multi Format
At grade 5, expose to get your highlights where they want them. Then develop the print for 4-5 minutes instead of the usual 1 to 2 minutes. Voila... blacker blacks than what you’re getting at grade 5. Adjust exposure as necessary.

I had to solve this exact same problem with a very low contrast plate of the moon just recently.

E602ED4C-C0A0-48C6-A980-B4631C0E7EF5.jpeg

877F5A40-B39F-4575-AB5C-BF9B4C00601A.jpeg
 

tezzasmall

Member
Joined
Dec 29, 2013
Messages
1,136
Location
Southend on Sea Essex UK
Format
Plastic Cameras
Nice to hear that you like no.1 - my fiance also liked it more. Maybe I'm just biased :smile:
I give another vote for the first picture = the one you don't like for whatever reason.

For the negative given, I think it's a great atmospheric print made from it and I don't think that you'll improve it with bleaching the highlights or any other process.

As Matt said, 'Before you employ a bunch of tricks to try to increase the range of the tones in the print, it is a really good idea to step back for a moment and ask the question: "should the print have a wide range of tones?" '

That's exactly what I would have said... :smile:

Terry S
 

tezzasmall

Member
Joined
Dec 29, 2013
Messages
1,136
Location
Southend on Sea Essex UK
Format
Plastic Cameras
At grade 5, expose to get your highlights where they want them. Then develop the print for 4-5 minutes instead of the usual 1 to 2 minutes. Voila... blacker blacks than what you’re getting at grade 5. Adjust exposure as necessary.

I had to solve this exact same problem with a very low contrast plate of the moon just recently.
Good job! I must remember that method. :smile:

Terry S
 
OP
OP
radiant

radiant

Member
Joined
Aug 18, 2019
Messages
2,135
Location
Europe
Format
Hybrid
At grade 5, expose to get your highlights where they want them. Then develop the print for 4-5 minutes instead of the usual 1 to 2 minutes. Voila... blacker blacks than what you’re getting at grade 5. Adjust exposure as necessary.

Great tip, thanks!

Another thing I've done in the past is "push" the paper. You could try that assuming you are using fiber base paper. It will give you a slight bump in contrast. You keep the exposure short enough so the highlights barely expose, then develop the print for 8 or 10 minutes.

Probably the same idea.. Does it really need to be fiber paper?

I'm always so amazed that there are so many hidden tricks in darkroom work :D
 

removed account4

Subscriber
Joined
Jun 21, 2003
Messages
29,832
Format
Hybrid
maybe i am imagining this but i seem to remember a thread somewhere here on this website about using potassium ferricyanide ( farmers reducer ) or another bleach to break the fixed layer so the film could be redeveloped darker, but as i said im not sure if i am remembering this, dreamed it or read it someplace.
good luck !
john
 

koraks

Moderator
Moderator
Joined
Nov 29, 2018
Messages
22,940
Location
Europe
Format
Multi Format
using potassium ferricyanide ( farmers reducer ) or another bleach to break the fixed layer so the film could be redeveloped darker
A couple of ways:
1. A rehalogenating ferricyanide bleach (NOT farmer's reducer!) could be used, followed by sepia toning. This will add some density as silver sulfide is created which is a bit bigger than silver and thus adds density. This can be done only one and what you then get is going to be final/definitive.
2. A rehaolgenating chromium bleach (dichromate + hydrochloric acid) followed by regular redevelopment. Chrome is deposited during this procedure, which can be repeated a number of times to progressively add density. Some say it can be repeated indefinitely, but this is not my experience. After the second round, not much density is added (not as much as in the 1st and 2nd pass) and after the third round nothing much happens anymore in my experience.
3. A copper sulfate + bromide bleach can be used followed by redevelopment in the presence of silver as is done with wet plate/collodion. Haven't tried this on film, but it might work.
 
Photrio.com contains affiliate links to products. We may receive a commission for purchases made through these links.
To read our full affiliate disclosure statement please click Here.

PHOTRIO PARTNERS EQUALLY FUNDING OUR COMMUNITY:


Ilford ADOX Freestyle Photographic Stearman Press Weldon Color Lab Blue Moon Camera & Machine
Top Bottom