Making a print of low contrast negative

St. Clair Beach Solitude

D
St. Clair Beach Solitude

  • 8
  • 2
  • 101
Reach for the sky

H
Reach for the sky

  • 3
  • 4
  • 140
Agawa Canyon

A
Agawa Canyon

  • 3
  • 2
  • 173

Recent Classifieds

Forum statistics

Threads
198,873
Messages
2,782,390
Members
99,738
Latest member
fergusfan
Recent bookmarks
0

138S

Member
Joined
Dec 4, 2019
Messages
1,776
Location
Pyrenees
Format
Large Format
A powerful way is making an internegative, we make a contact copy on low ISO copy film, color separation film, microfilm CMS 20 or regular ISO 25 film, copied emulsion to emulsion in contact, so we get a positive, and from that positive we make another contact copy to get again a negative.

In the developments of the two contact copies we develop to increase contrast as needed to get excatly the contrast what we want. If we have a densitometer and the calibration of the copy film ((https://www.flickr.com/photos/53687643@N04/45541983072)) we may adjust exposure/processing to nail the densities we want in the new negative. If going this way without instruments and graphs we have to make several tests: we increase exposure for the contact copy until thin areas have all detail and then we increase development time until the dense areas are in the spot we want.

As the copy film will outresolve the taking film then no quality should be lost, and we don't risk the original negative, when the negative is important then this matters.

Another choice is HiRes scanning, editing and using a digital film recorder to obtain film again: https://www.firstcall-photographic.co.uk/transfer-36-digital-images-back-to-35mm-film/p7124
 

removed account4

Subscriber
Joined
Jun 21, 2003
Messages
29,832
Format
Hybrid
A couple of ways:
1. A rehalogenating ferricyanide bleach (NOT farmer's reducer!) could be used, followed by sepia toning. This will add some density as silver sulfide is created which is a bit bigger than silver and thus adds density. This can be done only one and what you then get is going to be final/definitive.
2. A rehaolgenating chromium bleach (dichromate + hydrochloric acid) followed by regular redevelopment. Chrome is deposited during this procedure, which can be repeated a number of times to progressively add density. Some say it can be repeated indefinitely, but this is not my experience. After the second round, not much density is added (not as much as in the 1st and 2nd pass) and after the third round nothing much happens anymore in my experience.
3. A copper sulfate + bromide bleach can be used followed by redevelopment in the presence of silver as is done with wet plate/collodion. Haven't tried this on film, but it might work.

thanks for setting me straight koraks ! i knew it was something like that, i know just enough information to spew out DISinformation !
sorry about that vedostuu!
 

138S

Member
Joined
Dec 4, 2019
Messages
1,776
Location
Pyrenees
Format
Large Format
maybe i am imagining this but i seem to remember a thread somewhere here on this website about using potassium ferricyanide ( farmers reducer ) or another bleach to break the fixed layer so the film could be redeveloped darker,

This would work if Rehalogenating, and later developing with an staining Pyro developer to add the proportional stain, we just develop with lights open to expose all silver.

If rehalogenating and later developing in the regular (non staining) way that won't deliver a darker negative, we won't get more silver that we had in the beginning.
 
Joined
Sep 10, 2002
Messages
3,590
Location
Eugene, Oregon
Format
4x5 Format
See my post (#7) about bleach/redevelop. Yes, you need a rehalogenating bleach. You only get more contrast redeveloping if you use a staining developer to add extra density. Otherwise all you're doing is replacing the original image with another of approximately the same density but developed from silver bromide grains...

If you just need about a Zone more contrast and you developed with a conventional developer to start, I'd choose selenium intensification before bleach/redevelop.

Best,

Doremus
 

Nodda Duma

Member
Joined
Jan 22, 2013
Messages
2,685
Location
Batesville, Arkansas
Format
Multi Format
T
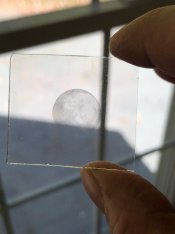
Not related to this topic but how did you get such a large moon image on plate? :O

That’s the enlargement from the 35mm plate

FA75A29A-C4CA-4766-9E9B-E3C23661F754.jpeg
 

koraks

Moderator
Moderator
Joined
Nov 29, 2018
Messages
22,940
Location
Europe
Format
Multi Format
Are you going to mount the glass original in a mini frame or even a pendant? I'm sure it looks beautiful against a dark background, like an ambrotype as it were.
 

Nodda Duma

Member
Joined
Jan 22, 2013
Messages
2,685
Location
Batesville, Arkansas
Format
Multi Format
Are you going to mount the glass original in a mini frame or even a pendant? I'm sure it looks beautiful against a dark background, like an ambrotype as it were.

I think it’s in my desk drawer. Not sure.
 

KenS

Member
Joined
Jan 2, 2005
Messages
941
Location
Lethbridge, S. Alberta ,
Format
Multi Format
I have few negatives that look good when scanned but when I tried to print those, I just cannot squeeze the dynamic range on paper. Using grade 5 filter I still cannot get highlights and blacks on the same print. Of course I can get one, but then it's either over or under exposed print.

Would flashing help on this one? That would make shadows more dark so then I could shorten the exposure time? Of course I will try to tone the print where highlights are mostly OK but blacks are not blacks. Don't know if that helps..

Or is there something to be done on the filtering; let's dream that I would have full blue light source on the enlarger, could I push the contrast further or is the grade 5 filter the maximum contrast? Is there some "contrast limit" on multigrade papers?

Any tricks, tips on this?

Sorry for any delay in responding.. I've just seen it. Might I suggest that you increase the optical 'density/contrast' by 'staining the negative with selenium toner

Ken
 

titrisol

Subscriber
Joined
Aug 2, 2004
Messages
2,071
Location
UIO/ RDU / RTM/ POZ / GRU
Format
Multi Format

koraks

Moderator
Moderator
Joined
Nov 29, 2018
Messages
22,940
Location
Europe
Format
Multi Format
I see some people recommending split grade printing, but that does make me wonder how it would help if the negative has too low contrast to get a desired print at grade 5. Split grade won't add more contrast than you can get with grade 5; you'll just end up with a 0% low contrast and 100% high contrast ratio and run out of steam, possibly after wasting some time figuring out you never even left square one.
 

MattKing

Moderator
Moderator
Joined
Apr 24, 2005
Messages
52,983
Location
Delta, BC Canada
Format
Medium Format
I see some people recommending split grade printing, but that does make me wonder how it would help if the negative has too low contrast to get a desired print at grade 5. Split grade won't add more contrast than you can get with grade 5; you'll just end up with a 0% low contrast and 100% high contrast ratio and run out of steam, possibly after wasting some time figuring out you never even left square one.
In many cases, application of a single high contrast filter over the entire image leads to some areas that print too dark and contrasty, even with low contrast negatives.
The advantage you get with split grade techniques is that they more easily permit you to print with different contrast at different locations within the print.
Which in turn makes it easier to differentiate between different elements in the image.
Combine that with some judicious localized bleaching, and you can accomplish a lot.
 

koraks

Moderator
Moderator
Joined
Nov 29, 2018
Messages
22,940
Location
Europe
Format
Multi Format
I know, @MattKing. But OP has a negative that has too low contrast all across the image for even a straight grade 5 print to come out to his liking. In that scenario, split grade is not going to help. I guess my observation is that split grade is sometimes thrown into a debate as if it were a panacea. But there are things that split grade just won't solve, and this situation here looks like one.
 
OP
OP
radiant

radiant

Member
Joined
Aug 18, 2019
Messages
2,135
Location
Europe
Format
Hybrid
I see some people recommending split grade printing, but that does make me wonder how it would help if the negative has too low contrast to get a desired print at grade 5. Split grade won't add more contrast than you can get with grade 5; you'll just end up with a 0% low contrast and 100% high contrast ratio and run out of steam, possibly after wasting some time figuring out you never even left square one.

And that is the case in here. I've mentioned in the post https://www.photrio.com/forum/threads/making-a-print-of-low-contrast-negative.171337/#post-2229555 that the print is made with grade 5 filter - so I've already maxed out filter possibilities. Yes, it doesn't help exposing with filter 00 for 0 seconds :wink: Maybe @titrisol didn't read that post.

But there are things that split grade just won't solve, and this situation here looks like one.

That is the exact reason why I even made this thread - how to cope from similar situations. Maybe I should change the title of this thread "when grade 5 filter is not enough.." :wink: (but I can't..)
 

138S

Member
Joined
Dec 4, 2019
Messages
1,776
Location
Pyrenees
Format
Large Format
That is the exact reason why I even made this thread - how to cope from similar situations. Maybe I should change the title of this thread "when grade 5 filter is not enough.." :wink: (but I can't..)

Sill, we may add some factors that may help:

> using a high contrast developer, mixing it if it was discontiued: Edwal G, Dokumol, Agfa 108.

> Underexposing paper an overdeveloping at 30ºC

> Using some KBr restrainer

> Using a bulb in the enlarger with 1/4 of the power, a very long exposure provocates LIRF in the paper, this will make more contrasty the highlights at least.

Also we have the easy way: hybrid. If the negative is flawed then perhaps we may not expect a superb print, in that case, personally, I'd tend to not make a great effort in the darkroom with that image, but it all depends...
 
OP
OP
radiant

radiant

Member
Joined
Aug 18, 2019
Messages
2,135
Location
Europe
Format
Hybrid
Also we have the easy way: hybrid. If the negative is flawed then perhaps we may not expect a superb print, in that case, personally, I'd tend to not make a great effort in the darkroom with that image, but it all depends...

As we can see the negative itself is not an award winning masterpiece :smile: However this is more like a learning / technique thing - to learn more what to do when grade 5 is not enough -> what are the options. Really worthwile option is to forget the negative :smile:
 

koraks

Moderator
Moderator
Joined
Nov 29, 2018
Messages
22,940
Location
Europe
Format
Multi Format
what are the options
One interesting option that was mentioned (at least, in a way) by @Hekoru at least for this particular negative would IMO be a lith print. Not necessarily a second pass lith print as Hedoku suggested, but a straight lith print would also be a valid option (I consider second pass lith just a workaround for papers that won't lith well in first pass, and I personally prefer to pick a more suitable paper in those cases). Of course, it's a completely different aesthetic than a regular print, but I personally would actually prefer a lith interpretation of this particular negative.
 

138S

Member
Joined
Dec 4, 2019
Messages
1,776
Location
Pyrenees
Format
Large Format
As we can see the negative itself is not an award winning masterpiece :smile: However this is more like a learning / technique thing - to learn more what to do when grade 5 is not enough -> what are the options. Really worthwile option is to forget the negative :smile:

Of course, dealing with challenging situations is a way to learn about materials and about processing, this is a powerful training !
 

titrisol

Subscriber
Joined
Aug 2, 2004
Messages
2,071
Location
UIO/ RDU / RTM/ POZ / GRU
Format
Multi Format
Maybe @titrisol didn't read that post.
That is the exact reason why I even made this thread - how to cope from similar situations. Maybe I should change the title of this thread "when grade 5 filter is not enough.." :wink: (but I can't..)
I WAS WRONG - After looking at the neg scan at home - lots of base fog and overexposure (maybe over dev)
There is no DMax in that picture unless you burn the hill and leave the post as is
It looks like the only way to save that print is to bleach that negative
move on and try another one

I did read your post, and I've had the same challenge before, your negative (lightpost) is not bad

What you said is that you can;t get dynamic range (shadows and highlights) so using a technique to extend this range sound logical.

Also the separation between the sky and the post is very small (about 2 zones) and your shadows are also mid gray only

I was as skeptic as you were but gave it a shot and was very surprised at the result (workable prints) even with a cheap set of filters (Arista). Later I think R.Knoppow suggested to use a green (00) and blue/magenta (6) filter instead of the polyscontrast set. Sicne you have a color head try using a 100M setting or use a real magenta filter
It also helps if your developer is stronger for the paper

The only other option (maybe not practical) is to add some contrast by either toning or bleach/stain processes of the negative
You should have plenty of silver in the sky but will need to bleach the shadows
 
Last edited:

koraks

Moderator
Moderator
Joined
Nov 29, 2018
Messages
22,940
Location
Europe
Format
Multi Format
@titrisol could you explain how split grade printing would expand the tonal range of the print in this scenario?
I really try to keep an open mind in these things, I really do, but your reasoning just fails to make sense in my view.
 

MattKing

Moderator
Moderator
Joined
Apr 24, 2005
Messages
52,983
Location
Delta, BC Canada
Format
Medium Format
Split grade can help, but it all turns on the fact that how a print looks is a very subjective question.
The reason it can help is that if you have varying amounts of contrast at different locations in the print, those locations which are printed with the higher contrast filter will appear more contrasty than they will if the entire print is made with the high contrast filter overall.
A reflection densitometer wouldn't reveal higher contrast, but our tendency to evaluate details in a print by comparing them with other details will make the print appear to have more contrast.
Try this (fairly difficult to accomplish) test:
Take a low contrast negative and print the mid-tones with a mid-level of contrast. Be careful to both print to a mid-tone density and to shield the highlights from too much of this exposure.
Next you need to print the shadow areas and highlight areas at high contrast, being careful to make sure that the highlights end up reasonably bright, while the shadows are printed quite dark. Different times, burning and dodging will almost certainly be required.
The result should end up to be a print with a much wider range of tones than a print that is made by using the high contrast filter alone. The split grade version will appear much more contrasty than the print made just with the high contrast filter.
The problem with this approach, and the reason that you generally should try for a negative with moderate contrast instead, is that the approach tends to leave you with mid-tones that are quite "blah", and "blah" mid-tones are subjectively disappointing
 

koraks

Moderator
Moderator
Joined
Nov 29, 2018
Messages
22,940
Location
Europe
Format
Multi Format
Matt, yes, that approach would work, but a burned & dodged grade 5 print would achieve more or less the same, but with more contrast in the mid tones if you're careful. And it'll only work if there's sufficient distance between the dark and light areas to allow for natural looking burning & dodging (your split grade approach would help a bit with that), or if a dedicated contrast mask is made.
 
Photrio.com contains affiliate links to products. We may receive a commission for purchases made through these links.
To read our full affiliate disclosure statement please click Here.

PHOTRIO PARTNERS EQUALLY FUNDING OUR COMMUNITY:


Ilford ADOX Freestyle Photographic Stearman Press Weldon Color Lab Blue Moon Camera & Machine
Top Bottom