Like Removing a Kidney?

Pump House?

A
Pump House?

  • 0
  • 0
  • 7
Deer Lake Infrared

D
Deer Lake Infrared

  • 3
  • 0
  • 32
Tree in warm light

D
Tree in warm light

  • 0
  • 0
  • 27
Sonatas XII-33 (Homes)

A
Sonatas XII-33 (Homes)

  • 1
  • 2
  • 38
24mm

H
24mm

  • 1
  • 0
  • 53

Recent Classifieds

Forum statistics

Threads
199,421
Messages
2,791,386
Members
99,907
Latest member
Dlu22
Recent bookmarks
0

thuggins

Member
Joined
Jan 12, 2008
Messages
1,144
Location
Dallas, TX
Format
Multi Format
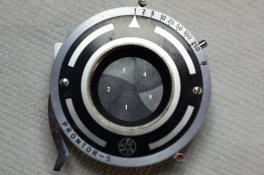
I got a Nettar with a Pronto shutter. One of the blades is messed up, which is quite a surprise considering the multiple affirmations of "Good Condition!", "Works Great!" from the seller. The back does not appear to come off. I assume this must be accessed from the front? That would entail removing the speed control, self timer, release linkage (essentially everything)? I've done an extensive web search but not seen anything with this detail.

_1040006.JPG

_1040007.JPG
 

BrianShaw

Member
Joined
Nov 30, 2005
Messages
16,622
Location
La-la-land
Format
Multi Format
I have no idea how to get into that shutter (sorry) but wonder what your goal is. Those blades look seriously messed up. Are you thinking of trying to straighten them?
 

BradS

Member
Joined
Sep 28, 2004
Messages
8,120
Location
Soulsbyville, California
Format
35mm
Removing a kidney is easy. The difficulty is in getting it back together and working right. :smile:
 

removedacct1

Member
Joined
Nov 12, 2014
Messages
1,875
Location
97333
Format
Large Format
As there appears to be physical damage (deformation) of at least two of the shutter blades, I don't think there's much point in disassembling the shutter to remedy its problems. You won't be able to restore those shutter blades to ideal flatness.

That aside, if the Prontor shutter is anything like a Compur, the three screws on the back of the shutter housing should "split the case" when removed, which separates the mechanism plate (interior body) from the housing. The shutter blades should be accessible once the outer case comes off. The aperture blades will likely stay affixed to the outer case (don't remove the retaining plate that holds the aperture blades in place unless absolutely necessary! You can do a lot of cleaning in place with patience and time). Once the outer case is lifted off, it should reveal the shutter blades. Odds are, they will not be held in place by anything, so remove the case gently and take a photo immediately to record the position of the blades (which way they overlap, which blade is in the first position, etc). This should give you access to the blades, but I'm doubtful they can be restored to functional condition.
 

Donald Qualls

Subscriber
Joined
Jan 19, 2005
Messages
12,334
Location
North Carolina
Format
Multi Format
I agree, there are at least two blades with damage. I presume those are shutter blades, not aperture, due to the shape of the partial opening.

I also agree, there's almost no chance of restoring those blades to usable condition. If it were mine, I might try burnishing the blade edges against a backing block (which wouldn't even require removing the blades or clockwork), but I'm almost certain the metal is stretched, which will prevent the blade ever returning to flat (get the dents to lay down, and the whole blade will curve like a potato chip). The other alternative might be to actually cut or grind the damaged edges back enough to eliminate the deformed metal, but that's also a procedure very deeply fraught with opportunities to fail -- and no guarantee the shutter would close completely after removing metal from the edges of the blades (nor any guarantee you can do the job without warping the remaining blade).

I presume a condition like this is behind a Compur I have that came to me with no shutter works at all (blades and clockwork entirely missing) but perfect aperture. Fortunately, I have a Speed Graphic with working focal plane shutter, so I can still use the nice 13.5 cm Tessar that's mounted in the defunct shutter housing.
 

shutterfinger

Member
Joined
Feb 25, 2013
Messages
5,020
Location
San Jose, Ca.
Format
4x5 Format
It depends on whether you are trying to remove one of your kidneys or someone else.:D

I have successfully flattened such edge bends in the past by placing the blade on a smooth flat desk top and rubbing the bent edge with the sooth, rounded end of a plastic handle #0 screwdriver. Some blades have a pivot pin in them so a wood block needs to be used for them. A layer of paper towel can be used between the blade and wood block also.
Download the Prontor factory service manual(s) you need from my google drive: https://drive.google.com/drive/folders/0B1sPJkp-MdghNGM1aGY5akgtTmc?usp=sharing
 

Donald Qualls

Subscriber
Joined
Jan 19, 2005
Messages
12,334
Location
North Carolina
Format
Multi Format
Hopefully, @shutterfinger is more correct than I am. Same technique suggestion, higher estimate of odds.
 

cmacd123

Subscriber
Joined
May 24, 2007
Messages
4,320
Location
Stittsville, Ontario
Format
35mm
looks like at least one of the blades is off the pivot. wonder if it was taken appart but not reassembled correctly.

"learn Camera repair" Lesson 7 is all about the Pronto shutter - Not sure of it would make sense if you have not gone through the previous lessons. but it can't hurt to read it anyway : https://learncamerarepair.com/product.php?product=603&category=1&secondary=0
 

shutterfinger

Member
Joined
Feb 25, 2013
Messages
5,020
Location
San Jose, Ca.
Format
4x5 Format
looks like at least one of the blades is off the pivot. wonder if it was taken appart but not reassembled correctly.
That's what I think, the blades were assembled in incorrect order and hit one another when it was operated.
Confirmed: D300_01000DSC_0282.jpg

I have a working Prontor S sitting on my work desk. 1 second on the left, 1/250 top speed and B on the right; aperture scale on outside edge of shutter case; PC socket.

If memory serves correctly the shutter blades are .002 inch thick blued steel. Start working the bend out at the shallowest end.
 
Last edited:
OP
OP

thuggins

Member
Joined
Jan 12, 2008
Messages
1,144
Location
Dallas, TX
Format
Multi Format
For those that may come after me, I leave these breadcrumbs. This is a late model Pronto shutter off of a 518/2 Nettar.

Disassemble the shutter down to the usual point for an immersion cleaning.
_1040006.JPG

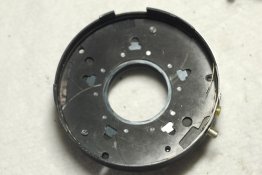
On the back are two screws. Remove them. Note that where the third screw should be it looks sort of like a pin.
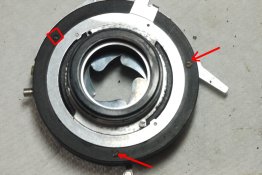
_1040007.JPG

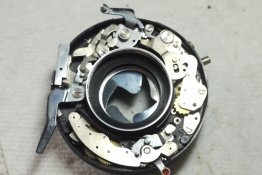
Turn it over and remove the shutter escapement. Then remove the little lever that closes the flash contacts.
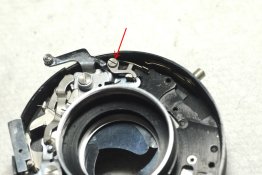
_1040009.JPG

Now you can see a screw head just below the flash contact. Remove it. That is the "pin" you see from the back. Why they put this screw in from the front is beyond me.
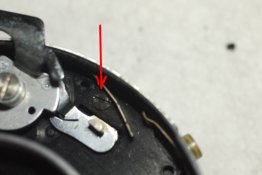
_1040010.JPG

The mechanism will pull out of the shutter housing. Here are the shutter blades with the errant one put back in place.
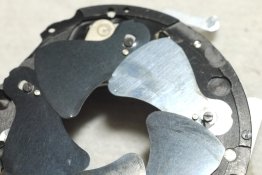
_1040012.JPG

The loose shutter leaf has a chunk taken out of it. Another one has a ding. I can't imagine how you could do this. It does not look like this shutter has ever been removed before.
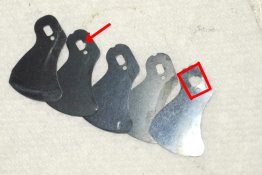
_1040015.JPG

The cool thing about the Pronto is the mechanism is self contained, i.e. it can still be worked when disassembled. I believe Copals, Klios and Varios work this way. Compurs need to have the cam plate in place to work them, so they're not as fun. The iris mechanism is also self contained. No worry about the blades coming loose.
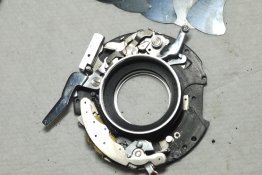
_1040019.JPG _1040014.JPG

I had already gone back to the credit card company with a fraud complaint. The second the package was opened it was obvious that one of the shutter blades was just hanging there. But that hadn't stopped the seller from glowingly describing the great working condition.

Now I have a beautiful lens with no shutter. And another fully functional shutter with no glass. Too bad they're not the same size. :-(
 

shutterfinger

Member
Joined
Feb 25, 2013
Messages
5,020
Location
San Jose, Ca.
Format
4x5 Format
he loose shutter leaf has a chunk taken out of it. Another one has a ding. I can't imagine how you could do this. It does not look like this shutter has ever been removed before.
I'll stick with the "blades were assembled incorrectly" statement.
In your photo of the blades the one on the far left has a rounded end at the controller end and the other 4 have a notch in the controller end. The notch is there for case or component clearance. Looking at the service manuals they state that the earlier shutter's blades have a reinforcement on their top side with the 5th blade having the reinforcement on the bottom side and a specific position for it to be in. It also states that later shutters use blades of a stronger material and do not need the reinforcement. The parts manual shows a flattened edge on the controller end of the blades in some shutters. If there is no specific order for the blades in your shutter then the wrong length of screws were used or something similar occurred as the damage to the blades is from hitting something solid or incorrect installation.

There may be enough clearance to bond or solder a .001 piece of metal or bond a piece of mylar to the blades. Sheet film is .007 inch thick, 120 and 135 films are .004 inch thick. I may still have a sheet of .002 shim stock steel in my stock pile if it made the move.
Let me know if you want a piece and I'll dig around and see if I can find it.
 

Donald Qualls

Subscriber
Joined
Jan 19, 2005
Messages
12,334
Location
North Carolina
Format
Multi Format
If you can still find an Ace Hardware local to you, they (used to) sell brass and stainless shim stock by the inch, from rolls four or six inches wide, in thicknesses from .001" and up. I bought a few inches of .001 brass a while back to make pinholes, $5 got me enough to convert every Altoids and gum tin I have saved up and still leave a couple inches by roll width. A small engine repair shop might also part with a piece. Worst case, you could visit your nearest Harbor Freight and get a cheap feeler gage set and use the .001 or .002 blades for several repairs this size (possibly even to fabricate a complete blade or two).
 

Luckless

Member
Joined
Feb 9, 2016
Messages
1,365
Location
Canada
Format
Multi Format
It has been awhile since I worked with sheet metal that thin, and haven't made anything that directly compares to a shutter blade all that well, but I did find it was a bit of a pain to cut and shape cleanly without warping.

Anyone have tips to add to the thread to avoid or deal with fine burs without risk of cupping and not investing in excessive tooling?

But I guess the problems I had in past projects may be less noticeable when dealing with sections as small as a leaf shutter blade.
 

Donald Qualls

Subscriber
Joined
Jan 19, 2005
Messages
12,334
Location
North Carolina
Format
Multi Format
I've never made a shutter leaf (and I can see some issues with making the rectangular hole; that seems to call for a shear punch, and one of those that can cut steel won't be easy to find or make), but I've had good results for other uses with steel and brass under .002 just cutting them with heavy scissors (DO NOT use the other half's sewing shears for this; buy a pair of "cuts a penny!" type for the job). Once cut, you can burnish the cut edge flat and polish the edge with fine sandpaper to deburr. Gun stores sell a cold blue solution that may work on stainless (it's made for carbon steel, but you probably can't get carbon steel in shim thickness). Failing that, I don't know what to suggest to blacken the blade that will stay on once the shutter operates a few hundred or a few thousand times.
 
OP
OP

thuggins

Member
Joined
Jan 12, 2008
Messages
1,144
Location
Dallas, TX
Format
Multi Format
I've got quite a few repair projects in the queue and don't have a great desire to try making shutter blades. Besides, trying to make a square hole is a problem I don't even want to broach. ;-)

Maybe I can fit it onto the Graphic and have a wide angle lens for wet plate landscapes.
 

cmacd123

Subscriber
Joined
May 24, 2007
Messages
4,320
Location
Stittsville, Ontario
Format
35mm
I've got quite a few repair projects in the queue and don't have a great desire to try making shutter blades. .
keep an eye out for a lens with bad glass sold cheep and salvag ethe blades from that - or a camera with impact damage.
 

Donald Qualls

Subscriber
Joined
Jan 19, 2005
Messages
12,334
Location
North Carolina
Format
Multi Format
keep an eye out for a lens with bad glass sold cheep and salvag ethe blades from that - or a camera with impact damage.

Yes, this. Get a "parts only, as is" camera with an undamaged shutter, and you could be in for a few bucks.
 
Photrio.com contains affiliate links to products. We may receive a commission for purchases made through these links.
To read our full affiliate disclosure statement please click Here.

PHOTRIO PARTNERS EQUALLY FUNDING OUR COMMUNITY:


Ilford ADOX Freestyle Photographic Stearman Press Weldon Color Lab Blue Moon Camera & Machine
Top Bottom