-
Welcome to Photrio!Registration is fast and free. Join today to unlock search, see fewer ads, and access all forum features.Click here to sign up
- Home
- Forums
- Analog Workflow Forums (100% Analog/Traditional)
- Analog Equipment
- Medium Format Cameras and Accessories
You are using an out of date browser. It may not display this or other websites correctly.
You should upgrade or use an alternative browser.
You should upgrade or use an alternative browser.
Lighter Fluid would not have cured this one!
-
A
- Thread starter shutterfinger
- Start date
Recent Classifieds
-
For Sale Componon-S 5,6/300 and Componon-S 6,8/360 Enlarging lenses
- Started by alanbradford
-
For Sale Leica, Weston meters and Nikon filters.
- Started by Logical1
-
Want to Buy Fujinon A180mm F/9
- Started by loccdor
-
For Sale FS: Linhof 18x24cm Plate Holders
- Started by B.S.Kumar
-
Under Offer Several Pentax K-mount camera bodies
- Started by madsox
Forum statistics
gotta admire your determination. Me, I'd soak it in lighter fluid and then add a lit match.
Yikes! looks like that one went for a swim.
Ya' gonna sell it once it's working again? 

- APUGuser19
- Deleted
peter k.
Member
Oh my... will be watching ... what a challenge... yikes!
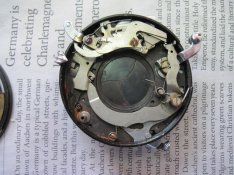
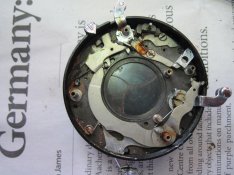
Its a #1 Graphex from 1939-1946 without flash sync. It came on a Miniature Speed Graphic lens board.
The main cocking spring and high speed springs only have surface rust and are quite strong.
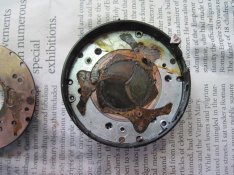
The only mystery is was the name plate screw, a #0 or #1 3/32 inch long, stuck in the shutter blade path along the outer edge of the case the cause of the jam that resulted in bad storage and the rust or something that occurred afterwards. The bits of paper towel were definitely after, an attempt to get it going by wiping the shutter blades.
And yes I may sell it after I get it running, like new? I doubt I will do any filing on the speed ring.
Heh... I guess I won't be buying any Graphex shutters for awhile. 

- APUGuser19
- Deleted
Its a #1 Graphex from 1939-1946 without flash sync. It came on a Miniature Speed Graphic lens board.
The main cocking spring and high speed springs only have surface rust and are quite strong.
The only mystery is was the name plate screw, a #0 or #1 3/32 inch long, stuck in the shutter blade path along the outer edge of the case the cause of the jam that resulted in bad storage and the rust or something that occurred afterwards. The bits of paper towel were definitely after, an attempt to get it going by wiping the shutter blades.
And yes I may sell it after I get it running, like new? I doubt I will do any filing on the speed ring.
I had one in a Rolleiflex Standard that looked worse than that, but with patience cleaned up very well. The camera had been dunked on a canoe trip, brought home & partly dried with a hairdryer then sat on a shelf in the garage for some years until I got it. I still use that camera, so it is possible.
The shutter blades had rusted through leaving a thin circle at the outside edge of the shutter opening with the blades closed. They would not accept solder after cleaning so I have painted them with Golden Heavy Body Acrylic Artist Paint #1040 carbon black. It is diluted 30% with water. It dries to a plastic like flexible coat that does not crack or flake. The clearance between the shutter blades and the shutter plate is .0015 inch when assembled. If sufficient clearance had been available I would have bonded unprocessed film stock to the blades. The shutter blades are .003 thick metal. The paint will be rubbed down as needed to get the blades to lay flat against one another and to operate smoothly.
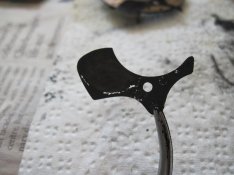
The aperture blades are a copper alloy. The pivot pins are formed by a punch cutting a 4 or 5 section that forms the hole and the edges turn up then are flared out into the aperture plate hols to retain them. All but 1 of the upturned pieces had broken off one aperture blade. I checked it and found the blade hole to be a #50 drill bit, .070 inch. The aperture blades are .003 inch. The aperture plate hole .076-.080 inch. I rolled .001 shim stock around a #56 drill bit, .0465inch, 3 or so turns then slid it into the aperture blade hole. I removed the drill bit, flushed the bottom edge of the new brass pin to the aperture blade, clipped the top about the thickness of the aperture plate, then soldered the pin to the aperture blade at the base of the pin using a 15 watt soldering iron. When the center of the pin filled with solder I left it. Upon getting the pin in the aperture plate I used the smooth section of miniature needle nose pliers to crimp the aperture blade to the aperture plate. The blade was very tight at first but gentle coaxing got it to move and after less than ten back and forth movements the blade operated smoothly throughout its full open to full closed positions. I dressed the base of the repaired aperture blade with a needle file to ensure the adjoining/overlapping aperture blades lay flat on it.
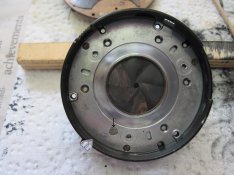

The aperture blades are a copper alloy. The pivot pins are formed by a punch cutting a 4 or 5 section that forms the hole and the edges turn up then are flared out into the aperture plate hols to retain them. All but 1 of the upturned pieces had broken off one aperture blade. I checked it and found the blade hole to be a #50 drill bit, .070 inch. The aperture blades are .003 inch. The aperture plate hole .076-.080 inch. I rolled .001 shim stock around a #56 drill bit, .0465inch, 3 or so turns then slid it into the aperture blade hole. I removed the drill bit, flushed the bottom edge of the new brass pin to the aperture blade, clipped the top about the thickness of the aperture plate, then soldered the pin to the aperture blade at the base of the pin using a 15 watt soldering iron. When the center of the pin filled with solder I left it. Upon getting the pin in the aperture plate I used the smooth section of miniature needle nose pliers to crimp the aperture blade to the aperture plate. The blade was very tight at first but gentle coaxing got it to move and after less than ten back and forth movements the blade operated smoothly throughout its full open to full closed positions. I dressed the base of the repaired aperture blade with a needle file to ensure the adjoining/overlapping aperture blades lay flat on it.

Wow... that's amazing work. I can't imagine being able to do all that, especially these days.
admire your eyes and fine motor skills!
Shutter blades painted, polished with car wax, rubbed with extra fine powdered graphite, assembled, operates as specified in the manual but not as smooth as new so the fast speed(s) may suffer.
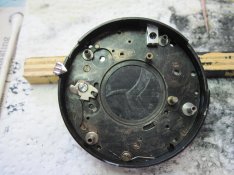
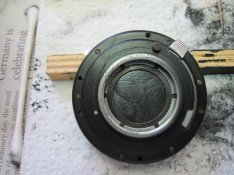


I use 1.5 power reading glasses for reading, a 2 power pair on over the 1.5 pair makes the small detail as visible as it was 45 years ago.admire your eyes

peter k.
Member
Wahooo!!!
Now fer the testing...
Now fer the testing...
- APUGuser19
- Deleted
Well the pliers slipped off the end of the main cocking spring while tensioning it and hit the shutter blades breaking one off completely and separating a second along its rust hole pattern.
I went ahead and got the spring in and yes the shutter would have worked properly.
I would not have gone this far on anything but my own equipment until I have developed the technique to succeed then I would consider doing it for hire.
More experimenting and possibly making new shutter blades.
The repairable Miniature Speed will be here in a few days, I may just use it as a barrel for the lens it came with.
Dang, that's hard luck and a darned shame after all the time you put into it. At least you know it can be done... a rust bucket made to work for awhile.
- APUGuser19
- Deleted
Not a dumb question. ( Dumb mistake using too small a pair of pliers which slipped off the spring 4 times prior to the near fatal to the shutter mishap.)why could not new shutter blades be cut from sheet film stock or similar?
The material that can be used to make a blade from depends on the shutter. This one uses .003 inch blued steel? on brass pivot pin. The blades only have .0015 inch clearance between the blade and the metal plates they are between. The blade controller turns in a 45° arc and has a post that fits into a hole in the blade while the pivot pin in the blade slides in a slot.
Some shutters use fixed pins on the blade controller and plates requiring only holes in the shutter blades. Some shutters have .010 inch to .020 inch clearance for the blade to operate in.
The thinnest film is Fuji color at .0035 inch in 120 format which may not be rigid enough for the length of the blade. The pivot pin is shouldered and is a press fit onto the blade so there is no way to get it off and remount it to a new blade easily and even more difficult to make a new pin without a lathe and press.
Several years ago I made 2 blades for a Wollensak Studio shutter from Portra sheet film as that is what I had on hand that was out of date and had severe color shift. I used 2 layers gluing them together emulsion to emulsion. It worked very well.
When doing repairs such as this it is best to remain close to original design/material thickness.
I'm not currently under any deadline requirements to get this one fixed.
I have a 3x4 RB Series B I'm in the process of making a new shutter curtain for also. I thought I could get this one fixed while the coating on the new material was curing.
Last edited by a moderator:
- APUGuser19
- Deleted
It was dead to begin with. I nearly brought new life to it as was and it is still very repairable.
Not a dumb question. ( Dumb mistake using too small a pair of pliers which slipped off the spring 4 times prior to the near fatal to the shutter mishap.)
The material that can be used to make a blade from depends on the shutter. This one uses .003 inch blued steel? on brass pivot pin. The blades only have .0015 inch clearance between the blade and the metal plates they are between. The blade controller turns in a 45° arc and has a post that fits into a hole in the blade while the pivot pin in the blade slides in a slot.
Some shutters use fixed pins on the blade controller and plates requiring only holes in the shutter blades. Some shutters have .010 inch to .020 inch clearance for the blade to operate in.
The thinnest film is Fuji color at .0035 inch in 120 format which may not be rigid enough for the length of the blade. The pivot pin is shouldered and is a press fit onto the blade so there is no way to get it off and remount it to a new blade easily and even more difficult to make a new pin without a lathe and press.
Several years ago I made 2 blades for a Wollensak Studio shutter from Portra sheet film as that is what I had on hand that was out of date and had severe color shift. I used 2 layers gluing them together emulsion to emulsion. It worked very well.
When doing repairs such as this it is best to remain close to original design/material thickness.
I'm not currently under any deadline requirements to get this one fixed.
I have a 3x4 RB Series B I'm in the process of making a new shutter curtain for also. I thought I could get this one fixed while the coating on the new material was curing.
McMaster-Carr sells blued steel shim stock, very good for making shutter and aperture blades; it's kind of shiny so etching it and using a cold blue solution gives a nice dark matte surface. The pivot pins are not pressed in but riveted, the factory most likely had jigs and punches to do this rapidly and accurately, making one or two pins from hard brass stock and riveting them by hand with a hammer (small hammer - 3/4 oz. or so with a rounded polished face) is possible with practice - or get your local watchmaker to do it.
shutterfinger... Do you have spare parts at your disposal?
I believe I'd throw that shutter in the parts box and put it out of my mind (as best as possible). Although I do not take the loss to this world of a photographic gadget easily; that will never be made again.
Me too.
I always thought that I was a repair guy, but I was beaten by this endeavour I most probably would never had begun...
But I know the situation when you already spent some effort, anf then things turn out to be worse than expected and I feel at kind of point-of-no-return and I go on trying new approaches ending to find out that it is 5AM already...
SIDE NOTE: shutterfinger did a fantastic job on a bellows replacement for me and at a very fair price too. I'm forever grateful.
McMaster-Carr sells blued steel shim stock, very good for making shutter and aperture blades; it's kind of shiny so etching it and using a cold blue solution gives a nice dark matte surface. The pivot pins are not pressed in but riveted, the factory most likely had jigs and punches to do this rapidly and accurately, making one or two pins from hard brass stock and riveting them by hand with a hammer (small hammer - 3/4 oz. or so with a rounded polished face) is possible with practice - or get your local watchmaker to do it.
"3/4" means three quarters of an ounce, about 21g. Small hammers for riveting, big hammers for drifting. Pliers on a spring?? No. Make a bar with a slightly 'L' shaped notch in it, you'll likely need at least two or three different ones. Kinda like a tool used to install springs on drum brakes, back when cars had them.
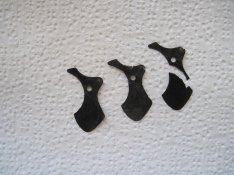
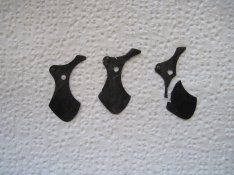
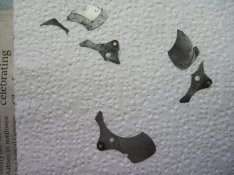
Center blade hanging together by a thin piece about the size of a thread and came apart during cleaning. Soaked in lacquer thinner to remove the paint then rubbed with a Scotch Brite pad for metal.
This thread was started to demonstrate what can be done to repair old shutters.
All gear shafts, pivot posts, lever bushings are round and is the basis for continuing the repair. A worn shutter will show wear marks or be an elliptical shape on these parts. The further out of round the worse the wear.
Wear results from heavy usage (normal), continuing to use when signs of servicing (slow shutter speeds) show up, and from poor servicing practices both of which fall into the category of neglect.
Last edited by a moderator:
| Photrio.com contains affiliate links to products. We may receive a commission for purchases made through these links. To read our full affiliate disclosure statement please click Here. |
PHOTRIO PARTNERS EQUALLY FUNDING OUR COMMUNITY:  |


