Lens Convergence?

Exhibition Card

A
Exhibition Card

  • 0
  • 0
  • 30
Flying Lady

A
Flying Lady

  • 5
  • 1
  • 63
Wren

D
Wren

  • 0
  • 0
  • 34

Recent Classifieds

Forum statistics

Threads
199,037
Messages
2,785,098
Members
99,787
Latest member
jesudel
Recent bookmarks
0

Sirius Glass

Subscriber
Joined
Jan 18, 2007
Messages
50,391
Location
Southern California
Format
Multi Format
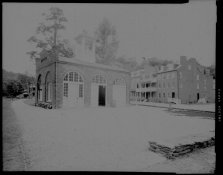
These are two photographs that I took learning to correct for convergence. The negatives were quickly flat scanned saved; then GIMP was used to reverse the images and adjust the contrast so that they would be viewable.

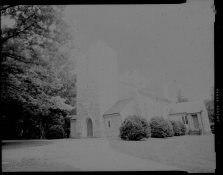
Both negatives were taken with a Schneider-Kreuznech Angulon f6.8 90mm lens. In both photographs I thought that I had corrected for convergence, but on the right of both of them there is convergence. The one of Haper's Ferry has slight convergence and the one of the church has a larger convergence.

Are the convergences an artifact of the lens or an Operator Assisted Failure [OAF]?

Steve
 

Attachments

  • Harpers Ferry.jpg
    Harpers Ferry.jpg
    113.4 KB · Views: 124
  • Church.jpg
    Church.jpg
    133 KB · Views: 109

BradS

Member
Joined
Sep 28, 2004
Messages
8,120
Location
Soulsbyville, California
Format
35mm
Neither really looks like lens distortion. Both really just look like you did not have the camera back perfectly vertical.

If you are sure that you did, there may be a mechanical issue with the camera or film holder itself - but these seem very unlikely.
 

Ian C

Member
Joined
Feb 8, 2009
Messages
1,255
Format
Large Format
OAS is the likely culprit.

If you leave the lens centered over the film with all controls at neutral and keep the lens axis horizontal (you can check with a sprit level), then the verticals should come out vertical on the image. This isn’t perspective correction. Rather it’s prevention of distortion in the first place. But the composition might not meet your requirements. One possibility is to shoot horizontally so that no distortion occurs, and then crop out what doesn’t fit the image you want.

Often we have no choice but to aim upward. That necessarily makes the verticals converge at the top.
The difficulty in seeing things near the edge of the frame, especially with a WA lens, makes correcting architectural perspective tough. About the best you can do is learn to stay under the completely dark focusing cloth long enough until your “night vision” sensitivity increases enough to see the darker parts of the screen for accurate correction.

To make this work you must have the GG and your head well tented so that NO light reflects upward from the ground. That’s easy to state, but not so easy to accomplish.
 

Diapositivo

Subscriber
Joined
Nov 1, 2009
Messages
3,257
Location
Rome, Italy
Format
35mm
The first image looks tilted to the right to my eyes, and the second tilted to the left. This possibly influenced the subsequent perspective "correction" work. Maybe the ground was soft and after levelling the camera there was a small movement which you did not notice.

You can clearly see that the camera is not levelled because an imaginary central vertical line, which is vertical in nature, and which is in the exact centre of your picture, must be vertical (all other lines will converge to a point "above the frame" if the camera is looking "upward", or below the frame if the camera is looking downward, but a central vertical line is always vertical, and if it isn't that means the camera is not properly levelled.

This is very hard to judge by eye as for the eye verticals are always vertical. I mean, if you brutally tilt a camera 20° to the right an look through its viewfinder, the horizon will be horizontal just the same :wink: but the resulting frame will obviously be tilted 20° to the left.

Small differences are very hard to judge. Bubble levels are decently precise, but not overly precise. One can easily make a mistake of 0.1 or even 0.2 degrees using bubble levels. I don't understand why don't they make them more precise. It probably has to do with tolerances in installing the bubble on the tripod head (or tolerances in perfect geometry of the cameras).
 

Monito

Member
Joined
May 16, 2011
Messages
335
Location
Nova Scotia,
Format
Multi Format
Yaw free controls are best. With some view camera setups as you correct one part another part goes out, so you have to adjust by successive approximation until you get everything lined up the way you want to. Some good advice above.
 

David A. Goldfarb

Moderator
Moderator
Joined
Sep 7, 2002
Messages
19,974
Location
Honolulu, HI
Format
Large Format
These shots don't need very complex movements, and the 90/6.8 Angulon doesn't produce this kind of distortion, so my guess is that you were probably trying to overcorrect, and that caused more problems than it solved. For shots like this, you should only need to aim the camera, level the camera on the tripod, and use some front rise/rear fall to frame, maybe shift if there are issues about where you are able to put the camera, or you want to look down an open corridor or something like that, and you shouldn't need any tilt or swing (except with both standards parallel if you need indirect rise/fall/shift, which you shouldn't with the modest image circle of a 90/6.8 Angulon on 4x5"). While a yaw-free camera is nice, these kinds of shots shouldn't put you in a situation that produces yaw (i.e., tilt and swing on the same standard).

Also, be careful with the 90/6.8 Angulon, because the circle of good definition is considerably smaller than the circle of illumination. See how you're going blurry in trees and the bell tower in the first shot? That's either more rise than the Angulon is good for, or unnecessary tilt or both.
 

removed account4

Subscriber
Joined
Jun 21, 2003
Messages
29,832
Format
Hybrid
steve

does your ground glass have a grid on it ?
you don't need something expensive, or to draw lines in pencil ...
i printed out a grid in mac draw years ago, and printed it on paper
and then went to my neighborhood copy shop and printed it on a piece of
clear plastic. it cost about 10¢ ...
i cut it out and put it on top of the ground glass ...

having a grid is helpful because it shows you how things are leaning and if everything is level.
a post bubble / level is cheap as dirt as well, and come in handy to put on the back of the camera
to assure that the film back is not tilted funny, which sometimes is not easy to detect ...
then the front ...

and sometimes when all else fails, taking a few steps back and setting up again,
giving the subject a little more room to breathe helps too

good luck !
john
 

lxdude

Member
Joined
Apr 8, 2009
Messages
7,094
Location
Redlands, So
Format
Multi Format
Steve, just don't have a few drinks before you go out next time.:tongue:
 
OP
OP
Sirius Glass

Sirius Glass

Subscriber
Joined
Jan 18, 2007
Messages
50,391
Location
Southern California
Format
Multi Format
Steve, just don't have a few drinks before you go out next time.:tongue:

I wanted to correct the convergence, not over correct it. I have seen too many others proudly show their LF work with the top of the buildings expanding to be larger than the base.

Back to working on it again.

Thanks,
Steve
 

ic-racer

Member
Joined
Feb 25, 2007
Messages
16,553
Location
USA
Format
Multi Format
How are you "correcting for convergence?" If the back standard is plumb vertical no correction is needed.
 
OP
OP
Sirius Glass

Sirius Glass

Subscriber
Joined
Jan 18, 2007
Messages
50,391
Location
Southern California
Format
Multi Format
How are you "correcting for convergence?" If the back standard is plumb vertical no correction is needed.

I am using a Pacemaker Speed Graphic so there are no back adjustments. I leveled the camera left-to-right with a 6 inch spirit level but in first photograph I aimed the camera up to cut out the excessive foreground. In the second photograph the church was on a small rise. In both photographs I raised the lens but I forgot to check the edges.

These are the first two photographs that I took using the front rise.

Steve
 

BradS

Member
Joined
Sep 28, 2004
Messages
8,120
Location
Soulsbyville, California
Format
35mm
I am using a Pacemaker Speed Graphic so there are no back adjustments. I leveled the camera left-to-right with a 6 inch spirit level but in first photograph I aimed the camera up to cut out the excessive foreground. In the second photograph the church was on a small rise. In both photographs I raised the lens but I forgot to check the edges.

These are the first two photographs that I took using the front rise.

Steve

The back must be vertical for these shots. So, you need to level up and down - not left to right. You would normally make the lens "look up" by using front rise (sometimes tilt).

on the speed/crown graphic, you can set the level on top, oriented front-to-back. When level in this direction, you should not see convergence of verticals. Does that make sense?
 
OP
OP
Sirius Glass

Sirius Glass

Subscriber
Joined
Jan 18, 2007
Messages
50,391
Location
Southern California
Format
Multi Format
The back must be vertical for these shots. So, you need to level up and down - not left to right. You would normally make the lens "look up" by using front rise (sometimes tilt).

on the speed/crown graphic, you can set the level on top, oriented front-to-back. When level in this direction, you should not see convergence of verticals. Does that make sense?

Yes. In both cases I knew that I was aiming the camera up. The church, so that I could get the top of the tower and there was too much foreground at Harper's Ferry.

Next time I will level the camera and see if the front rise will take in the top of the building.
 

removed account4

Subscriber
Joined
Jun 21, 2003
Messages
29,832
Format
Hybrid
steve

there are ways people have made their speed graphics have movements to adjust for tilting the camera up ...
some folks reverse their front standard, so they can tilt the lens down ..
the best way to photograph the scenes you have posted is to get a view camera ... tilt the camera up,
and then straighten the back standard, and do the same for the front.
press cameras are great for portraits, and straight on photography like a 35mm or mf system, but when it comes to architecture
unless it is straight on ... they tend to fall flat... it is best to use a camera that has back and front movements.
a view camera will let you do anything you want - fix and distort and flare the tops of buildings to give the keystoning effect

john

ps post levels / bull's eye levels are much easier to use than a 6" level
 

BradS

Member
Joined
Sep 28, 2004
Messages
8,120
Location
Soulsbyville, California
Format
35mm
too bad the graphic doesn't have a tripod mount on the TOP....:smile:

If it did, it could be mounted up-side-down and accomplish the "point it up and straighten out the standards" by dropping the bed.

hmmmm...perhaps, there is a way to do it using the tripod mount on the side and a fancy three way tripod head....
 

Diapositivo

Subscriber
Joined
Nov 1, 2009
Messages
3,257
Location
Rome, Italy
Format
35mm
Shift movements alone should provide the amount of correction needed for this kind of pictures. In 35mm the usual procedure is to level the camera (not just left-right but also front-back) and then "shift" the lens until the desired degree of "perspective correction" is achieved.

If the lens projects an image circle big enough one should be able to "correct perspective" with nothing else than shift movements.

I have no experience of work with LF cameras and don't know a fig about rear-standard movement, camera tilting etc. but I do know that shifting can "compensate" any kind of converging verticals within certain practical constraints introduced by the lens. So in the case of the pictures published by the OP if the camera has a shifting movement that should be enough or, in case, mounting a shift lens on it should be enough to reach the effect that the OP was aiming at, IMO.

Fabrizio

PS That doesn't mean there cannot be alternative or more comfortable ways. I mean one doesn't necessarily need a camera with complicated movements for this kind of pictures.
 

David A. Goldfarb

Moderator
Moderator
Joined
Sep 7, 2002
Messages
19,974
Location
Honolulu, HI
Format
Large Format
For vertical shots, you can only get about 1cm front rise with a 90/6.8 Angulon, before the image quality at the top of the frame becomes a problem. I'm not sure how that translates for horizontals. You might want to take some test shots to get an idea of what the limits are. Find a subject like a church with a tall steeple and a cross on top, take notes, and see how much front rise you can get away with before the cross goes uncontrollably blurry at a typical 4x5" aperture like f:16 or 22.

Once you know this, then you can split the difference by applying maximum front rise and tilting the camera on the tripod to get the top of the building, and apply a smaller correction at the enlarging stage by tilting the easel.
 

BradS

Member
Joined
Sep 28, 2004
Messages
8,120
Location
Soulsbyville, California
Format
35mm
Shift movements alone should provide the amount of correction needed for this kind of pictures. In 35mm the usual procedure is to level the camera (not just left-right but also front-back) and then "shift" the lens until the desired degree of "perspective correction" is achieved.....

The key to preventing convergence of vertical lines, however, is to keep the film plane perfectly vertical. Front rise only affects what part of the image circle projected by the lens is "seen" by the film. So, front rise (vertical shift) is not what prevents vertical convergence but front rise is often used in conjunction with making what ever adjustments are necessary to either the tripod head, the camera back or both to get the back of the camera, and thus, the film plan vertical.
 
Photrio.com contains affiliate links to products. We may receive a commission for purchases made through these links.
To read our full affiliate disclosure statement please click Here.

PHOTRIO PARTNERS EQUALLY FUNDING OUR COMMUNITY:


Ilford ADOX Freestyle Photographic Stearman Press Weldon Color Lab Blue Moon Camera & Machine
Top Bottom