latensification

about to extinct

D
about to extinct

  • 0
  • 0
  • 30
Fantasyland!

D
Fantasyland!

  • 9
  • 2
  • 102
perfect cirkel

D
perfect cirkel

  • 2
  • 1
  • 121
Thomas J Walls cafe.

A
Thomas J Walls cafe.

  • 4
  • 6
  • 286

Recent Classifieds

Forum statistics

Threads
198,745
Messages
2,780,278
Members
99,693
Latest member
lachanalia
Recent bookmarks
0

Clueless

Member
Joined
Dec 6, 2004
Messages
168
Format
Multi Format
A little kid passed by and read over my shoulder, "Oh, I get it, it's just like skin, film that is. When you go to the beach to get a tan, you can go and get burned or you can ahead of time go to a tanning bed and get the tan started". (one of the problems of using the internet at the library)
 
OP
OP

Claire Senft

Member
Joined
Dec 7, 2004
Messages
3,239
Location
Milwaukee, W
Format
35mm
Keep in mind

It needs to be done after the film is exposed. It is not the same a pre-exposure. It needs to have a minmum of 15 minutes and requires really dark conditions. It will only work with film that has been exposed to normal conditions...it will not work with film that required reciprocity compensation for exposure correction, I know of no reason that low light latensification can not be used on a frame that was pre-exposed but one would have to be quite careful not to get a very low contrast result. I did not get spurred into trying this idea from David Vestal but a from a Vestal edited article due to work and writing by Ralph Steiner and that David did a wonderful job of editing, Although I had read about it at least 30 years earlier I finally get around to trying very recently.

You need to do your own work to set it up. The light level being used is so dim that one can hardly see it much less measure it and specify a set up.
 

Maine-iac

Member
Joined
Oct 12, 2004
Messages
462
Location
Island Heigh
Format
Med. Format RF
Claire Senft said:
Bob one technique that I have used to increase film speed that does not increase contrast is to prebathe the film prior to development in a solution of 1% sodium perborate.

This should give a doubling of speed with any black&white film with the contrast and grain size staying the same.


Claire,

I was intrigued by this suggestion, since I'd not heard of it before, despite some 35 years in the film-developing game. Maybe I did, but it didn't register on the radar. Anyway, I tried it today. Took my Rollei SL-66 out with two backs, each loaded with Delta 400. I have previously established that for my developer, ISO 200 is normal. So I shot one roll at 200 and the other at 400 (to be treated with the perborate solution later). I metered for a Zone V exposure, (high, bright, even overcast) and then shot several bracketed exposures of each scene with each back.

I treated the roll shot at 400 in the perborate and then developed both rolls at my usual time in my usual soup (Phenidone, Vitamin C, metaborate). I then contacted and made prints from several of the scenes from both rolls. Strangely, I did not get the increase in film speed you suggest--at most about a third of a stop. In fact, in each case, the roll shot at my usual 200 and left untreated by the perborate was the better negative, giving me the fullest range of tonal values and shadow detail without blocking highlights.

Is it possible, do you think, that the T-grain structure of Delta film is not susceptible to this pre-development treatment? Perhaps I should try again using FP4+ or Fuji Neopan which are more conventional grain films?

I did not notice any increase in grain, as you said would be the case. It's a simple treatment, but only worth it if it really does increase film speed.

Larry
 
OP
OP

Claire Senft

Member
Joined
Dec 7, 2004
Messages
3,239
Location
Milwaukee, W
Format
35mm
what can I say.

It is not a technique that I dreamed up myself. I got very close to 1 stop increase in film speed. And I got it with regularity. However, I got even more with low level light...asa 64 to 200 with 100TMax and an icrease in shadow contrast. Try a shadow based exposure and try again with two 1dentical placements on Zone 2 or three and see if it helps. I first picked up on this technique from an article written by a Mr. Pericano...I hope I spelled his name correctly. If my memory serves me correctly, One article was about monobath developers, another was about kallitypes and a third was about desenisitizers and there may have been a fourth. I believe that the monobath article mentioned it but I don't know which of the other 2-3 mentioned it. All of the articles appeared in the finest..my opinion..photography magazine extant. Photo Techniques. What else would one call a photo magazine that publishes those neat articles by Patrick Gainer? I should have been a bit more moderate in my statement and have said that it can add up to 1 stop of film speed.

I believe that if you use Google and type in "film latensification" or "sodium perborate" you can find other information useful to you about it.
 

Maine-iac

Member
Joined
Oct 12, 2004
Messages
462
Location
Island Heigh
Format
Med. Format RF
Claire Senft said:
Try a shadow based exposure and try again with two 1dentical placements on Zone 2 or three and see if it helps. All of the articles appeared in the finest..my opinion..photography magazine extant. Photo Techniques. What else would one call a photo magazine that publishes those neat articles by Patrick Gainer? I should have been a bit more moderate in my statement and have said that it can add up to 1 stop of film speed.

I'll try your suggestions with meter placements on lower Zones. I did notice some improvement in shadow contrast in yesterday's experiments, but not a true increase in speed. The best printable negs from the perborate treated roll were those exposed at the same ISO--200 as the non-treated roll.

Although I've been a subscriber to Photo Techniques since its beginnings, I don't remember those particular articles, but since I've still got all the back issues, I'm sure I can find it. Of course, the fact that I can't remember something is no great issue these days. In my second half-century, my data bank is pretty full, and my apparatus for accessing long-buried data is becoming increasingly unreliable. :smile:

Larry
 

Nicole

Member
Joined
Sep 27, 2004
Messages
2,562
Location
Perth, Western Australia
Format
Multi Format
Claire, I got lost somewhere between erborate and perborate...
I'm with you Cheryl.
Geeesh!
Helen, can I pass as a semi-perborate blonde? :tongue:
 
OP
OP

Claire Senft

Member
Joined
Dec 7, 2004
Messages
3,239
Location
Milwaukee, W
Format
35mm
I should keep my opinion to myself but

I should keep my opinion to myself...I know you did not ask me but I feel so strongly that you are so much more to be likened to a Lotus than to say a Mack, SAAB or Peterbilt Nicole. Just passing remark in the righthand lane.
 

Bob Carnie

Subscriber
Joined
Apr 18, 2004
Messages
7,735
Location
toronto
Format
Med. Format RF
Claire

Just so you know ,I am still watching this thread as it contains some really interesting and valuable stuff that I think I can use towards this night project that I am about to start. Usually I shoot a few hundred rolls before I even get a feel for a project. If any of the suggestions posted here help me it will save me hundreds of $$$ as well as improve the imagery I want to produce. What I like is the level of competence some of the posts put forth to this discussion. very good thread.
 

Reinhold

Advertiser
Joined
Aug 20, 2003
Messages
911
Location
Washougal, Washington
Format
Multi Format
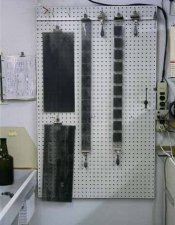
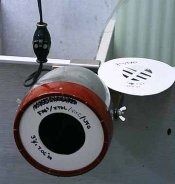
Thought you might like a peek at my set-up for low level light latensification.

On the far wall of my darkroom, I have a piece of peg-board with a row of hooks spaced for 6 rolls of 120/220 film. I use 12 common paper clamps, the 6 upper clamps and the 6 hook ends are dabbed with glow paint. The 6 lower clamps have 6 ounce fishing weights attached to keep the film from curling and swinging around.

When I'm latensifying 8x20 film, I peg in some extra hooks (which have a dab of glow paint on the ends) at the appropriate places on the peg-board. To locate the clamp on the film end without biting into the emulsion, I made a simple jig out of mat board (again, with glow paint at the appropriate places) that guides the clamp to the middle of the film end and limits it to a 1/8 inch "bite".

At the opposite end of the darkroom, 11 feet away, I put a common Kodak 5-1/2 inch safelight with a #3 filter and a 7.5 watt bulb. A variety of "waterhouse stops" limit the light output according to film speed. The one to the side has a few strips of tape to "adjust" the light output. I haven't got around to making a proper one yet, it's been working ok for the past 5 years....

I've adjusted the light output "stops" for a consistent 16 minute latensification period for all of the films that I use. My darkroom is in the basement. During the day I darken the outer rooms so I can get in and out while the film is being latensified.

That's how I do it...
 

Attachments

  • Latensify wall.jpg
    Latensify wall.jpg
    41.1 KB · Views: 170
  • Latensifier lamp.jpg
    Latensifier lamp.jpg
    28.6 KB · Views: 150

Nicole

Member
Joined
Sep 27, 2004
Messages
2,562
Location
Perth, Western Australia
Format
Multi Format
Claire, thank you... (blushing) :smile:

Claire Senft said:
I should keep my opinion to myself...I know you did not ask me but I feel so strongly that you are so much more to be likened to a Lotus than to say a Mack, SAAB or Peterbilt Nicole. Just passing remark in the righthand lane.
 

Helen B

Member
Joined
Jul 1, 2004
Messages
1,590
Location
Hell's Kitch
Format
Multi Format
Once again, thanks to Claire for bringing this to our attention.

So, post-exposure latensification by low intensity light appears to produce better results than chemical latensification while permitting normal film development, possibly by a commercial lab. The drawback is the slight problem of doing the post-exposure itself if you don’t have a darkroom. To date I have made my tests with in-camera latensification. This allows different amounts of latensification on each frame, but it is extremely time-consuming, especially as very long ultra-low intensity exposures seem to lead to less fog than shorter ones at a higher intensity. The ‘better’ the reciprocity characteristics of the film, the more important this may be (I still have a lot of tests to do to satisfy myself that this is true). I’m also looking at the timing of the latensification exposure: how much do delays affect the result?

Patrick’s circular affair with a central light didn’t appeal to me, so I thought of another obvious way of doing it: take some square section drainpipe or other long box affair, arrange a simple film holder inside, make a long slot in the other side and cover it with a dense light attenuator made from layers of exposed, developed silver-image film. It’s designed for use without a darkroom, and to be as compact as possible.

Here are the rough details of the contraption I’ve started to work on.

The film is wound into the box on an endless belt of polyester film. The film leader is attached to the belt by a film clip that allows any misalignment to be accommodated. The tail end of the film is simply taped to the belt. A modified changing bag will cover the loading end of the box. The end of the box has an additional cover to use when the changing bag is open. The exposure itself is made in dim room light – possibly measured with a lightmeter.

I decided on the endless belt idea to prevent scratching of the film and to permit winding to be done from the loading end – inside the changing bag. If the box was big enough, and the belt wide enough, it could be used with sheet film. I've tested the film loading idea with a steel tape measure instead of a belt - this works well enough with 35 mm and is very simple, though a little awkward. A short 'axle' keeps the front end of the tape under control.

Best,
Helen
 

Donald Qualls

Subscriber
Joined
Jan 19, 2005
Messages
12,291
Location
North Carolina
Format
Multi Format
jdef said:
Should I be worried that a pinhole might not provide even enough light over the surface of the film? Perhaps a group of pinholes?

Seems to me the pinhole will project a pinhole image of the light source on to the film. That would be bad...

Solution: use a diffuser between light source and pinhole, evenly illuminated by the light source (you can check with a light meter, with the filter removed from the safelight), large enough that the image of the diffuser will cover the entire film. Build this all into a black foam core box and you have a latensification unit that could potentially be operated (including inserting and removing film holders) in a lit room. There'll be some light lost to scattering by the diffuser, so you may need to experiment with light levels and exposure times, but that and getting a good light seal ought to be the only significant issues.

Of course, a group of pinholes would be better in terms of passing more light (assuming you're using a very dim source -- one advantage of a small, single pinhole is that you don't *need* a very dim source), as long as the diffuser is large enough so that every pinhole's image of the diffuser covers the entire film.
 

dancqu

Member
Joined
Sep 7, 2002
Messages
3,649
Location
Willamette V
Format
Medium Format
IF a pre or post 0.1 exposure is given and that much attendent fog result,
by how much will that zone one one stop speed boost differ from a
prolonged post exposure with same fog level?

I keep hearing about more or less fog with prolonged post exposure.
Anybody got a densitometer? Dan
 

Donald Qualls

Subscriber
Joined
Jan 19, 2005
Messages
12,291
Location
North Carolina
Format
Multi Format
jdef said:
Thanks, Donald.

I thought of the diffuser too, but I was most curious about the evenness of illumination from a single pinhole.

Ah, okay, I missed what you were looking for. Assuming the diffuser is evenly lit, the intensity of light from the pinhole falling on the film plane is determined by the same inverse square law used to calculate flash exposures -- so you simply need to make the pinhole far enough from the film that there's less than 1/3 stop difference in the light intensity from center to corner, and ensure the diffuser is evenly lit. And, since you don't need to worry about image sharpness, you can simply make the single central pinhole larger if you find you need more light (which you probably will unless you use a 60 W bulb for a light source).

Let's see, 1/3 stop is cube root of 2, about 1.26x light intensity, and the square root of that is approximately 1.12 -- so the pinhole distance must be such that the distance to the corner is no more than 12% greater than that to the center of the film. For 8x10 film, the film radius, center to corner, is square root of 41, 3.45 inches, so a right triangle with one leg that size musn't have more than 12% different between the other leg and the hypotenuse -- so 3.45^2 + X^2 = (1.12 * X)^2 and thus 11.9 = 0.26 * X^2 and X (the distance from film plane center to pinhole) must be at least 6.77 inches. I'd personally make it longer...
 
OP
OP

Claire Senft

Member
Joined
Dec 7, 2004
Messages
3,239
Location
Milwaukee, W
Format
35mm
Pinhole if you want

If you want to uaw a pinhole go ahead. I still think that an inline bulb dimmer is extremely easy to use and at about $10.00 frpm Home Depot very inexpensive. The lamp can be run from full on to virtually off.
 

Reinhold

Advertiser
Joined
Aug 20, 2003
Messages
911
Location
Washougal, Washington
Format
Multi Format
The idea of making a latensification chamber for those with limited darkroom space got me to thinking.

Here's one idea...

Make a 2-part box consisting of a base unit to hold the film and a slip-on cover box with a "window" covered with plain 'ol black polyethylene film. In case you haven't noticed, the common 2 or 3 mil black plastic you buy at the local hardware store is not 100% light proof. It actually lets 1 or 2 % (???) light thru it.

With a bit of experimentation, one could figure out how many layers will be needed to reduce the light inside the chamber to the proper level for 15 to 20 minutes of latensification. (I'd guess that 2 layers will do it in an indoor situation). The "window" in the cover box should be the full length of the film to avoid uneven light.

In use, you'll need to find a place where the room light is uniform and repeatable. Bouncing a light off of the ceiling and making sure no bright light shines directly onto the plastic "window" is probably the easiest way.

The base could be a simple affair, made from 1/8" masonite or 1/4" plywood with a frame made from 1 x 4 boards. By making the frame with a 1/4" space between the boards, a light trap is created. The cover box could be made from black foam core with the black plastic taped over the "window".

The sketch shows the chamber used horizontally where large format films are merely laid on the floor, but roll films will argue as you try to clamp them down. It could also be wall mounted where roll films will behave, but large format films will take more care. Lighting for a wall mounted unit will take more thought.

Have fun...
 

Attachments

  • Latnsif. chamber.pdf
    6.5 KB · Views: 174

Helen B

Member
Joined
Jul 1, 2004
Messages
1,590
Location
Hell's Kitch
Format
Multi Format
A colleague and I did a modest search of available information on perborate latensification then mulled it over for a while. Here is our lazy, hurried plagiarism of other people’s hard work, with a few insignificant additions, fantasies and elaborations of mine:

Background
Perborate exists in solution as a peroxide-perborate equilibrium. The latensification effect appears to be caused by the perborate reducing silver halide onto the existing silver atoms in the latent sub-image specks, thus making them developable. Therefore it is advantageous to adjust the pH to favour the perborate: pH 10 is the minimum pH necessary, and pH 11 gives some improvement. Lower pH favours peroxide which is less selective: therefore it produces lower speed gain and higher fog.

Film selection
The faster the film, the less the speed gain.

Spectral response
The action does not involve the conversion of photons to electrons, so is independent of the method of spectral sensitisation – ie it is not spectrally selective.

Reciprocity
Latensification will not work if the intensity of the light is low enough to require long exposures – it seems that one second or thereabouts is the upper limit.

Timing
Because the latensification action is on image specks with few silver atoms it is important to do it as soon as possible after the formation of the latent image. Storage temperature has an effect on the stability of clusters with few silver atoms. The potential speed gain may be reduced by 50% after a week at 20°C.

Concentration
2 g/l sodium perborate was effective if the emulsion was dried after treatment and before developing.
10 g/l sodium perborate was as effective, but didn’t need to be dried.

Treatment
30 seconds at 20°C was adequate. Most of the action occurred during the first 5 seconds. If the film is not subsequently dried, it should be left for a couple of minutes after the perborate bath before development. If the film is dried, additional speed gain is possible by repeating the perborate/drying cycle.

Development
You should carry out tests to determine optimum development time. The longer the film spends in the developer, the less effect the perborate has on the final image. (my thought: does this favour a developing agent like Metol that has rapid shadow action, and a low density range in the negative? )

Results
The perborate does increase the graininess of the images, but it is estimated to be less than the increase in graininess by using faster film.
All the ‘speed increase’ happens in the toe. There is little change in the midtones and nothing in the shoulder.

I'm continuing with my own comparisons, but a very minor leg injury has slowed me down a little, pathetic wimp that I am.

Best,
Helen
 

Reinhold

Advertiser
Joined
Aug 20, 2003
Messages
911
Location
Washougal, Washington
Format
Multi Format
Helen:

Fascinating. Thanks for doing the research.

The bit about latent image decay reducing the perborate's potential is especially interesting to me. A few years ago I toyed with the idea, but never got around to trying perborate (I've still got a bottle of solution I mixed up 5 or 6 years ago).

Now, I suspect that if I would have tried it on the 50 rolls of 220 film I usually shoot in Europe, the results would've been disappointing. It usually takes at least one month from the time I start shooting the first roll until I get home and start developing.

I can testify that latent image decay is not a problem with low light latensification on films that have been exposed as much as 6 to 8 weeks before development. I guess I could theorize that low light latensification is one way to compensate for holding films for extended periods before developing. (Obviously, I'm not suggesting that latensification should be used on a roll of film that grandma took 10 years ago... the fog would be horrendous)

Thanks again.
 

Maine-iac

Member
Joined
Oct 12, 2004
Messages
462
Location
Island Heigh
Format
Med. Format RF
Helen B said:
A colleague and I did a modest search of available information on perborate latensification then mulled it over for a while. Here is our lazy, hurried plagiarism of other people’s hard work, with a few insignificant additions, fantasies and elaborations of mine:


Best,
Helen

Helen,

Thanks very much for doing this (ahem) leg work on your injured leg.

Your research offers several explanations for why my first attempt at perborate latensification didn't seem to have a great impact:

1. I was using Delta 400, and so your remarks about faster film showing less effect are probably apt.

2. I didn't check the pH of my perborate solution prior to using; could have had something to do with it.

3. Slow shutter speeds. I can't remember, but I may have been shooting at 1 or 2 second exposures.

Did you discover, or do you know, whether the perborate solution must be used as a one-shot, or can it be re-used several times?

Thanks again,
Larry
 

fhovie

Member
Joined
Mar 20, 2003
Messages
1,250
Location
Powell Wyoming
Format
Large Format
Helen! - I do so enjoy your posts. Thanks
 

Helen B

Member
Joined
Jul 1, 2004
Messages
1,590
Location
Hell's Kitch
Format
Multi Format
Thanks for the kind comments.

I suspect that the numbers I quoted for limiting shutter speed and loss of effect over time are highly variable from one film to another.

Image stability: I wonder how noticeable the loss of latent sub-image is - as far as I know, the fewer the silver atoms clustered together, the less stable they are. The '50% loss of speed increase in a week' example I gave was a 'may' not a 'shall'. The stability of the image centres in the less exposed grains will depend a lot on the film itself, I guess. A few years ago I left some exposed APX 400 and Tri-X for a few weeks in the tropics before developing. The APX 400 lost a lot of shadow detail while the Tri-X stood up very well.

I don't know if the perborate would be re-usable. There are all kinds of things going on between borates and hydrogen peroxide and stuff so it might be that the pH falls over time and that the reduction-oxidation properties change. This particular aspect is getting outside my current understanding.

<panic>

Sodium perborate forms an alkaline solution, hydrogen peroxide an acid solution. Bear in mind, if using a borate-peroxide mix instead of perborate, that commercial H2O2 may include an acid stabiliser.

Oh, Persil got its name from perborate-silicate.

(later addition: hydrogen peroxide is more stable in acid solutions than alkaline ones; pharmaceutical grade has low amounts of stabiliser, cosmetic grade has the most)

Best,
Helen
 
Last edited by a moderator:

jason314159

Member
Joined
Jan 25, 2005
Messages
18
Location
Los Angeles, CA
Format
Medium Format
Helen B said:
A colleague and I did a modest search of available information on perborate latensification then mulled it over for a while. Here is our lazy, hurried plagiarism of other people’s hard work, with a few insignificant additions, fantasies and elaborations of mine:

Helen,

Very interesting info. Will have to experiment. American Cinematographer had some articles about low-light latensification in the 1950s. Apparently Columbia Studios used it especially for productions like "Sunset Boulevard". I have not been able to find a library with ASC that went back that far.

-jlc
 

Helen B

Member
Joined
Jul 1, 2004
Messages
1,590
Location
Hell's Kitch
Format
Multi Format
'American Cinematographer had some articles about low-light latensification in the 1950s.'

The 1948 Kodak research note that we dug up appeared to be for movie film.

Best,
Helen
 

Lee L

Member
Joined
Nov 17, 2004
Messages
3,281
Format
Multi Format
a method for testing and some untested ideas

David Vestal wrote about his adaptation of Ralph Steiner's latensification techniques in Darkroom & Creative Camera Techniques, Nov/Dec 1993, page 43 e.p. (now Photo Techniques, whose web site shows the back issue still available). He uses the Kodak 5.5" round safelight and 7W lamp, half covered for Plus-X, and masked to a 1.75 inch square for Tri-X, at 15 to 20 minutes (old emulsions). He also finds that twice the time at half the light intensity gives the same speed gain in the shadows with less fog.

To test, he lights something like a Kodak Q-13 grey scale suspended well in front of a black background and shoots identically underexposed negatives so that he can compare the grey scale against the "absolutely" black background. He puts sections of this roll at distances of 7, 8.5, 10, and 12 feet from the safelight, making sure they don't cast shadows on each other, saving one strip with no latensification for comparison. He gives 15 minutes of exposure to the safelight. He develops the strips identically and suggests trying 10% to 15% extra development time as an option when latensifying. The best latensification exposure is the one with greatest density and detail increase in the shadows, but with minimal fog. Keep the light source at least 5 feet from a 36 exposure roll of 35mm or risk uneven coverage due to the inverse square law.

One thing I'm considering for myself is using a green LED off an adjustable 12V power source. A great source for these is superbrightleds.com, and I'm considering trying versions at:
Dead Link Removed
and
Dead Link Removed
(I also intend to try their amber and red versions for safelights and a dimmed green for development by inspection.)

DO NOT buy the 120VAC Edison screw base versions expecting to dim them, it won't work properly because of the electronics used to drive the LED. The 12VDC versions should be dimmable to the appropriate levels with a variable voltage DC "wall wart" transformer. Be sure the coverage of the LED is wide enough to cover the film evenly. A little sandpaper or emery cloth on the dome of the LED should work to diffuse it, or some frosted material in front of the LED. Some LEDs come with frosted or milky diffusion built in. The light bars at superbrightleds have 50 and 90 degree beams, so should be fine as is. Note that the cheaper 12" bar is lower output, while the more expensive one is brighter, but can be broken up into sections of 3 LEDs each. Either will need significant dimming.

Lee
 
Joined
Oct 26, 2004
Messages
33
Location
Lowell, MA
Format
Multi Format
Great thread. Now, a few months later, did anyone have any luck with latensification contraptions for use in limited darkroom space?

I thought that both the pinhole device and the centrally lit cylinder device were particularly interesting. A hybrid of these two might be a convenient and cheap device--a pizza box or thin cylinder with a diffused pinhole. One could load it in a darkened bathroom and expose it on the table under your dining room light as long as your spouse/child/roommate doesn't open the box mistaking it for dinner!
 
Photrio.com contains affiliate links to products. We may receive a commission for purchases made through these links.
To read our full affiliate disclosure statement please click Here.

PHOTRIO PARTNERS EQUALLY FUNDING OUR COMMUNITY:


Ilford ADOX Freestyle Photographic Stearman Press Weldon Color Lab Blue Moon Camera & Machine
Top Bottom