Last Step Before Paper Drying?

Recent Classifieds

Forum statistics

Threads
198,707
Messages
2,779,606
Members
99,682
Latest member
desertnick
Recent bookmarks
0

ragnar58

Member
Joined
Feb 20, 2008
Messages
28
Format
35mm RF
Is it a common practice to perform an additional step between the wash and drying?
I could understand a rinse in distilled water before drying if the water is hard or if a water softener is used.
If the drying method is the back-to-back on a line, I could maybe see a wetting agent used before hanging.
I’ve never seen spots from the water but wondered if anyone took an extra step at this phase.
 

Tom A

Member
Joined
Apr 28, 2005
Messages
148
Location
Moen, DK
Format
Multi Format
My last step before drying the paper is a dip in Agfa Sistan.
The Sistan protecs the silver (I hope. I will know in another 50-100 years :wink:) just like toning, and another positive effect of the Sistan, it makes it easier to flatten the FB-prints after they have dried.

Regards Tom
 

trexx

Member
Joined
Nov 16, 2004
Messages
291
Location
Tucson
Format
4x5 Format
Test for residual hypo, then sistan.
 
Joined
Dec 30, 2005
Messages
7,175
Location
Milton, DE USA
Format
Analog
Wirelessly posted (BBBold: BlackBerry9000/4.6.0.167 Profile/MIDP-2.0 Configuration/CLDC-1.1 VendorID/102 UP.Link/6.3.0.0.0)

I water rinse and then hang to dry with RC papers. No intermediate step.
 

jp80874

Member
Joined
Jul 28, 2004
Messages
3,488
Location
Bath, OH 442
Format
ULarge Format
I squeegy (spell) the water off on a flat surface and put the print dry, image down, on screens with a second screen on top. Some believe image up. It may not matter. If I let Kentmere Fineprint fbvc 16x20 and 20x24 dry slowly overnight it will be almost flat and need little or no flattening. If I hurry the process I will make potato chips.

John Powers
 

removed account4

Subscriber
Joined
Jun 21, 2003
Messages
29,833
Format
Hybrid
my last step is to use a windshield wiper blade
and squeegee the prints on a sheet of plexi,
then either hang them on corner from a line, or
put them on a drying rack
face down if fiber or face up if rc, on a screen ...
 

Sirius Glass

Subscriber
Joined
Jan 18, 2007
Messages
50,338
Location
Southern California
Format
Multi Format
After rinsing I squeegee the prints on a sheet of glass with a print wiper and place them in a tray at different angles [so they do not stick together when I take them out one at a time]. I then take the prints to another room and load them in to the print dryer.

Steve
 

DannL

Member
Joined
Jan 11, 2006
Messages
586
Location
Oklahoma
Format
Multi Format
I have been running fiber prints (8x10) through a print wringer. So far it has worked great. Now that I'll be working with 16x20 I will probably use a large hand roller that came with the ferrotyping plates. I would be somewhat hesitant to pull (drag) a squeegy across a soft print surface, but then again I'm not an expert in this field.
 
Last edited by a moderator:

Sirius Glass

Subscriber
Joined
Jan 18, 2007
Messages
50,338
Location
Southern California
Format
Multi Format
After rinsing I squeegee the prints on a sheet of glass with a print wiper and place them in a tray at different angles [so they do not stick together when I take them out one at a time]. I then take the prints to another room and load them in to the print dryer.

Steve

Add or use a print roller ...

Steve
 

dancqu

Member
Joined
Sep 7, 2002
Messages
3,649
Location
Willamette V
Format
Medium Format
The Sponge VS ...

A print roller. Now that's an alternative, a break
from the constant druming of the squeegees.

For myself the sponge can't be beat. A sponge will
soak up water, not spread it about. Any flat water
proof surface will suffice. Also, a sponge will
draw water from a surface leaving it drier
to start.

Photo Grade sponges are available. Household
sponges work well. For 98 cents what
have you to loose? Dan
 

Sirius Glass

Subscriber
Joined
Jan 18, 2007
Messages
50,338
Location
Southern California
Format
Multi Format
What about instead of a sponge using ShamWow?

Steve
 

Nicholas Lindan

Advertiser
Advertiser
Joined
Sep 2, 2006
Messages
4,242
Location
Cleveland, Ohio
Format
Multi Format
Soak in Pakosol used at print-flattening dilution. Drain. Pat dry with cotton bath towel. Dry with an Arkay drier - usually face-to-canvas but sometimes face-to-ferrotype. Flatten in dry-mount press.

The Pakosol gives a nice 'hand' to the paper.

For RC, just pat dry with a towel and leave face up to dry on a new towel.
 

Rick A

Subscriber
Joined
Mar 31, 2009
Messages
9,921
Location
Laurel Highlands
Format
8x10 Format
After rinsing, I check for residual hypo, then two mins in hypo clear, and rerinse if necessary. Then its off to a large plate glass for the squeegee. I have used a roller in the past, but now I only use one if I am ferrotyping, that's a must for that. I usually dry on screens, even though I have a print dryer.I own two dryers, one I've had for years, and one brand new in the box that I picked up a couple of years ago, and still havent used.
Rick
 

Sirius Glass

Subscriber
Joined
Jan 18, 2007
Messages
50,338
Location
Southern California
Format
Multi Format
Soak in Pakosol used at print-flattening dilution. Drain. Pat dry with cotton bath towel. Dry with an Arkay drier - usually face-to-canvas but sometimes face-to-ferrotype. Flatten in dry-mount press.

The Pakosol gives a nice 'hand' to the paper.

For RC, just pat dry with a towel and leave face up to dry on a new towel.

I use the sme dryer and I have never been able to face the print towards the ferrotype. How do you do that without the emulsion sticking to it?

Steve
 

DannL

Member
Joined
Jan 11, 2006
Messages
586
Location
Oklahoma
Format
Multi Format
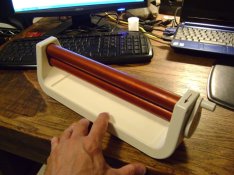
Here's a picture of that that wringer thingy I've been using. Good for prints up to 11x14. Made by Falcon Safety Products Inc, Mountainside, NJ.
 

Attachments

  • Dsc02979.jpg
    Dsc02979.jpg
    257.8 KB · Views: 113

ozphoto

Subscriber
Joined
Apr 2, 2006
Messages
1,918
Location
Adelaide, SA, Australia
Format
Multi Format
For me, the last steps I take before drying:
  • Selenium Tone 1:19 for archival permanence;
  • Final rinse to remove any excess toner;
  • Sponge dry with a soft sponge;
  • Place image between two pieces of blotting paper to dry naturally.
Just printed up some fiber based prints and the blotting paper really stopped them from curling badly!
 

2F/2F

Member
Joined
Apr 29, 2008
Messages
8,031
Location
Los Angeles,
Format
Multi Format
For me, from out of the wash to either presented or stored:

1. place print face first onto my bathroom mirror (after cleaning mirror with plain water)
2. squeegee the back
3. air dry wherever I can find room in the bathroom/laundry room. Sometimes this means tacking the prints into the already-battered drywall (only bit of drywall in the whole house, and proud of it...so proud of it that I fill it with holes to pin up my prints to dry :D).
4. flatten between mount boards in a dry mount press once dry
5. observe print to see if it is worth any more work or if it needs to be re printed
6. spot
7. If a print is going to be matted, framed, hung, etc., I just dry mount it straight away and make an overmat to protect the print surface (usually with a gutter). If I am not sure what I'll be doing with them, I keep them loose in old paper boxes.

P.S. This is assuming that I do not bleach or tone the print. If so, insert after number 5: perform other chemical processes as desired, then rewash and start the above list over from the top.
 
Last edited by a moderator:

Wade D

Member
Joined
Feb 15, 2006
Messages
897
Location
Jamul, CA
Format
Multi Format
I use the sme dryer and I have never been able to face the print towards the ferrotype. How do you do that without the emulsion sticking to it?

Steve

A bit higher temp might be indicated if the prints stick when they are face to ferrotype. The prints should 'pop' off the dryer at the end of the cycle. I don't know about other surfaces but with F surface paper this should give you a good glossy.
 

Nicholas Lindan

Advertiser
Advertiser
Joined
Sep 2, 2006
Messages
4,242
Location
Cleveland, Ohio
Format
Multi Format
I use the sme dryer and I have never been able to face the print towards the ferrotype [without sticking].

The 'tin' has to be very, very clean - I scrub it with Windex and Bon Ami. It also has to be scratch and haze free. They used to sell ferrotype wax/polish to minimize sticking but I use Carnuba car wax instead. Pakosol (I don't know if they still make it, you can use dilute hexylene glycol instead) helps quite a bit with ferrotyping.

There is all sorts of advice on temperature. I used to ferrotype prints in the old days at room temperature - just roll the print on the tin and prop it up against the wall, it would pop off when dry. Some folks like to have the tin so hot it sizzles when they plop the print on. I find medium-hot works fine.
 
Photrio.com contains affiliate links to products. We may receive a commission for purchases made through these links.
To read our full affiliate disclosure statement please click Here.

PHOTRIO PARTNERS EQUALLY FUNDING OUR COMMUNITY:


Ilford ADOX Freestyle Photographic Stearman Press Weldon Color Lab Blue Moon Camera & Machine
Top Bottom