Konica Auto S2 shutter repair

Recent Classifieds

Forum statistics

Threads
197,550
Messages
2,760,918
Members
99,401
Latest member
Charlotte&Leo
Recent bookmarks
0

silvertab

Member
Joined
Dec 31, 2021
Messages
43
Location
Canada
Format
Multi Format
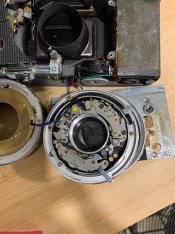
Hi there, I recently bought a Konica Auto S2 and I think it might've been banged up a bit during transport; when I received it, I noticed that 2 of the shutter blades had actually fallen off the shutter and were stuck in the other blades. I managed to remove the front lens, and the back one, and made my way to the shutter, and removed the 2 loose blades. They're still in pretty good shape so I'd like to try to put them back in their place, but I'm kinda stuck trying to split the aperture and the shutter apart. Not quite sure which screws to remove next to be able to reach between the shutter and the aperture to try to put the blades back in their places.

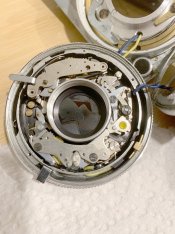
Here's some picture of where I am; on one side I have this
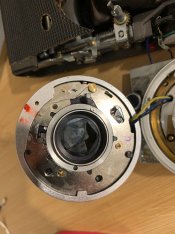
IMG_3591.jpeg

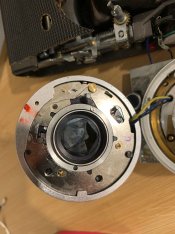
And on the other side, I have this:
IMG_3589.jpeg

Any tips on how I can split these apart in order to reinstall these blades?
 

shutterfinger

Member
Joined
Feb 25, 2013
Messages
5,020
Location
San Jose, Ca.
Format
4x5 Format
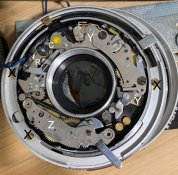
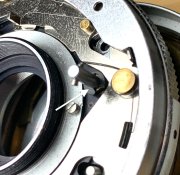
Looking up your camera it has a Copal SVA shutter. Finding a service manual will be difficult, so
konica shutter.jpg
The ring needs to be removed, screws marked with black X.
The speed time delay mount screws marked with white Y. The top screw is likely under the cocking spring lever.
Z is the self timer.
C is the cocking, R is the release, F is the flash sync contacts.

Post another closeup picture of the shutter when you get the ring off.
Post a picture of the loose shutter blades, with the amount of oil on the ones still in the camera they may be broken.

Edit:
This is likely a copy of the Prontor SV/SVS shutter. If so it has been modified to work in the camera. Shutter manufacturers made a base shutter then adapted it to many different camera applications. The Prontor SV/SVS service manual covers the
base shutter. https://learncamerarepair.com/downloads/pdf/PRONTOR-S-SV-SVS1-Repair-Manual.pdf
The cocking and release in your shutter is through the back of the shutter.
Take good pictures and pay close attention to how it is assembled. Shutter blade order is very important as shown on pdf page 76 of the manual.
 
Last edited:
OP
OP

silvertab

Member
Joined
Dec 31, 2021
Messages
43
Location
Canada
Format
Multi Format
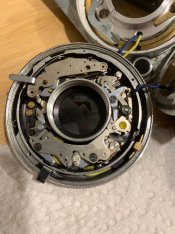
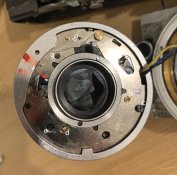
Managed to remove the ring, here's what it looks like after:
IMG_3594.jpeg

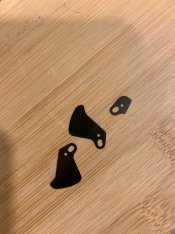
And here's a pic of the 2 blades, and one of the blade shim that fell off:
IMG_3592.jpeg

I found this which is for a slightly different copal shutter, but seem similar in many ways:
http://ratfactor.com/yashica/

On this copal mx shutter, it looks like the aperture can be separated from the shutter by removing these 4 screws on the aperture side:
mx.jpg

I've also found this post, where someone managed to do the exact thing I'm trying to do... but the picture is so blurry that I can't quite see which screws its trying to show: https://www.photrio.com/forum/threads/konica-auto-s2-copal-shutters.33074/#post-472015
 
Last edited:

shutterfinger

Member
Joined
Feb 25, 2013
Messages
5,020
Location
San Jose, Ca.
Format
4x5 Format
The screws on the rear of that shutter likely hold the aperture operating ring in place.
Remove the delay timer by removing the two screws with the white arrow.
Remove the self timer by lifting straight up on it operating the setting gear (right end) as needed to clear the center collar.
The 3 screws should be visible around the perimeter of the main plate.
The shutter blades look undamaged. Reattach the reinforcing piece with a very thin coat of glue or nail polish. Blade thickness is important.

IMG_3594.jpeg
 

albada

Subscriber
Joined
Apr 10, 2008
Messages
2,171
Location
Escondido, C
Format
35mm RF
You are correct: The four screws on the back secure the base assembly of the shutter. The aperture ring must be in the correct position to reveal those screwheads. As shutterfinger said, first remove the self-timer and anything else that might hinder removal. Then remove the four rear screws with the shutter facing down. Lift the housing up, revealing the base and the remaining blades sitting on top of the base.
I have seen this problem of loose blades before, so I suspect it's common. The problem is that the four screws support the front control rings, and over the years, those screws become loose, causing one or more blades to slip over its pins. You need to put them back. If this loose-screw theory is correct, you will find that those four screws are loose and will come off effortlessly.

Mark Overton
 
OP
OP

silvertab

Member
Joined
Dec 31, 2021
Messages
43
Location
Canada
Format
Multi Format
Thank you both for your invaluable advice! I'm going to unsolder every wire that's in the way first since it makes it really hard to work on it, and then will attempt what you both suggested! I'll post an update once I'm there! I have to say I'm less and less confident that I'll be able to put it back together if I successfully re-install the blades, but worst case, I guess it'll be a good learning experience, and a lot of spare parts if I end up picking another KAS2
 

Kino

Subscriber
Joined
Jan 20, 2006
Messages
7,618
Location
Orange, Virginia
Format
Multi Format
A quick word of warning: be aware of a locator pin that fits into the brass plate between the two halves of the lens assembly and DON'T break it! It is the only thing keeping the front half from rotating and once broken, you have a good looking paperweight! (Ask me how I know...)

It rises out of the back half of the shutter and fits into a "D" shaped hole (if I remember correctly). When you go to re-tighten the two halves together again, take great pains to NOT let the front half rotate AT ALL or it will shear off!
 
OP
OP

silvertab

Member
Joined
Dec 31, 2021
Messages
43
Location
Canada
Format
Multi Format
Ok I'm re-reading everything and I'm getting confused (sorry, I'm very new at this and other than a quick clean up of my yashica tlr's shutter, I've pretty much no experience).

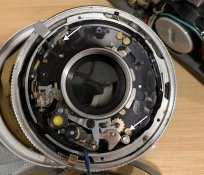
Am I correct that the 4 screws I'm looking for, to separate the shutter and the aperture, are on this side:
IMG_3591.jpeg

And if so; I'm wondering why I need to remove the self-timer, etc. to be able to reach them, since that's all on the other side :cry:

Edit: The reason I am asking is that I found this post on the forum where someone did exactly what I'm trying to do, and it seemed to mention not having to touch the self-timer etc. but I might be misunderstanding:

Once that was in, the two haves went together without further fuss. So I re-soldered the yellow sync flash wire and was pleased with the newly reassembled aperture / shutter assembly. Since I didn't have to dis-assemble any of the clock works for the self timer, shutter release, etc., I'm really hoping that I don't need to work on them.
 
Last edited:

albada

Subscriber
Joined
Apr 10, 2008
Messages
2,171
Location
Escondido, C
Format
35mm RF
Ok I'm re-reading everything and I'm getting confused (sorry, I'm very new at this and other than a quick clean up of my yashica tlr's shutter, I've pretty much no experience).
Am I correct that the 4 screws I'm looking for, to separate the shutter and the aperture, are on this side:
View attachment 298194
And if so; I'm wondering why I need to remove the self-timer, etc. to be able to reach them, since that's all on the other side :cry:
Edit: The reason I am asking is that I found this post on the forum where someone did exactly what I'm trying to do, and it seemed to mention not having to touch the self-timer etc. but I might be misunderstanding:
I remove self-timer and such in order to make removal and re-insertion of the base easier. Examine the top carefully to anticipate what might prevent the base from being pulled straight out. There is often a machined slot in the outer case, or a lip on the inner throat, and an object in either will prevent removal. In particular, the first (large) self-timer gear often fits under the inner lip, so I habitually remove it.

Mark Overton
 
OP
OP

silvertab

Member
Joined
Dec 31, 2021
Messages
43
Location
Canada
Format
Multi Format
Ok thanks! That makes sense...

So, looking at the other side, I'm trying to figure out which 4 screws I need to remove in order to split the aperture and the shutter apart... it looks like there's 6 or 7 screws on that side; are any of these part of the 4 I need to remove or am I looking at the wrong thing? (I've annotated the picture with letters next to all the screws I could find)


back.jpg
 

shutterfinger

Member
Joined
Feb 25, 2013
Messages
5,020
Location
San Jose, Ca.
Format
4x5 Format
Standard pictures for Copal/Prontor shutters show three screws in the base plate holding it to the shutter housing and the self timer, delay timer, and often times the cocking/release has to be removed to access the screws. Now if this shutter requires the screws in the back to be removed the self timer, delay timer, cocking/release, or flash contacts may have parts that will try to expand into the outer case and have to be pressed back in to get the parts together.

I've had a lot of shutters apart and put back together, mostly Compur/Synchro Compour and a few Prontor for large format lens and the Compur's are more complicated than this Copal. There are 3 main assemblies, delay timer, self timer, cocking/release/flash sync. Look at each one individually and its connection to the other sections. Once you have the blades in place you will not be able to operate the blade controller with the top of the plate components in place except for normal operation of the shutter. If the blades are not on the controller in the correct order they will hit each other, jam, bent, break when trying to operate the shutter normally. The blade controller with blades should float and open/close with the weight of a 1/4 inch long down feather pushing it. Also its easy to manually operate the controller slowly and verify the controller/blades operate smoothly.

The sequence of events for a correctly operating shutter aare
Blades closed and the controller locked in place by the mechanisms.
Cocking the shutter sets the main cocking spring and positions levers to close the shutter blade controller once it opens.
Pressing the shutter release unlocks the blade controller lock, a weak spring throws the controller to full open in .0003 to .0005 second and the delay timer blocks the cocking spring from closing for the selected shutter speed time up to 1/125 second then the controller is forced to the closed position.
Speeds of 1/250 and higher are booster springs to force the controller closed faster with the delay locked out of operation.

Tame the monster!
 
OP
OP

silvertab

Member
Joined
Dec 31, 2021
Messages
43
Location
Canada
Format
Multi Format
Update: I was able to remove the self-timer and the delay, phew! However, I'm still not quite sure what I'm looking for as to what screws keeps these 2 halves together :unsure:
Removing these 2 parts did reveal 2 brass screws (white arrows on the pic)... maybe part of what I'm looking for?

2screws.jpg
 
OP
OP

silvertab

Member
Joined
Dec 31, 2021
Messages
43
Location
Canada
Format
Multi Format
Update: Turns out that it was indeed screws from the aperture side that needed to be taken out in order to separate the shutter and the aperture! I found all 4, but it looks like there's still a clip attached to the cocking mechanism's rod that prevents me from separating the two (see attached picture). I've been trying to remove the clip for a good 20 minutes now but with no luck... gah! So close!

clip.jpg
 

albada

Subscriber
Joined
Apr 10, 2008
Messages
2,171
Location
Escondido, C
Format
35mm RF
That's an e-clip. Or maybe it's called a c-clip. Anyway, put a small screwdriver into the tiny space at the back of it, turn the screwdriver a little, and the clip will move backwards and you can get it off. But be careful to not let it fly across the room!
 
OP
OP

silvertab

Member
Joined
Dec 31, 2021
Messages
43
Location
Canada
Format
Multi Format
That's an e-clip. Or maybe it's called a c-clip. Anyway, put a small screwdriver into the tiny space at the back of it, turn the screwdriver a little, and the clip will move backwards and you can get it off. But be careful to not let it fly across the room!

haha thanks for the heads up, that's exactly what ended up happening... but I managed to find it!
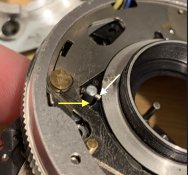
I'm now left with one final thing preventing me from splitting the aperture and the shutter, and it's that same rod, with the c-clip removed, which is attached to the shutter's cocking mechanism, and is kinda shaped like a "T" (white arrow on image), and will not go through the hole in the aperture (yellow arrow), to fully free the aperture from the shutter.
Quite a puzzle :blink:

grrrr.jpg
 

shutterfinger

Member
Joined
Feb 25, 2013
Messages
5,020
Location
San Jose, Ca.
Format
4x5 Format
That pin is likely pressed in, is it flush on the other side of the shaft?
It seems unlikely it would be pressed in after installation, look at the rear of the case around the shaft as there may be a slot for it to slide through.
Otherwise it will have to be driven out or pulled out.
 

albada

Subscriber
Joined
Apr 10, 2008
Messages
2,171
Location
Escondido, C
Format
35mm RF
As shutterfinger suggested, that cross-pin is pressed in tightly. Here's a way to remove it.
1. Locate a scrap needle-nose pliars.
2. With a Dremel equipped with a cutting wheel, cut a notch in one of the jaws of the pliars just wide enough to bit over the cross-pin.
3. Put the pliars over the cross-pin so that one end is in the notch, and the other jaw is pressing on the pin.
4. Squeeze hard, and the pin will push out some.
5. Use another (or the same) needle-nose pliars to pull out the cross pin the rest of the way.

BTW, one end of the cross-pin might be slightly thinner than the other. That will tell you which way you should push it out.

Mark Overton
 
OP
OP

silvertab

Member
Joined
Dec 31, 2021
Messages
43
Location
Canada
Format
Multi Format
Thank you both! I was able to remove the pin and finally get the shutter and the aperture apart. While doing so I realized that one of the shutter blade's shim was missing; I was able to find it stuck between the two pieces that holds the aperture blades together, and unfortunately it was impossible to take it out of there without also taking apart the aperture... so I now have a LOT of blades (5 shutter blades, and 5 aperture blades) to try to put back in their right places, and I'm not quite sure I have the dexterity to do it judging by my first few attempts :laugh:
 

shutterfinger

Member
Joined
Feb 25, 2013
Messages
5,020
Location
San Jose, Ca.
Format
4x5 Format
Try 11 aperture blades, much more fun!
Aperture blades may work only one way but go in either way. There are two rings, one fixed with the holes for the blade pins the other movable with holes for the pins. Determine the correct orientation for the blades.
Place painters tape over the fixed holes on the back side pressing the tape into the holes.
Lay the blades in pressing the pins into the tape in a clockwise manner laying the second and subsequent blades on top of the previous. When you get to the point where the pin holes are not visible slide the next blade under the previous. Assemble at the wide open position. Lay the operating ring in place at wide open engaging the blade pins then secure in place, remove the tape and verify smooth operation of the aperture from wide open to smallest aperture opening and back to wide open several times.
 
OP
OP

silvertab

Member
Joined
Dec 31, 2021
Messages
43
Location
Canada
Format
Multi Format
Thanks shutterfinger! With some patience I was able to put the aperture and shutter blades back together... unfortunately I think I might've messed up the order of the aperture blades because if I close the aperture down all the way to f16, it gets stuck there... it did not do that before. One of the few things I don't seem to have a photo of as a reference :sad:

The shutter on the other hand, I had plenty of reference so I'm confident I have the proper order/positioning.
 
OP
OP

silvertab

Member
Joined
Dec 31, 2021
Messages
43
Location
Canada
Format
Multi Format
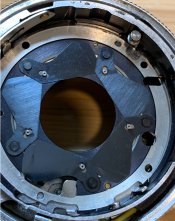
The aperture on the Konica Auto S2 is considerably different than what I found in the manual... this is what it looks like (and how I have it installed):
aperture.jpg

I went for the "logical" arrangement where every blade is over the previous one, and under the next one... but I'm not sure that's how they were setup initially.
 
OP
OP

silvertab

Member
Joined
Dec 31, 2021
Messages
43
Location
Canada
Format
Multi Format
Update: I've reversed the order (so... every blade is under the right one, and over the left one) and for the last blade, I actually put it completely on top of both surrounding blades (kinda like with the shutter), and it seems to have fixed the problem... I have no idea if it's the correct arrangement, but I think it works!
 
Photrio.com contains affiliate links to products. We may receive a commission for purchases made through these links.
To read our full affiliate disclosure statement please click Here.

PHOTRIO PARTNERS EQUALLY FUNDING OUR COMMUNITY:


Ilford ADOX Freestyle Photographic Stearman Press Weldon Color Lab Blue Moon Camera & Machine
Top Bottom