Kodak Medalist II rangefinder part question - longshot

Tyndall Bruce

A
Tyndall Bruce

  • 0
  • 0
  • 29
TEXTURES

A
TEXTURES

  • 4
  • 0
  • 56
Small Craft Club

A
Small Craft Club

  • 2
  • 0
  • 52
RED FILTER

A
RED FILTER

  • 1
  • 0
  • 45
The Small Craft Club

A
The Small Craft Club

  • 3
  • 0
  • 52

Recent Classifieds

Forum statistics

Threads
198,903
Messages
2,782,796
Members
99,743
Latest member
HypnoRospo
Recent bookmarks
0

porkrind

Member
Joined
Sep 9, 2006
Messages
11
Format
4x5 Format
I recently picked up a Medalist II in cosmetically good shape in hopes that it worked. The seller didn’t know how to check operation so I took a gamble. As it turns out, it works quite well. Or I should say, it worked well for a while. Somewhere into the second roll, the upper half of the rangefinder split image disappeared.

I went home and (gently) pulled off the finder cover assembly to take a look. The problem was immediately obvious. The topmost of the pair of coincidence prisms came loose. I looked at the repair manual for clues as to how to refit it back into position, and basically find that back in the day, the coincidence prisms were ordered as a complete assembly with the erecting prism.

So on a scale from 1 to oh crap, just how bad off am I? Is there a way to reattach that loose prism?

1689989280516.png
 

Dan Daniel

Subscriber
Joined
Jul 4, 2009
Messages
2,885
Location
upstate New York
Format
Medium Format
You up for learning to recement prisms? This is the most common rangefinder problem I've seen in Medalists. you need to get the loose prism back in place. and use a very thin cement without it gooing out into the edges and such. If it isn't tight, there will be a black line in the rangefinder image and maybe some tearing and such but it will be usable.

Anyone here with a suggested cement for a job like this, much appreciated. Kodak had a very thin material, dissolves in acetone.
 
OP
OP

porkrind

Member
Joined
Sep 9, 2006
Messages
11
Format
4x5 Format
You up for learning to recement prisms? This is the most common rangefinder problem I've seen in Medalists. you need to get the loose prism back in place. and use a very thin cement without it gooing out into the edges and such. If it isn't tight, there will be a black line in the rangefinder image and maybe some tearing and such but it will be usable.

Anyone here with a suggested cement for a job like this, much appreciated. Kodak had a very thin material, dissolves in acetone.

Ha! This is the camera you and I were emailing about yesterday. You’re going to be seeing this camera late September. How badly do you want me to _not_ mess with this?

I assume that the prism cements to the vertical plate, not to the other prism. That sound right?

Nope. Now I see it does bond to the lower prism.
 
Last edited:

Dan Daniel

Subscriber
Joined
Jul 4, 2009
Messages
2,885
Location
upstate New York
Format
Medium Format
Go for it! Just let me know what you use for glue if it does make it until September :smile: Who knows, you might have everything running smoothly by then.
Well, I do have spares but they are few and far between.

You could try a drop of thin super glue and develop a clamping/pressure method to press it tight quick enough. Done carefully, you can then remove any superglue gush seams with acetone.
 
OP
OP

porkrind

Member
Joined
Sep 9, 2006
Messages
11
Format
4x5 Format
Go for it! Just let me know what you use for glue if it does make it until September :smile: Who knows, you might have everything running smoothly by then.

Well, I do have spares but they are few and far between.

You could try a drop of thin super glue and develop a clamping/pressure method to press it tight quick enough. Done carefully, you can then remove any superglue gush seams with acetone.

I spent an hour going down the rabbit hole of the various optical cements out there and how so many of them are UV cured. Then I realized that this bonding layer is not in the optical path. I just need a glue that can be worked thin, has a reasonable setup time so I can get things aligned, and won’t fog the glass. So I have an idea. If it works, I’ll post it. If it doesn’t work, it wasn’t my idea and I never thought of doing it.

Trying to align two tiny triangles by their points is an exasperating business.

I’m going out of town Sunday and I really want to take this camera. Desperation fuels experimentation.
 

MattKing

Moderator
Moderator
Joined
Apr 24, 2005
Messages
53,006
Location
Delta, BC Canada
Format
Medium Format
I’m going out of town Sunday and I really want to take this camera. Desperation fuels experimentation.

With time constraints, I would put it back together and use scale focusing for the trip.
 
OP
OP

porkrind

Member
Joined
Sep 9, 2006
Messages
11
Format
4x5 Format
With time constraints, I would put it back together and use scale focusing for the trip.

That's good thinking. A totally reasonable idea. That said, given that I thought this camera didn't even work when I bought it, I don't know how I got so set on using it next week.
 

Dan Daniel

Subscriber
Joined
Jul 4, 2009
Messages
2,885
Location
upstate New York
Format
Medium Format
I have used a LocTite 'Glass Glue' sold at Lowes for the rear viewfinder glass in the past. Strangely, the blister pack and the tube do not have a product number! SKU 79340 29175

The rear viewfinder element will sometimes have serious separation from the glass plate it sits on. Soaking in acetone and cleaning with acetone will dissolve the joint and clean off the original cement. Then a very small film applied with a metal pin and the glass dropped into place and light pressure applied. Usually will get a clean joint, or acetone will break it apart again. A small working time, maybe 15 seconds.

The worry about it for the coincidence prisms is the thickness of the final glue layer. The glue itself is more of a white glue consistency, not water consistency.

I've also used that glue to rejoin broken front viewfinder elements. Not perfect at all but reduces the bright line of a crack. With that, a little acetone will remove any bead that forms as the glue gooshes out. You have to be patient and delicate since if the acetone starts wicking into the joint it will dissolve it.
 
Last edited:
OP
OP

porkrind

Member
Joined
Sep 9, 2006
Messages
11
Format
4x5 Format
I have used a LocTite 'Glass Glue' sold at Lowes for the rear viewfinder glass in the past. Strangely, the blister pack and the tube do not have a product number! SKU 79340 29175

Thanks. I picked up some of that this morning. I also have a small tube of optical cement coming from Amazon later, so I’ll have the opportunity to experiment.

But as for last night’s experiment, I’ll say this; “If it’s stupid and it works, it’s not stupid.” I thinned down a dab of high quality PVA glue and worked it with the stick end of a swab into the thinnest layer I could manage. I fumbled around with that loose prism for quite a while trying to get it aligned, and finally with the help of a flat ground surface for leveling guitar frets, I got it into place. and it works.

It seems to be holding even after a relatively vigorous swabbing to remove the squeeze-out. The line might be a bit thicker than I like, but the overall experience is night and day from the dim, dirty view the camera made upon arrival. Goofing around with that prism game me a chance to clean the various other lenses and prisms to good effect.

Now the focus scale is off slightly, so I gotta go through that 15-foot procedure once I find it again, but that should be relatively simple, I hope.
 
OP
OP

porkrind

Member
Joined
Sep 9, 2006
Messages
11
Format
4x5 Format
Thanks. I picked up some of that this morning. I also have a small tube of optical cement coming from Amazon later, so I’ll have the opportunity to experiment.

But as for last night’s experiment, I’ll say this; “If it’s stupid and it works, it’s not stupid.” I thinned down a dab of high quality PVA glue and worked it with the stick end of a swab into the thinnest layer I could manage. I fumbled around with that loose prism for quite a while trying to get it aligned, and finally with the help of a flat ground surface for leveling guitar frets, I got it into place. and it works.

It seems to be holding even after a relatively vigorous swabbing to remove the squeeze-out. The line might be a bit thicker than I like, but the overall experience is night and day from the dim, dirty view the camera made upon arrival. Goofing around with that prism game me a chance to clean the various other lenses and prisms to good effect.

Now the focus scale is off slightly, so I gotta go through that 15-foot procedure once I find it again, but that should be relatively simple, I hope.

Actually, now that I’m messing with the ground glass, I’m worried that the lens and scale are still correct, and that it‘smthe rangefinder image that’s wrong. Still thinking about that.
 

Dan Daniel

Subscriber
Joined
Jul 4, 2009
Messages
2,885
Location
upstate New York
Format
Medium Format
Welp. alrighty then...

On the black arm that follows the cam and moves the right large prism, is there is a screw? If so-

Extend lens fully. Install scale and adjust so that the 3-1/2 marking is under the red infrared line on the scale- drop top into position to confirm.

Put camera on tripod. Target at 15 feet... well, I use ten partly because my shop isn't that big and justified by thinking that portrait focus on a 100mm lens is more important than group shot. Anyway, your call. align rangefinder and see where the 15/10 foot mark falls. If off, you need to adjust with the screw at the end of the black arm. I never remember which way to turn- just do a quarter turn, reset rangefinder focus, and see which way the scale moved. Keep adjusting this to get rangefinder and scale to match.

I know, different than manual which says to adjust scale to match 15 foot focus. So court martial me.

Now use the ground glass and adjustment on cam following screw on lens tube to make ground glass focus and rangefinder align.

As a check, try other distances. Be aware: what matters is the relation between rangefinder and film plane. Period. Focus scale is a nice toy, means nothing in real use, setting means nothing. BUT: still do this to get the upper cam follower in proper position. Best as I can tell, the cam itself is an offset circle, not a parabola, but I don't want to find out that I am wrong the hard way.

Work it in this order. Don't do one thing, then another and go back and forth and such. A, B, C, checks, Done.
 
OP
OP

porkrind

Member
Joined
Sep 9, 2006
Messages
11
Format
4x5 Format
Welp. alrighty then...

Thanks for this. I agree that I'm way more interested in making the rangefinder match the ground glass so that's where the core of my effort is going. Biggest issue I have is that I'm using a focusing screen from a RB67 that is not in my RB because I hate it and replaced it with a better one.

Secondarily, when I think about using a loupe on ground glass to focus, like with my Crown Graphic, I'm used to endlessly twiddling the focus back and forth slightly until I've convinced myself I've hit the mark. Problem here is that the Medalist does not seem to want you to adjust focus with the shutter open on B. The focus ring feels stiff in a way I don't want to force.
 

Dan Daniel

Subscriber
Joined
Jul 4, 2009
Messages
2,885
Location
upstate New York
Format
Medium Format
When you get back from your trip you can clean out the focus helical. It is capable of very smooth operation, and shutter setting doesn't affect it, or shouldn't.
 
OP
OP

porkrind

Member
Joined
Sep 9, 2006
Messages
11
Format
4x5 Format
When you get back from your trip you can clean out the focus helical. It is capable of very smooth operation, and shutter setting doesn't affect it, or shouldn't.

Ok, I've already done one pass with a wood stick from my RB seal replacement kit. Was just worried there was some sort of interlock between the helicoid mechanism and the shutter when open based on my understanding of how the shutter can be damage if you force it while the lens is retracted. Anyway, I really appreciate the help. Be sure to charge me appropriately in September.
 
OP
OP

porkrind

Member
Joined
Sep 9, 2006
Messages
11
Format
4x5 Format
On the black arm that follows the cam and moves the right large prism, is there is a screw? If so-

No screw on the follower tip, I think this an earlier-style ragefinder. Looks like adjustment of the left-right alignment of the right prism is done through differential adjustment of the screws on either edge of the prism holder.
 
OP
OP

porkrind

Member
Joined
Sep 9, 2006
Messages
11
Format
4x5 Format
OK! With tons of help my saga for this weekend is complete!

  • Coincidence prisms re-bonded with PVA
  • Rangefinder agrees with range dial agrees with focus.

Not done, leaving for Dan...

  • Rangefinder slightly duplicates a bit of the image
  • Rangefinder and lens focus could probably be adjusted a little tighter by someone not fighting with progressive lenses, a small loupe, and a frustrating piece of ground glass.
  • All mechanical motions other than shutter slightly sticky.
 

Dan Daniel

Subscriber
Joined
Jul 4, 2009
Messages
2,885
Location
upstate New York
Format
Medium Format
No screw on the follower tip, I think this an earlier-style ragefinder. Looks like adjustment of the left-right alignment of the right prism is done through differential adjustment of the screws on either edge of the prism holder.

Best to not play with those screws on the prism holder. They adjust tilt of the image and are pretty touchy. I do have a way to adjust the tip when there is no screw as on earlier models, but I won't encourage anyone to try it unless they like crude mechanics and have a spare part or two lying around.

As we disucssed with the focus scale not returning quickly when the lens is retracted, old grease and dirt make these cameras balky. Disassembly and lceaning takes care of this.
 
OP
OP

porkrind

Member
Joined
Sep 9, 2006
Messages
11
Format
4x5 Format
You are 100% correct that the prism screws are fiddly. But I messed with them anyway (yesterday, before you warned me) and got it almost all of the way there. Felt a lot like the procedure on the Crown Graphic In that it was adjust, check, adjust again, and so on, in a long, slow loop. I got the left-right spot on, and the up-down very close. Good enough for now. Someone had done this work in the past in that one of the screw heads is a little chewed up and all three had witness marks.

Was heading out to the photography museum here in San Diego today, but hey, summer hours are Thurs-Sun only! Oops. Seems like a tourist-season miss to me.


Dan Daniel

Subscriber
Joined
Jul 4, 2009
Messages
2,885
Location
upstate New York
Format
Medium Format
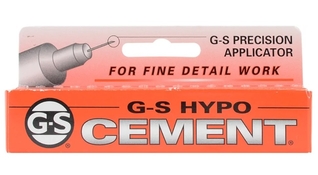
I have used this cement successfully on recementing prisms and beamsplitter glass. It is cyanoacrylate free.

G-S Hypo Cement on Amazon https://a.co/d/0AcY9jS

Thanks. Any tips for use? My problem is not really knowing how to get a clean thin coat and not having it gush out and/or slide around in positioning and trying to get it to hold.
 
Photrio.com contains affiliate links to products. We may receive a commission for purchases made through these links.
To read our full affiliate disclosure statement please click Here.

PHOTRIO PARTNERS EQUALLY FUNDING OUR COMMUNITY:


Ilford ADOX Freestyle Photographic Stearman Press Weldon Color Lab Blue Moon Camera & Machine
Top Bottom