Kodak Bantam Special Repair

Red

D
Red

  • 4
  • 1
  • 79
The Big Babinski

A
The Big Babinski

  • 2
  • 6
  • 113
Memoriam.

A
Memoriam.

  • 7
  • 6
  • 168
Self Portrait

D
Self Portrait

  • 3
  • 1
  • 78
Momiji-Silhouette

A
Momiji-Silhouette

  • 2
  • 3
  • 89

Forum statistics

Threads
198,008
Messages
2,768,127
Members
99,525
Latest member
ty17
Recent bookmarks
0

BAC1967

Subscriber
Joined
Oct 30, 2014
Messages
1,422
Location
Bothell, WA
Format
Medium Format
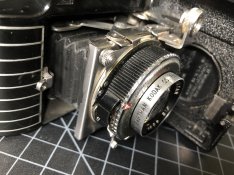
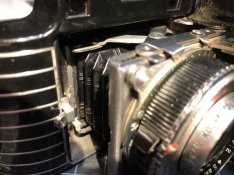
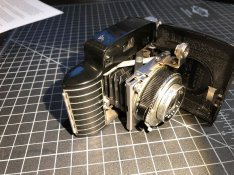
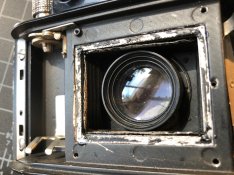
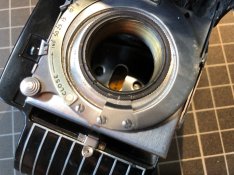
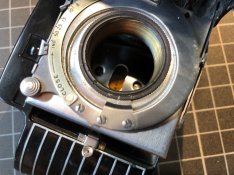
I have a Kodak Bantam Special and a set of bellows that I believe will work as a replacement. Before I start digging into this camera does anyone know how it comes apart? I have done several searches and can't find any information. I have an idea how to get at the back part of the bellows, four screws around the film gate, but getting at the front part doesn't look obvious.

I have tried repairing the leaks in the bellows but they are just too far gone. Every time I fix a leak a new one shows up. Otherwise the camera is in really good condition, lens looks good and the shutter works properly.

IMG_6586.JPG IMG_6587.JPG
 

John Koehrer

Subscriber
Joined
Apr 3, 2004
Messages
8,275
Location
Aurora, Il
Format
Multi Format
THAT does not look like fun at all. FWIW the bellows may be glued to the front plate.
 
Joined
Nov 20, 2019
Messages
221
Location
Oxford, MI
Format
Analog
Yes, did this a few months ago. It's kind of a PIA.

FYI, bellows for the other Bantams (f/4.5 and Flash Bantam) will not fit the Bantam Special. I had a set of replacement bellows custom made from Camera Bellows in the UK. The cost was about 65 Pounds if I recall.

The film plane is attached by four screws, three of which have locking nuts on them. The lock nuts need to be removed first by using a forked screwdriver and then the inner screws can be removed. The film plane will be lightly adhered to the rear of the bellows. Once the film plane is removed, the rear of the bellows will be glued and have a metal frame that is crimped around the frame of the camera. You're going to have to pry up on the frame to remove it any try not to damage it, as you will have to crimp it again after you have attached the new bellows.

The purpose of the four adjustment screws is to level the film plane in relation to the front lens element, this would be done after the camera is reassembled and with a piece of ground glass in the film plane.

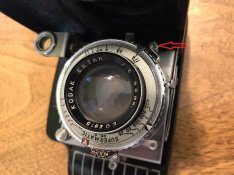
On the front end, the lens and shutter assembly can be removed from the helical by removing the screw that is on a bracket at the 7 o'clock position (for the Supermatic). Then the shutter assembly can be screwed off counterclockwise to remove it from the lens board. Be sure to note what position it comes off the threads in, as there are eight start positions for the helical.

Now things get complicated. First, remove the focusing ring and lever. To do so you need to remove the helical and its ring. Note that the circumference of the helical ring is toothed, and that there is a locking wedge attached to the focus ring by two screws. Do not remove that locking wedge for the time being. It would be a good idea to scribe a line in the locking wedge and helical ring so you know how to align them on reassembly.

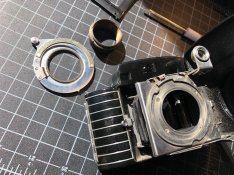
Note also that the helical and its toothed ring are locked together by a single small screw. Do remove this screw. Now you need to remove the lower part of the lens helical. There are slots for a spanner on the backside of the lens board, but unless you have or want to make a tool specifically for this application, it may be easier to use your fingers to try and separate the lower part of the helical from its upper ring. Once you remove the lower part of the helical, now remove the top ring by removing the two screws on the locking wedge and the locking wedge. Now you can remove the helical ring and the focusing ring. The front of the bellows are glued to a metal plate, the plate is held to the bellows by fours screws on the lens board. With the focus ring removed, the screws can now be removed. Now you can slide the bellows out the side and attach the plates to the new bellows.

Good Luck!
 
OP
OP
BAC1967

BAC1967

Subscriber
Joined
Oct 30, 2014
Messages
1,422
Location
Bothell, WA
Format
Medium Format
On the front end, the lens and shutter assembly can be removed from the helical by removing the screw that is on a bracket at the 7 o'clock position (for the Supermatic). Then the shutter assembly can be screwed off counterclockwise to remove it from the lens board. Be sure to note what position it comes off the threads in, as there are eight start positions for the helical.

Thanks Hunter, this is very helpful! The bellows I have are 1 3/4" x 1 1/2" non tapered, they appear to be the same measurement as the ones that are on the camera. In the photo below, is that the screw you're talking about to start removing the helical?

IMG_6588.JPG
 
Joined
Nov 20, 2019
Messages
221
Location
Oxford, MI
Format
Analog
is that the screw you're talking about to start removing the helical?

Yes, that's the one that prevents the shutter assembly from rotating when focusing. If you remove it, the shutter assembly can be screwed off. But again, note what orientation the shutter assembly is in when you remove it. Mine pops out of the threads with the screw bracket pointing to 8 o'clock in relation to where the shutter is normally. However, this point will vary depending on the infinity focus point of your camera. You will have some indication as to the correct point when reassembling, as if screwed in too far, it will hit the lens board before reaching infinity, and if screwed in not far enough, the door won't close fully.

I am going to have too look for my measurements I sent for when I had my bellows replicated, but what you have sounds right. I do recall there was a slight taper, but not significant enough that having non-tapered bellows would be a problem. Can I ask where you sourced your bellows?

I also have some notes on rangefinder adjustment if and when you get to that point that I can relay.
 
OP
OP
BAC1967

BAC1967

Subscriber
Joined
Oct 30, 2014
Messages
1,422
Location
Bothell, WA
Format
Medium Format
Yes, that's the one that prevents the shutter assembly from rotating when focusing. If you remove it, the shutter assembly can be screwed off. But again, note what orientation the shutter assembly is in when you remove it. Mine pops out of the threads with the screw bracket pointing to 8 o'clock in relation to where the shutter is normally. However, this point will vary depending on the infinity focus point of your camera. You will have some indication as to the correct point when reassembling, as if screwed in too far, it will hit the lens board before reaching infinity, and if screwed in not far enough, the door won't close fully.

I am going to have too look for my measurements I sent for when I had my bellows replicated, but what you have sounds right. I do recall there was a slight taper, but not significant enough that having non-tapered bellows would be a problem. Can I ask where you sourced your bellows?

I also have some notes on rangefinder adjustment if and when you get to that point that I can relay.
Thanks Hunter. There’s a seller on eBay that has them. He doesn’t say what camera they are for but the measurements seem correct.

https://rover.ebay.com/rover/0/0/0?mpre=https://www.ebay.com/ulk/itm/181935830746
 
OP
OP
BAC1967

BAC1967

Subscriber
Joined
Oct 30, 2014
Messages
1,422
Location
Bothell, WA
Format
Medium Format
I am going to have too look for my measurements I sent for when I had my bellows replicated, but what you have sounds right. I do recall there was a slight taper, but not significant enough that having non-tapered bellows would be a problem. Can I ask where you sourced your bellows?

I also have some notes on rangefinder adjustment if and when you get to that point that I can relay.

I spent the better part of the day working on it but I got them in. You were right Hunter, they are tapered but I managed to get the one I had installed. It was sized about right for the front and slightly too tall and too narrow width for the back. I had to get a little creative to make it fit. It comes real close to the metal bracket that holds the lens out, I don't think it's rubbing but time will tell. Everything appears to be light tight and my focus looks good. This was not a project for the faint of heart and I probably would have broken something without your instruction, thank you very much for that. As far as I can tell these are the only instructions for doing this on the internet, hopefully someone else will find them useful as well. Now I need to get some film in it and see how it does.


Kodak Bantam Special New Bellows 1.jpg Kodak Bantam Special New Bellows 2.jpg
 
Joined
Nov 20, 2019
Messages
221
Location
Oxford, MI
Format
Analog
Nice Job! I took several days to get mine installed, but as you observed I did not have the benefit of knowing how it could be done before hand and had to figure out how to do it as I went.

I hope it works well for you, there's not a whole lot of information out there about shooting these cameras, as opposed to just their aesthetic styling. I am of the opinion that it is a good camera as a whole, but I am a bit biased as I liked the 828 format before I acquired one. The Ektar f/2.0 will definitely not disappoint if in good condition and collimated properly. The biggest problem I find is that the shutter release is small and awkwardly positioned, a body release would have been really nice. It's clearly also a camera with slow speed film in mind, based on the range of apertures and shutter speeds. Shooting Kodachrome (ASA 8) of the era would not be difficult with this camera. ISO 25-100 is probably ideal, I would avoid anything above ISO 400 though, unless you want to add dark filters for compensation.
 
OP
OP
BAC1967

BAC1967

Subscriber
Joined
Oct 30, 2014
Messages
1,422
Location
Bothell, WA
Format
Medium Format
Here are some photos I took during the process so I could keep track of things.

This was kind of a messy and ugly process getting the back of the bellows off. I had to scrape away a glue like substance that was very hard all the way around the perimeter. I found that I only had to pry 3 sides loose, the fourth side slid out.
thumbnail_image0.jpg
I didn't have to remove the locking wedge that holds the outer part of the helical in position to get it out but I did have to remove it to put it back together. You can see where I made my mark to get it back into the proper location. The tiny screw that locks the ring into position does not get screwed in until it is firm when you are putting it back together, it will inhibit the rotation for focusing. Just put it in lightly and make sure everything moves freely. Also, when re-installing the locking wedge make sure it's pushed firmly against the toothed ring as you tighten the screws so it holds firmly. There is enough play in the screw holes that it can go on loose.
thumbnail_IMG_6607.jpg

At this point it's just a matter of unscrewing the 4 screws within the focus ring to release the front of the bellows. one of the screws is covered by the focus ring in my photo.
thumbnail_image2.jpg
 
Joined
Nov 20, 2019
Messages
221
Location
Oxford, MI
Format
Analog
When I did mine, I removed the locking wedge and then the helical locking screw. This gave me many headaches in terms of getting the helical apart as it was free to rotate. I am glad my hindsight was able to make the process simpler for you.
 
OP
OP
BAC1967

BAC1967

Subscriber
Joined
Oct 30, 2014
Messages
1,422
Location
Bothell, WA
Format
Medium Format
I ran a roll of film through this camera, the focus was definitely off. I bought this camera at an estate sale last year along with another Bantam Special and two Flash Bantams. There was a note in one of the cases that said it had focusing issues. I think I figured out what happened. If you look at the picture below there are multiple marks on the ring in addition to the one I made when I took it apart. I think someone tried fixing this before and screwed up the focus. I spent some more time with it today, hopefully I got it right this time. I checked the collimation with another camera and it looks good. I’m running another test roll through it.

4CA6CD33-CD3E-4314-9593-434777D2F115.jpeg

This is from the first roll, this one looks good but anything shot with close focus using a wide aperture was obviously focusing past where I wanted it.

Airplanes, Windmill, Bike, Barn and Sunset by Bryan Chernick, on Flickr
 

guangong

Member
Joined
Sep 10, 2009
Messages
3,589
Format
Medium Format
Not a project I would undertake, but I admire your accomplishments. Bravo!
 
OP
OP
BAC1967

BAC1967

Subscriber
Joined
Oct 30, 2014
Messages
1,422
Location
Bothell, WA
Format
Medium Format
Not a project I would undertake, but I admire your accomplishments. Bravo!
I’ll admit this is one of the more challenging ones I have done but it’s a great learning exercise. Despite the focus issue the bellows replacement worked well.
 
OP
OP
BAC1967

BAC1967

Subscriber
Joined
Oct 30, 2014
Messages
1,422
Location
Bothell, WA
Format
Medium Format
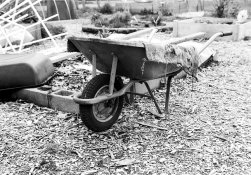
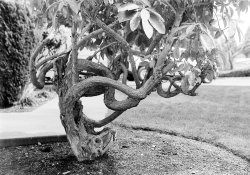
Looks like I got the focus issue sorted out, or at least as close as I'm going to get it. In the first picture the focus was on the front of the wheel barrow, the second picture it was on the front of the mailbox and on my twisted old rhododendron it was on the trunk.

P4060001+s.jpg P4060003+s.jpg P4060005+s.jpg
 

mdanie789

Member
Joined
Dec 26, 2014
Messages
11
Format
35mm
Just found this - it will be very useful when I get around to repairing my older Bantam Special - thanks.
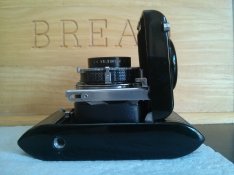
Hunter_Compton, any chance you could share the true bellows dimensions and rangefinder adjustment procedure? I also have a non-square "cover" - ie the struts click and lock into place with the cover about 80 degrees to the body, not 90 degrees. Do you know if this is adjustable? Many thanks for any advice.
IMG_20200601_161347.jpg
 
Joined
Nov 20, 2019
Messages
221
Location
Oxford, MI
Format
Analog
Unfortunately, I do not have the original bellows any longer, and I cannot find my notes. However, I do have the dimensions for the new bellows sent to me by Custom Bellows, and they should be close enough, as they are custom made reproductions of the original bellows that I sent them. The bellows are a pleated design with truncated corners. There are 6 pleats on the short edge and 5 pleats on the long edge. The extended length is 1.450" and the compacted length is 0.315".
Small End Dimensions: 1.450" outside (1.150" inside) X 1.520" outside (1.415" inside)
Large End Dimensions: 1.520" outside (1.250" inside) X 1.850" outside (1.570" inside)
The good news is that I sent my bellows over to the UK, so if you ordered new ones from them, they should have the pattern on file. The ones I received did require some filing/fitting of the frames, so that is something to be aware of.

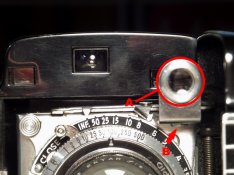
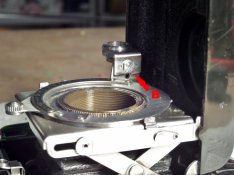
The primary rangefinder adjustments are done on the external rangefinder arm. There is a knurled ring on the back of lens A in the below photo. Loosening this ring will allow you to shift the lens up and down on the rangefinder arm, which will shift the image in the upper rangefinder patch up and down.
SAM_5733 (1024x767).jpg

Screw B can be loosened (which is best accomplished by removing the lens and shutter assembly) and then the rangefinder arm can be shifted left and right, which will move the upper rangefinder patch left and right.
SAM_5735 (1024x768).jpg

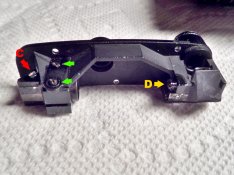
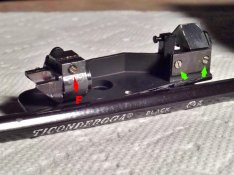
Unless your rangefinder is messed up or the camera has been dropped, you shouldn't have to adjust the rangefinder internally, as there should be enough travel in the external adjustments. However, you probably want to clean the internals, and adjustment may become necessary. Removing the three screws on the back of the viewfinder bump will allow the whole rangefinder assembly to pull out the back. The screws marked in green should not need to be touched as they only deal with the mounting and not the alignment of the prisms. Screw C can be loosened and the end prism tuned which will shift the lower rangefinder patch left and right. Screw D most likely will not need to be touched unless the rangefinder prisms are very dirty, by which loosening it will allow you to remove the double prism, although aligning it after removal is a bit difficult and mostly a trial and error affair.
SAM_5736 (1024x767).jpg

Screw F can be loosened, allowing you to rotate the whole end prism mount up and down, which will move the lower rangefinder patch up and down, but will also cant the lower rangefinder patch clockwise and counterclockwise, so you may need to use it in conjunction with turning the end prism to keep vertical lines vertical.
SAM_5738 (1024x767).jpg

I believe the easiest method to collimate the lens and rangefinder on this camera is to remove the lens/shutter assembly and set the camera at a fixed distance. Then set the distance scale to that distance. Now, adjust the rangefinder so that the vertical and horizontal lines converge properly at that fixed distance. Next, remount the lens, place a piece of ground glass in the film plane. If the image on the film plane is not in focus, remove the locking wedge from the distance scale ring and rotate the inner helical until the image comes into focus, then replace the locking wedge.

As to your lens board alignment, that may be a show stopper. The lens board should be perfectly parallel to the film plane and the lens door should be exactly 90 degrees to the body. There is no adjustment in the body mechanism to correct the issue shown by your picture, and I suspect it is from somebody who did not know better forcing the door closed, probably bending the trellis struts in the process. I don't think there is any fix for this, and it probably won't be possible to get sharp images with the misalignment that is visible in your photo. I know Mike Eckman had a review on his website about a Bantam Special with the same issue as yours and he wasn't able to get sharp images from it.
 

mdanie789

Member
Joined
Dec 26, 2014
Messages
11
Format
35mm
Hunter_Compton, thank you for your swift, excellent reply and comprehensive details - they will be indispensable when I start this repair. The door issue is rather worrying - I did notice Mike's review and the comments from other owners. Time to take some careful measurements and calculate how much "correction" is needed and if it is even possible given the use of rivets. The lens board does appear to be parallel to the film plane - and there is no obvious bending of the struts - but I need to check that optically. Many thanks once again.
 

Hatchetman

Member
Joined
May 27, 2011
Messages
1,552
Location
Chicago, IL
Format
Multi Format
Just a note on focus issues. When you roll your own film it can be difficult to get the film to lay flat against the pressure plate unless you punch the little sprocket hole that 828 film should have. Just something to consider. if you use perforated 35mm film it should not be a problem, but I was cutting down 120 film.
 

mdanie789

Member
Joined
Dec 26, 2014
Messages
11
Format
35mm
Hatchetman - thanks for the advice. I'll start with standard 135 to test things.
 

nosmok

Subscriber
Joined
Jun 11, 2010
Messages
678
Format
Multi Format
The other possibility, re: film flatness in the Bantams, is to take off the finger that pokes thru the single sprocket hole in true 828 film. It's not a big deal to do. Then you just use the backing paper and the green (!) window for advancing. I use unperforated 35mm microfilm in my 828 reloads, and use cut down 120 backing paper with the 4.5x6cm numbers showing-- you learn to wind it a little short to not waste too much film.
 

Hatchetman

Member
Joined
May 27, 2011
Messages
1,552
Location
Chicago, IL
Format
Multi Format
The other possibility, re: film flatness in the Bantams, is to take off the finger that pokes thru the single sprocket hole in true 828 film. It's not a big deal to do. Then you just use the backing paper and the green (!) window for advancing. I use unperforated 35mm microfilm in my 828 reloads, and use cut down 120 backing paper with the 4.5x6cm numbers showing-- you learn to wind it a little short to not waste too much film.

The issue is that with the finger holding one side of the film firmly in place, you can keep the film taut (assuming you have a hole in the film for the finger to poke into). I believe without the finger, slack in the roll and inherent curl in the film can cause the film to back up a bit, causing the aforementioned lack of flatness.

With the Bantam, I have achieved negatives with incredible sharpness and also total garbage and I am sure the problem involves flatness of the film plane or lack thereof.
 

mdanie789

Member
Joined
Dec 26, 2014
Messages
11
Format
35mm
... or pressing/taping in the button that retracts the finger and get in the habit of winding on just before taking the shot?? I think the latter is often used by photographers who shoot old folders to ensure the film is taut and as flat as possible.
 

Hatchetman

Member
Joined
May 27, 2011
Messages
1,552
Location
Chicago, IL
Format
Multi Format
Yes, you could do that. If you remember. I'm not sure how quickly the film springs back though (?). Anyway its something to think about.
 
Photrio.com contains affiliate links to products. We may receive a commission for purchases made through these links.
To read our full affiliate disclosure statement please click Here.

PHOTRIO PARTNERS EQUALLY FUNDING OUR COMMUNITY:


Ilford ADOX Freestyle Photographic Stearman Press Weldon Color Lab Blue Moon Camera & Machine
Top Bottom