Kallitype how-to videos

Rebel

A
Rebel

  • 0
  • 0
  • 13
Watch That First Step

A
Watch That First Step

  • 0
  • 0
  • 17
Barn Curves

A
Barn Curves

  • 0
  • 0
  • 17
Columbus Architectural Detail

A
Columbus Architectural Detail

  • 0
  • 0
  • 14
img421.jpg

H
img421.jpg

  • Tel
  • Apr 26, 2025
  • 1
  • 1
  • 30

Forum statistics

Threads
197,483
Messages
2,759,784
Members
99,514
Latest member
cukon
Recent bookmarks
0

tnp651

Subscriber
Joined
Jan 9, 2017
Messages
177
Location
St. Paul, Minnesota, USA
Format
4x5 Format
I've posted my very first YouTube videos, a 2-part series on how to make a kallitype. I hope you will find it helpful.
PART 1: Setup and coating
PART 2: Exposure and development

Tom Nelson
 

mard0

Member
Joined
Oct 12, 2017
Messages
47
Location
Netherlands
Format
Analog
Great video. My only point of critique is that no concentration are mentioned of the solutions that are used.
 
OP
OP
tnp651

tnp651

Subscriber
Joined
Jan 9, 2017
Messages
177
Location
St. Paul, Minnesota, USA
Format
4x5 Format
Great video. My only point of critique is that no concentration are mentioned of the solutions that are used.
There are a few concentrations (silver nitrate, citric, etc) but I hope specifics can be handled in the comments. Thanks for your feedback.
 
Joined
Dec 10, 2009
Messages
6,303
Format
Multi Format
Great job with the video and the Kalitype print!
 

awty

Subscriber
Joined
Jul 24, 2016
Messages
3,643
Location
Australia
Format
Multi Format
Excellent tutorial. Short intro, no life story, concise and unopinionated, the way they should be.
I would like the basic how to in text I could easily print out, saves trying to write it all down.


You should do more.
 

michr

Member
Joined
Sep 28, 2012
Messages
440
Format
Multi Format
Beautiful work! Thanks for the video, it will be my reference when I attempt to make my own Kallitypes.
 

Tom Taylor

Member
Joined
Jul 10, 2005
Messages
558
Location
California
Format
Multi Format
It was printed too deep which is why it popped-up too dark in the developer. Getting the correct exposure is the tricky part with the Kallitype and using a UV light box makes it harder unless you use a split-back contact printing frame so that you can examine the print during the exposure. If using a film negative the rebate will be readable if the exposure is on.

Thomas
 
Last edited:

ced

Member
Joined
Oct 10, 2011
Messages
866
Location
Belgica
Format
Multi Format
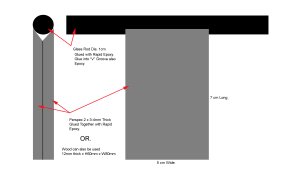
One method here to help with putting a handle on a glass rod or tube. Measurements need to be adjusted for width required.
Hope it helps. Coating Rod.jpg
 
OP
OP
tnp651

tnp651

Subscriber
Joined
Jan 9, 2017
Messages
177
Location
St. Paul, Minnesota, USA
Format
4x5 Format
I would like the basic how to in text I could easily print out, saves trying to write it all down.

Hi Paul, here's the basics of it:
Papers for kallitypes:
Arches Platine
Crane’s Platinotype
Stonehenge Rising
Buxton Platinotype

Other supplies:
My UV light: QUANS 110v 20W UV LED light US$49.99 on Amazon
UV-safe goggles
Gloves (and eye protection?)
Safelight (dim incandescent or a yellow bug light)
Coating rod and/or brush (Jack Richeson 9010)
A flat, waterproof surface (plate glass?)
Flat-bottomed tray
pH test strips

Coating solution:
Ferric oxalate (20%) or Solution #1 (27%) cut 5:1 with water
10% silver nitrate
TWEEN-20
Ammonium dichromate 5%

Processing chemicals:
Developer: there are many developers for kallitypes. 20% sodium citrate is the most common. I use a developer suggested by kallitypist Russell Young using borax and Rochelle salt. See https://unblinkingeye.com/Articles/Ferric/ferric.html
Citric acid
Toner (gold, palladium or platinum)
Fixer: 3-5% sodium thiosulfate (hypo)
Hypo clearing agent: 1% sodium sulfate

Here’s the sequence of development:
Develop: 10 minutes
First rinse: 2 minutes
Second rinse: 2 minutes
Clear (3% citric acid): 2 minutes
Wash: 1 minute
Toner: 2-10 minutes (gold, palladium or platinum)
Rinse: 1 minute
Fixer: 2 minutes
Wash: 1 minute
Hypo clear: 2 minutes
Wash: 20 minutes

Tom
 
Last edited:

Bruce

Member
Joined
Oct 25, 2006
Messages
202
Location
Centerville
Format
35mm
Tom- Nice videos and explanation. Just make sure you were gloves during the process. I am sure you do.
 

Opal DeRuvo

Member
Joined
Oct 27, 2021
Messages
5
Location
New Haven
Format
Hybrid
Any insight on where to land between Sandy Kings’ 2 min development and a longer development? Currently using ammonium citrate with 2g ammonium dichromate / liter

Hi Paul, here's the basics of it:
Papers for kallitypes:
Arches Platine
Crane’s Platinotype
Stonehenge Rising
Buxton Platinotype

Other supplies:
My UV light: QUANS 110v 20W UV LED light US$49.99 on Amazon
UV-safe goggles
Gloves (and eye protection?)
Safelight (dim incandescent or a yellow bug light)
Coating rod and/or brush (Jack Richeson 9010)
A flat, waterproof surface (plate glass?)
Flat-bottomed tray
pH test strips

Coating solution:
Ferric oxalate (20%) or Solution #1 (27%) cut 5:1 with water
10% silver nitrate
TWEEN-20
Ammonium dichromate 5%

Processing chemicals:
Developer: there are many developers for kallitypes. 20% sodium citrate is the most common. I use a developer suggested by kallitypist Russell Young using borax and Rochelle salt. See https://unblinkingeye.com/Articles/Ferric/ferric.html
Citric acid
Toner (gold, palladium or platinum)
Fixer: 3-5% sodium thiosulfate (hypo)
Hypo clearing agent: 1% sodium sulfate

Here’s the sequence of development:
Develop: 10 minutes
First rinse: 2 minutes
Second rinse: 2 minutes
Clear (3% citric acid): 2 minutes
Wash: 1 minute
Toner: 2-10 minutes (gold, palladium or platinum)
Rinse: 1 minute
Fixer: 2 minutes
Wash: 1 minute
Hypo clear: 2 minutes
Wash: 20 minutes

Tom
 
OP
OP
tnp651

tnp651

Subscriber
Joined
Jan 9, 2017
Messages
177
Location
St. Paul, Minnesota, USA
Format
4x5 Format
Any insight on where to land between Sandy Kings’ 2 min development and a longer development? Currently using ammonium citrate with 2g ammonium dichromate / liter
This article by Sandy King says 5-10 minutes: https://unblinkingeye.com/Articles/Kallitype/K002/k002.html "Development is visually complete in about 15-30 seconds, but a development time of 5-10 minutes is important for archival purposes: much of the residual ferric iron, which if left in the print could cause loss of permanence, is removed at this stage. Development can be ended when most of the stain on the sensitized but unexposed areas of the print, i.e. those areas that were masked during exposure, has been removed." I think I found a 10-minute recommendation somewhere else as well, but it's not in my notes. I don't think there's any disadvantage to giving a longer development time.

Incidentally, I've switched to a 20% sodium citrate developer (200 grams/liter). I found that the toner, not the developer, determines the tonality of the print. Citrate is cheap and easy to mix.
 
Photrio.com contains affiliate links to products. We may receive a commission for purchases made through these links.
To read our full affiliate disclosure statement please click Here.

PHOTRIO PARTNERS EQUALLY FUNDING OUR COMMUNITY:


Ilford ADOX Freestyle Photographic Stearman Press Weldon Color Lab Blue Moon Camera & Machine
Top Bottom