Incident light metering for calculating exposure of photographic paper

A window to art

D
A window to art

  • 0
  • 0
  • 0
Bushland Stairway

Bushland Stairway

  • 4
  • 1
  • 54
Rouse st

A
Rouse st

  • 6
  • 3
  • 98
Do-Over Decor

A
Do-Over Decor

  • 1
  • 1
  • 111

Recent Classifieds

Forum statistics

Threads
199,236
Messages
2,788,361
Members
99,840
Latest member
roshanm
Recent bookmarks
1

Jerry_K

Member
Joined
Mar 18, 2010
Messages
16
Location
San Diego, CA
Format
Multi Format
I'm just beginning my darkroom adventure and after first few prints I can't help but wonder if there are methods to make the exposure of photographic paper a more predictable endeavor.

I've learned of course of the test strip method, but even with test strip one needs a decent ballpark range of exposure times (hoping that the right exposure will be found somewhere in the middle). I just hate wasting paper and chemistry for no good reason, unless of course it's a one in a life time, move over Ansel Adams, work of art kind of print. Let me also add that I print from three formats (35mm, 6x7, 4x5), so depending on the enlargement size, lens used and crop factor the distance of the lens from the paper varies wildly and so thus the irradiation of the paper. I've quickly discovered that there are no simple rules of thumb I can develop for each format/lens combination.

So I was wondering if normal principles of photography (plus the Zone System) could be applied here with the help of incident light meter lying on the base board. In particular I was thinking about using a phone app since smart phones have really tiny light sensors which would be perfect for doing the spot metering of various spots of the enlargement. Having obtained their EV values and their corresponding exposure times (for the known paper speed) this way I could correlate them with zones and compute the right exposure.

That's the theory. I've just thought of it right now and haven't had a chance to test it. I can think of several factors that could adversely impact the efficiency of this method (like inaccuracy of paper's ISO sensitivity numbers), accuracy (or lack thereof) of the phone sensor or inadequacy of its range.

Any thoughts whether this could work? Do you guys know/use other methods?
 

MattKing

Moderator
Moderator
Joined
Apr 24, 2005
Messages
53,272
Location
Delta, BC Canada
Format
Medium Format
Look for an Ilford EM-10 or similar basic enlarging meter.

Once you have made a good print using trial and error, measure the light intensity at the easel with the negative removed.

Then after you make changes to the enlargement size, lens used and crop factor, use the EM-10 and your adjustable lens aperture to match that intensity. You will be in the ballpark.

You will have to do this for each paper. Differences in negative density and contrast settings will mean that test strips will still be needed.
 

RobC

Member
Joined
Nov 5, 2007
Messages
3,880
Location
UK
Format
Multi Format
Once you have your film exposures nailed then for a set print size such as 8x10 then you will know that at your normal enlarging fstop that you will be using a print time of approximately x seconds. A high quality print will never be the same time for every negative but they will always be ballpark x seconds if your negatives are consistently exposed. This is more true if you expose for the highlights and not the shadows but that is a highly contentious argument.
Basically printing experience will give you the ability to judge a negative starting print time just by looking at the negative.
Trust your instincts and do it by judgement and don't rely on metering. You will become a better printer that way.
It takes practice but in the long run its a better way to make prints IMO. i.e. acquire the judgement and skills through practice.
 
Last edited:
Joined
Jan 16, 2010
Messages
1,685
Location
Atlanta, GA
Format
Medium Format
Keep doing it and you will learn very quickly. I have owned a variety of enlarging meters and, with rare exceptions, find them of very limited use, so much so that I remove the batteries between semi-annual uses to avoid corrosion.
 

Carriage

Member
Joined
Feb 3, 2015
Messages
219
Location
Melbourne
Format
35mm
Consider looking up f stop timing. Here's a table http://www.waybeyondmonochrome.com/WBM2/Library_files/TemplatesEd2.pdf (page 3).

You'll get a feel as to what stop you need your lens at for the given enlargement. One good thing is that if your proper exposure is off and end of your test strip, you know how many stops to move the end of the strip to the middle or other end. It also means you're going to try a more reasonable set of exposures so you're going to need fewer strips
 

DREW WILEY

Member
Joined
Jul 14, 2011
Messages
14,098
Format
8x10 Format
Most camera meters are not sensitive enough to low light levels for practical enlarger usage. There are also real problems with the incidence of the
projected light causing what are termed cosine errors. High quality enlarging meters were once made. I have a couple of them and both were quite
expensive. I used them for color printing. You don't need to waste your time and money worrying about these kinds of gadgets to learn the Zone System. Fiddling around with test strips is as easy as it gets. I don't know why people like to complicate things so much.
 

Jim Jones

Subscriber
Joined
Jan 16, 2006
Messages
3,740
Location
Chillicothe MO
Format
Multi Format
I agree with Rob C in post #3. I've used a variety of enlarging meters. However, with experience, comparing the shadow density of the negative with the clear edges of the film is one way of getting a fairly well exposed print the first time. Even if not perfect, this first print is a good guide for the next exposure and for dodging, burning, and contrast tweaking.
 

Ko.Fe.

Member
Joined
Apr 29, 2014
Messages
3,209
Location
MiltON.ONtario
Format
Digital
Same for me, even if I'm only at second, no, third year in the darkroom. Just getting out from the dark by now :smile:
I have this exposure meter for darkroom. Magic box with blinking light. After committing RTFM and practicing with it I left it in the dusty corner.
I'm printing from different formats, on different sizes and types of papers. I have two enlargers and two lenses. But it is not indefinite combination. And even with not perfectly exposed negatives (sometimes), but with old fashion records in the notebook by pencil I could get it most of the time.
I'll just overexpose first print, by making guess based on previous records. It will give me the time.
Mobile phone app... You know, it is like fishing. With practice local guy with simple tackle will outfish heavily equipped tourist with sonnar.
Simple, mechanical only enlargers, hand written notes and vinyl records! Printing is Jazz :smile:
 

Doc W

Member
Joined
Nov 7, 2009
Messages
955
Location
Ottawa, Cana
Format
Large Format
Simple, mechanical only enlargers, hand written notes and vinyl records! Printing is Jazz :smile:

My nomination for quote of the week!
 
Joined
Oct 15, 2009
Messages
231
Location
Stockholm, Sweden
Format
Multi Format
I have a Rhdesign f-stop printer with a lightmeter. It is pretty handy after some calibration, and let's me get into the ballpark within seconds but it does not replace experience or understanding of printing. I still make teststrips and when split-grade printing I only use it as a timer.

For quick prints, you can measure parts of your negative for a proper exposure (judging highlights) and decide on contrast from experience or on whim. For more involved prints, I really like how I can visualize how different metered points/values fall on the greyscale, but I don't rely on it.

If you have the time to calibrate it and (more importantly...) understand what it does and what it doesn't, I highly recommend it. But nothing will ever replace experience with printing.
 

Jim Taylor

Member
Joined
Nov 2, 2009
Messages
151
Location
West Yorkshire, UK
Format
Medium Format
Have you established what your minimum exposure time for Dmax is? I find that using this gets me into the ballpark.

To do this, put some unexposed but developed film (your favourite or most common film and developer combo) into your neg carrier and make a test print at the same size and f-stop you would normally use. Develop this in fresh chemistry, using your favourite (or most common) developer then fix and dry this sheet. You are looking for the first strip that gives you maximum black (where the next-longest exposure doesn't give a different tone).

When you print a normal neg (prepared using this same combo of film + dev), you'll know that this minimum exposure that you have calculated should give you a good, solid black in your print. There are so many variables, this will only ever be a ballpark - but that's what you asked for!
 

MartinP

Member
Joined
Jun 23, 2007
Messages
1,569
Location
Netherlands
Format
Medium Format
Contact sheets. If the contacts are exposed consistently and correctly you can deduce what the problem(s) is/are with your negatives. Adjust the negatives for exposure and development so that they are always consistent. From then on, your basic work-print times and contrast will be easy to choose based on the contacts density and contrast. For examples of what I am explaining poorly, see HERE or HERE, or lots of other places.

Edit: It seems that several people have suggested the same sort of idea! Also, you have realised that when changing the size of enlargement the print time is proportional to the area of the print? Practically speaking, if you are filling a 5x7 sheet and want to move to filling a 12x16 then a sensible increase in starting exposure would be (12x16) / (5x7), which is (192 / 35), which is near enough five and a half times the exposure. With an increase in size then you would typically also need a slight increase in contrast, but with some practice adjusting the time and contrast from the approximate increase (or decrease, you might want a smaller print) you will save a lot of aimless guessing.
 
Last edited:

removed account4

Subscriber
Joined
Jun 21, 2003
Messages
29,832
Format
Hybrid
jerry k.

i have an exposure meter for a luna pro sbc, it is still in the box
and has never been used / installed. i always found it too much trouble
to use a meter or anything besides test strips. i figure a couple of wide test strips
and i am done, or at least close enough that i can ball park and burn and dodge ..
simple is good ( sometimes ).
good luck finding a method that works for you !
if you have a sbc, and want the attachment contact me via PM and we can figure something out.
john
 
Joined
Mar 18, 2005
Messages
4,942
Location
Monroe, WA, USA
Format
Multi Format
...I can't help but wonder if there are methods to make the exposure of photographic paper a more predictable endeavor.

I've learned of course of the test strip method, but even with test strip one needs a decent ballpark range of exposure times (hoping that the right exposure will be found somewhere in the middle). I just hate wasting paper and chemistry for no good reason

Here's one very simple method to arrive at the test strip starting point while using only the bare minimum of time and paper and chemistry. It does not require meters or other timing hardware. Nor does it require a practiced eye. Nor blind luck. But it is reliable and repeatable. And far quicker in practice than it took to describe here in writing.

After configuring and locking down your enlarger for the appropriate size and cropping for your negative (and assuming for this example you are making an 8x10-inch print), try the following:

(1) From an unexposed sheet of grade #2 8x10 paper cut a 2x10-inch strip.

(2) Determine a representative cross-section of texture and tones in the projected image. Under safelight lay this strip across that best cross-section.

(3) Make eight equal 1.25-inch test exposures across this strip using the following sequence of seconds (at one stop below wide open for your enlarging lens, which is almost always the sharpest aperture): 1 - 2 - 4 - 8 - 16 - 32 - 64 -128.

This is essentially an f/stop timer exposure sequence, but without the expense of buying such a timer. Start with this sequence every time, as you can be pretty certain that your correct exposure will never be only 1-second, and will never reasonably exceed 128 seconds (2-minutes 8-seconds).

The idea here is to surround the correct exposure on the very first try.

If it doesn't, then instead of eight test exposures, make ten 1-inch exposures. This adds tests for 256 and 512 seconds. If 512 seconds (8-minutes 32-seconds) doesn't succeed in bracketing the negative, throw the negative away and start over.

(4) After processing, choose the two side-by-side exposures where one is obviously too light, and the other is obviously too dark. For this example let's say 16-seconds is too light, and 64-seconds is too dark.

(5) Subtract the difference between your newly discovered upper and lower exposure boundaries (64 sec - 16 sec = 48 sec) and divide it by 10 (48 sec / 10 = 4.8 sec).

(6) Cut a second 2x10-inch strip from your unexposed grade #2 test sheet. Place it across the same representative cross-section of the image.

(7) Set your timer to the lower boundary of 16-seconds, which we already know is too light. Give your second test strip an overall exposure at this setting.

(8) Now divide the strip into nine equal parts. Reset your timer to give each part an additional 4.8 seconds of exposure. The cumulative sequence will run as follows (after applying the initial 16-second overall exposure): 20.8 - 25.6 - 30.4 - 35.2 - 40.0 - 44.8 - 49.6 - 54.4 - 59.2.

Now you have switched back to a traditional linear (non-f/stop) test strip to refine your starting exposure point. Each of the nine test exposures is an equal step up the scale from the previous exposure.

(9) After processing, choose the single test exposure that comes closest to appearing visually correct to your eye. For convenience, round the exposure for that test to the nearest whole second. If you cannot find a perfect match, interpolate between the two closest matches.

This is now your starting point for that negative/paper/contrast grade/developer/lens aperture/everything else. All it took was one-half sheet of paper and two quick processing passes to narrow it down from scratch.

If, like me, you are sometimes unsure of which contrast grade to target, go ahead an simultaneously make two (or three) sets of test strips, one for each grade to check. Then process the separate sets together for speed. (Multiple first strips, followed by evaluations, then multiple second strips, if still required.)

I have been successfully using this approach for years. Most recently just yesterday as I printed my submission for the current APUG Blind Print Exchange. It saves a huge amount of time and materials and frustration over just flailing around blindly.

Ken
 
Last edited:

MattKing

Moderator
Moderator
Joined
Apr 24, 2005
Messages
53,272
Location
Delta, BC Canada
Format
Medium Format
I think that a lot of people seem to be missing at least part of what the OP is asking.

Essentially, he is asking how to narrow down where to start his test strip sequence, in order to save time and paper.

A simple enlarging meter can really help with that.

As can recording "ballpark" exposures for different height settings and lens combinations on an enlarger.

At least until one gains experience and the ability to gauge exposure by eye.
 
Joined
Mar 18, 2005
Messages
4,942
Location
Monroe, WA, USA
Format
Multi Format
I think that a lot of people seem to be missing at least part of what the OP is asking.

Essentially, he is asking how to narrow down where to start his test strip sequence, in order to save time and paper.

Not missing it at all. That's exactly the question I am answering.

An exponential sequence from 1 sec to 128 secs (or slightly more in outlier cases) will bracket the correct exposure on the very first try. 1-to-128 is the test strip sequence starting point. One that works in all cases, and so needs no further adjustment or thought. Surrounding an unknown data point is the quickest entrance to the ballpark.

And the follow-up linear sequence based on those ballpark results will narrow the actual base starting point exposure (the whole reason for test strips in the first place) down to a resolution of a single second. Or at most an interpolated few seconds, if no perfect match is found on the second strip.

All in only two quick passes. Of about six minutes each. (~2 min exposing + 2 min dev + 1 minute stop + 1 minute test fix = 6 minutes.) Using only half a sheet of paper.

No credit cards, or decades of experience, required...

:smile:

Ken
 
Last edited:

RobC

Member
Joined
Nov 5, 2007
Messages
3,880
Location
UK
Format
Multi Format
I think that a lot of people seem to be missing at least part of what the OP is asking.

Essentially, he is asking how to narrow down where to start his test strip sequence, in order to save time and paper.

A simple enlarging meter can really help with that.

As can recording "ballpark" exposures for different height settings and lens combinations on an enlarger.

At least until one gains experience and the ability to gauge exposure by eye.

The answer is: Knowing the base print time of your last good print at that magnification and fstop, you take that time and span it with your test strip.
Just keep notes so you can refer to them next time. And the very first time its pure trial and error but second and subsequent times you should already know more or less and you can refine it more on third and fourth time etc.
 
Joined
Mar 18, 2005
Messages
4,942
Location
Monroe, WA, USA
Format
Multi Format
The answer is: Knowing the base print time of your last good print at that magnification and fstop, you take that time and span it with your test strip.
Just keep notes so you can refer to them next time. And the very first time its pure trial and error but second and subsequent times you should already know more or less and you can refine it more on third and fourth time etc.

Provided all other variables in the system remain constant. Which is rarely the case. Better, I think, is to apply a protocol that takes the current state of those other variables into account automatically, without any trial-and-error involved. And is far faster, easier, and more accurate than keeping and maintaining secondary notes.

Performed as described above, the final result of both test strips will always be a correct answer. On the first try.

Ken
 
Last edited:

removed account4

Subscriber
Joined
Jun 21, 2003
Messages
29,832
Format
Hybrid
I think that a lot of people seem to be missing at least part of what the OP is asking.

Essentially, he is asking how to narrow down where to start his test strip sequence, in order to save time and paper.

A simple enlarging meter can really help with that.

As can recording "ballpark" exposures for different height settings and lens combinations on an enlarger.

At least until one gains experience and the ability to gauge exposure by eye.

hi matt
i did see that was what the OP was asking.
for me at least, it takes about 1 sheet of paper to get an idea of exposure ..
one with a maybe 10 second intervals, and then more precise times and then a test exposure.
maybe with a meter it would save me 1 strip of paper but paper is cheap compared to other things,
certainly cheaper than buying a dedicated exposure meter.

maybe the OP can get a regular incident meter, put the flat disk on it, set it to iso 12 for a ball park iso ( sekonic studio deluxe will go to iso 6 )
make a reading, do a test strip/print and take notes that xyz paper, xyz developer, 8x10enlargement, and abc film
was 4 seconds off of what the meter said. to his enlarger and paper and film
and developer and working methods and that way he can easily have a ball park exposure.
the OP would have to do this with every paper, maybe a variety of developers ---and maybe have a folio of test prints calibrated from his meter,
he'd have to make sure the developer hasn't had much gone through it / same dilution + use or that might throw things off a little bit.
it seems like a lot of work, and having to rely on another machine, rather than sharpening one's skills ..

YMMV/TETO
 

markbarendt

Member
Joined
May 18, 2008
Messages
9,422
Location
Beaverton, OR
Format
Multi Format
I think that a lot of people seem to be missing at least part of what the OP is asking.

Essentially, he is asking how to narrow down where to start his test strip sequence, in order to save time and paper.

A simple enlarging meter can really help with that.

As can recording "ballpark" exposures for different height settings and lens combinations on an enlarger.

At least until one gains experience and the ability to gauge exposure by eye.

IMO enlarging meters are an invaluable tool, every bit as useful and accurate as an exposure meter is when setting camera exposure.

When using an enlarging meter and paper I'm familiar with, I can typically get a very workable print on the very first try.

For me test strips are only important for "learning a new paper".

One of the biggest advantages of an enlarging meter is the ability to adjust for camera exposure variances in real time, just grab the aperture ring and set a truly workable starting point.
 

craigclu

Subscriber
Joined
Sep 8, 2002
Messages
1,305
Location
Rice Lake, Wisconsin
Format
Multi Format
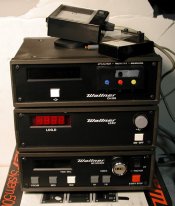
I've played around with a few incident meters in the darkroom but not with much success (some years ago now). I had an old "cheapy" Unicolor meter that actually worked better. Great for a good starting point once you're tuned into it a bit. I have a Wallner system that is based on a max black indexing of paper batches (photo attached). Once tuned into its nuances, it is surprisingly effective. I hate to bring it up as it always seems to draw detractors from the woodwork but I find it quite usable. I also have a Darkroom Automations (Pyro) meter http://www.darkroomautomation.com/em.htm but have been in the middle of a darkroom move/renovation and haven't taken time to learn it as yet. I thought retirement would bring more time for this stuff but so far, it isn't so....

WALLNER500.jpg
 

DREW WILEY

Member
Joined
Jul 14, 2011
Messages
14,098
Format
8x10 Format
Unless you're running a commercial lab, a "correctly" exposed print isn't necessarily a keeper. Even Babe
Ruth struck out a lot of times. It takes more than a good bat, and needs luck too. Correct can be boring.
You still need to pull actual strips and even whole prints to understand what a negative needs. And the
more you gain printing experience, the more you'll appreciate this fact. I say this as someone who owns
a very high-end projection (easel) densitometer, and not just good enlarging meters. Unless one knows
how to make valid test strips, these instruments themselves are largely useless. Get to first base first.
 

DREW WILEY

Member
Joined
Jul 14, 2011
Messages
14,098
Format
8x10 Format
I'll just add that I NEVER use either contact sheets or enlarging meters for black and white printing. No need. And I work with a variety of papers,
developers, and toners. One just has to get into a brawl with your medium, come back from a session black and blue, and learn from your mistakes.
Some of my mistakes have come out spectacular. What I did "wrong" created magic that I would have never stumbled on if I followed the "rules".
 

MartinP

Member
Joined
Jun 23, 2007
Messages
1,569
Location
Netherlands
Format
Medium Format
I really, really, really think blind test-stripping is a foolish way to get to a final print. Base the start exposure off what you see on the properly exposed contact sheet and it will usually be within a stop and near to the right base grade. The contact-sheet is typically an 8x10" sheet so if that looks ok, use the same exposure for an 8x10" print, otherwise vary it in proportion to the area of the print and/or how 'wrong' the specific frame is on the contact-sheet. Contrast can be relative to whatever is used for the contact-sheet too (remembering that size changes apparent contrast a bit).

Also, of course, one correctly exposed and developed neg at one size on one type of paper is going to be printing similar to the last time you did that, and any changes you might want will be suggested by (yet again) the contact-sheet.
 

DREW WILEY

Member
Joined
Jul 14, 2011
Messages
14,098
Format
8x10 Format
There is nothing "blind" about test strips. It only takes a few second, then into the developer. I can't think of anything easier once you get used to it.
And you're basically homing in on the actual results, a piece of the final print. All it takes is a piece of cardboard and a few seconds difference exposure along its length. If your habit is shooting jillions of frames and making contact sheets, fine. I find it vastly easier to cull my negatives on a lightbox without all that extra time and fuss, and print just the best. Whatever works. But there is nothing called a "correctly exposed" negative. You
expose it to be compatible with you chosen printing style and materials, but after that the game merely begins. Go ahead. Argue. But I doubt very
many of you are anywhere as near as nitpicky as I am about the quality of my negs or how the actual prints come out.
 
Photrio.com contains affiliate links to products. We may receive a commission for purchases made through these links.
To read our full affiliate disclosure statement please click Here.

PHOTRIO PARTNERS EQUALLY FUNDING OUR COMMUNITY:


Ilford ADOX Freestyle Photographic Stearman Press Weldon Color Lab Blue Moon Camera & Machine
Top Bottom