Ilford rapid fixer eating away contrast

Curved Wall

A
Curved Wall

  • 3
  • 0
  • 58
Crossing beams

A
Crossing beams

  • 8
  • 1
  • 76
Shadow 2

A
Shadow 2

  • 3
  • 0
  • 57
Shadow 1

A
Shadow 1

  • 3
  • 0
  • 55
Darkroom c1972

A
Darkroom c1972

  • 3
  • 2
  • 101

Recent Classifieds

Forum statistics

Threads
198,837
Messages
2,781,602
Members
99,721
Latest member
dcecbaroda
Recent bookmarks
0

Máx Arnold

Member
Joined
Jan 4, 2020
Messages
89
Location
Argentina
Format
Pinhole
Hi there!
As you may have seem from my thread "Homebrew developers in the middle of the CoVID-19 pandemic" I've been trying to dominate the paper negative process.
Getting into my darkroom for the first time today has been such an experience...

But now I'm facing a problem. My images look picture-perfect out of the stop bath. I usually take a closer loot at them under the safelight before putting them in the fixer, and they're aresome. Perfect density on shadows, midtones and highlights. When I put it into the fixer (Ilford rapid fixer 1+9) I can instantly notice the contrast on my print dies. It becomes flat, all made with shades of grey. And the overall image ends up looking soft. It looks as if the emulsion was in liquid form.
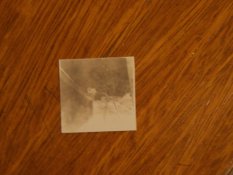
I'll give you a photo of my last negative, a picture of my backyard, so that you can see what I mean.
100_7891.JPG

I first thought that the softness came from the fact that I'm using a pinhole camera, but further shots show no problem. They're sharp and great.

What's happening here?

Best regards, Max.
 

NB23

Member
Joined
Jul 26, 2009
Messages
4,307
Format
35mm
All depends on the paper. Some papers react to fixer, others don’t.

always judge a print after fixing.

At last, yes check your light. Might be too strong.
 

pentaxuser

Member
Joined
May 9, 2005
Messages
19,956
Location
Daventry, No
Format
35mm
Could your safelight be the cause? Have you done a safelight test?
Can you reconcile your suggestion as to the possible cause might be with what the OP says in happening? It would appear that when looking for a cause for a problem you look at "what has changed or when has it changed" and this can often be successful. The OP is convinced that as soon as it hits the fixer the effect of loss of contrast is instant.

It's a new one on me but short of the OP re-examining exactly what was happening before, during and after the process we are unlikely to be able to conclude that the fixer is not the cause based on when he observes the change.

I assume he sees this sudden effect under safelight conditions as it occurs the instant he place the prints into the fix so at that point he should not have turned on the roomlight

OP unless you literally tell us everything about the details of your process I feel we can only conclude that the fixer is the problem as you have. What you do about it given that many millions of us do not have this problem with fixer I have no idea.

Solving this problem will not be easy on a forum but it starts with a detailed explanation of everything about your process. Getting to your darkroom and observing everything might well solve the problem in a couple of hours but this way of solving it is unlikely to be possible

pentaxuser
 

koraks

Moderator
Moderator
Joined
Nov 29, 2018
Messages
22,894
Location
Europe
Format
Multi Format
If you liberally expose paper and then develop it sparingly, you're essentially doing something that resembles lith printing. You create very tiny silver particles (that happen to be quite colorful as well; yellows, tans and pinks). These particles are not as robust as fully developed out black silver grains, and fixer tends to attack them. The solution is to develop a bit longer or use a stronger developer. If this creates an image that is overall too dense, back up on the exposure a bit.
Anyone who has done any lith printing would recognize this. The same happens with lumen prints, and it's also often encountered with Van Dyke brown prints and salted paper prints.
 

Ian Grant

Subscriber
Joined
Aug 2, 2004
Messages
23,263
Location
West Midland
Format
Multi Format
All Rapid fixers will start to dissolve and bleach the image if you over fix, it's a prperty of the Ammonium Thiosulphate. It happens more with Warmtone papers particularly where you use increased exposure and decereased development to increase warmth. You're effectively doing the same with your paper negatives.

You need to keep the fixing times to Ilfords recommendations or you will see the finer grained silver begin to bleach away as it's dissolved. I see this when I ;eave tset strips in my first fixer bath and they overlap even a couple of minutes makes a difference. You'd be better using 1+9 instead of 1+4 dilution.

Ian
 

pentaxuser

Member
Joined
May 9, 2005
Messages
19,956
Location
Daventry, No
Format
35mm
Hopefully the OP will reply with more details but I noted the word " instantly" when he refers to the change as soon as it hits the fixer. This is what I find puzzling. He says that he does uses the fixer at 1+9 but that is about the only actual "fact" as in accurate information that I can find in the his post

pentaxuser
 

Rick A

Subscriber
Joined
Mar 31, 2009
Messages
9,926
Location
Laurel Highlands
Format
8x10 Format
Don't forget that dry down also comes into play with apparent sharpness, Photos that look perfect when wet become slightly muddy when dry. Safe lights can cause some fogging if paper is exposed to them for extended periods of time. Fixer does bleach some as well. It's all a process of experiments and note taking to keep track of what works and what doesn't. Prints examined under a safe light should appear darker than needed, trial and error until preferred timing is hit.
 

pentaxuser

Member
Joined
May 9, 2005
Messages
19,956
Location
Daventry, No
Format
35mm
I don't. Make a lumen print or a particularly colorful lith print and watch it happen as it hits the fixer. Takes a few seconds for the smaller grains to fix away.
I had a look at the OP's thread on homebrew developers and I cannot see where he makes any reference to his negatives being anything other than normal negatives I cannot see any reference to Lumen or lith prints. In which post does he refer to other than normal negatives or lumen or lith?

Thanks

Does you explanation apply to other than normal developers and normal negatives. By normal I mean standard negatives using what he believes to be homebrew equivalent of standard developers.

pentaxuser
 

koraks

Moderator
Moderator
Joined
Nov 29, 2018
Messages
22,894
Location
Europe
Format
Multi Format
I had a look at the OP's thread on homebrew developers and I cannot see where he makes any reference to his negatives being anything other than normal negatives I cannot see any reference to Lumen or lith prints. In which post does he refer to other than normal negatives or lumen or lith?
He's using paper negatives developed in a DIY and inherently compromised developer. By means of contrast control, he controls development time. This can (but does not necessarily have to) result in silver images that share characteristics with lith and lumen prints: extremely small silver grains, which are susceptible to chemical and environmental attack (and they're very nicely colorful, of course!). So it's not literally lith or lumen, but it's fundamentally similar, with the same susceptibility to drastic changes in density during fixing.

Does you explanation apply to other than normal developers and normal negatives.
My explanation refers to any kind of very weak silver image with an inherently tiny grain size in the single digit micrometer scale. There are several processes that involve such types of images, whether intentional or sometimes also accidental. As far as I'm concerned, this is clearly a case of the latter.
 

ic-racer

Member
Joined
Feb 25, 2007
Messages
16,546
Location
USA
Format
Multi Format
In my darkroom a perfect dry print 'looks too dark in the developer tray' and 'looks too light in the wash bath.'
 
OP
OP
Máx Arnold

Máx Arnold

Member
Joined
Jan 4, 2020
Messages
89
Location
Argentina
Format
Pinhole
What Rick and ic-racer say is true: Prints always look darker under safelight.
I haven done a safelight test. But I load the paper under the same safelight as with I develop, and I stare at the paper's surface a couple times, cleaning it. As my highlights come paper white, I think there's no fogging.
All Rapid fixers will start to dissolve and bleach the image if you over fix, it's a property of the Ammonium Thiosulphate. It happens more with Warmtone papers particularly where you use increased exposure and decreased development to increase warmth. You're effectively doing the same with your paper negatives.

My negatives are warm in tone. You're right. I'm using the fixer at an 1+9 dillution (which I think it means 1 part fixer 9 parts water, does it?), but since I'm using tiny pieces of paper (4x4cm, 1.5748x1.5748in) I figured out they may be fixing way faster than a 8x10 print, right? There's less silver to dissolve in the first place.

The overall "underwater" effect I think it's my poor skills in the darkroom. I think I'm not agitating well in the developer and (or) fixer (I'm literally rocking the tray, up and down) But I'm anyway experimenting with the developer, so... maybe that's the problem.

pentaxuser, if you want me to explain everything I do, I will:

I prepare a crude for of parodinal using tylenol tablets and lye pellets. 2,5mg acetaminophen in 15,7 g of lye pellets into 50ml of tap water at room temperature. I let it sit in daylight 15 minutes, during which time it becomes lightly pink. (I leave it on daylight on purpose, p-aminophenol oxidizes faster in presence of light, and I need to see the change in colour to tell if It's formed.) I then dilute that to make 237ml of water. Everything is room temperature.
My stop bath is a mere strong dilution of lemon juice in water.
My fixer is Ilford rapid fixer 1 part fixer 9 parts water. It stinks like vinegar. (As it contains acetic anhydride, I think it's normal)

With the chemistry ready, I would cut a piece of Kentmere VC select RC photographic paper to 12 squares of the measures above and a couple of strips that I would fog and use to test developer and fixer. This is the time where there's more exposure to the safelight.
My safelight is around 40cm of the working surface. It's a red LED strip meant for its use as a car stop light. I power it with a 9v battery.
I'd then tape a square into my pinhole camera, which I find has no light leaks. It's a box, inside a box, and then inside another box. I can post a photo if you'd like.
I'd close the camera, ensure the shutter is closed and then go to my backyard to expose. Guessing and ISO of 1.5 and using a carboard "meter" issued by Ilford.
Some people have said it's not well designed, that it doesn't work, but I've been successful so far with the exposure.
Once exposed I would then get back into the "darkroom" which is a bathroom that has been made lightproof.
I would connect the safelight, put on my gloves, turn off the room light, then take the paper out of the camera and put it in the developer.
When I say room temperature it's not 20°c, it's colder. It's quite cold here, and a completely closed room just gets colder. I want to warm up the developer and see what happens, but I don't have more tablets for now, and I wouldn't anyway have any way of measuring the temperature of the water.
I would then develop, rocking the tray quite actively until an image appears and I can see deep blacks on the paper. I'd take it out and examine it on the safelight. It'd look contrasty, the way it should be, but still soft and "underwater", like this:
121209252-water-reflections-on-a-swimming-pool-underwater-photography-summertime-horizontal.jpg

I then would develop for a couple seconds more, and then I'd place it in the stop bath and rock the tray a few times.
Then it goes in the fixer for 1 minute (Ilford recommended time for 1+9 dilution) and the moment I place the paper in the fixer I notice the edges going white and the dark blacks becoming grey.
I'd then wash for the time it takes me to put another piece of paper in the camera. Time during which I don't turn on the room light.

When I turn on the lights I see something like the image I posted first.
I'd then go out of the darkroom and dry the paper with a hair-dryer.

That's it.
 
OP
OP
Máx Arnold

Máx Arnold

Member
Joined
Jan 4, 2020
Messages
89
Location
Argentina
Format
Pinhole
I once placed a heavily fogged strip of paper in the fixer, same as described, and it cleared almost instantly.
 
Joined
Sep 10, 2002
Messages
3,589
Location
Eugene, Oregon
Format
4x5 Format
Rapid fixers will bleach prints after extended over-fixing, but this usually shows up in the highlights and shouldn't happen at all with normal fixing times.

Papers before fixation are still laden with unexposed and undeveloped silver halides, which veil the image making it look darker. With some papers, this is really noticeable. Just look at how opaque a piece of unexposed film is; papers have a similar emulsion coating them, which makes the developed image look different and darker.

Then, when the paper hits the fixer, these halides get converted rather quickly to invisible soluble compounds. The print lightens noticeably in the fixer. Maybe this is what you are seeing? If your blacks are getting noticeably lighter right away in the fix, I think this is the culprit, not bleaching.

The solution, of course, is to not evaluate the paper negative before fixing (and under the safelight...) but rather find a time/temperature combination that gives you the paper negative you want after fixing. Do try the weaker dilution, but I doubt you'll see a lot of difference.

Best,

Doremus
 

pentaxuser

Member
Joined
May 9, 2005
Messages
19,956
Location
Daventry, No
Format
35mm
Thanks Max for the very comprehensive explanation. What you are using is "normal " paper i.e. Kentmere and normal fixer for the normal time. So I fail to see how fixer can have the effect you are seeing. What I am trying to say is that if the finished print is not what you want then the solution lies elsewhere. It will not be cured in my opinion by a change in what you do in the fixing process which is exactly as it should be.

I cannot comment on whether your developer is doing what it should nor do I know if the battery operated LED red safelight is in fact safe but a safelight test might be advisable.

It might mean changing one variable at a time until something has the effect you want.

Best of luck

pentaxuser
 

mshchem

Subscriber
Joined
Nov 26, 2007
Messages
14,661
Location
Iowa City, Iowa USA
Format
Medium Format
With printing out paper POP you need to use a dilute solution of plain sodium thiosulfate (hypo) .I tried using ammonium thiosulfate dilute it would zap the image like what you are seeing.
Don't know if this would help.
 
OP
OP
Máx Arnold

Máx Arnold

Member
Joined
Jan 4, 2020
Messages
89
Location
Argentina
Format
Pinhole
Papers before fixation are still laden with unexposed and undeveloped silver halides, which veil the image making it look darker. With some papers, this is really noticeable. Just look at how opaque a piece of unexposed film is; papers have a similar emulsion coating them, which makes the developed image look different and darker.

Then, when the paper hits the fixer, these halides get converted rather quickly to invisible soluble compounds. The print lightens noticeably in the fixer. Maybe this is what you are seeing? If your blacks are getting noticeably lighter right away in the fix, I think this is the culprit, not bleaching.
I think this is the case.
Since my developer is highly crude and experimental, what you say is probably what's happening.
I made a test dilluting the fixer and the negative looks exactly the same as the others fixed at 1+9.
After examinating the negatives I think I can conclude that the softness comes from the pinhole.
The "underwater" effect can be happening when I take the paper out of the derveloper to examine it and I don't place it in the stop bath straight away. The streaks really seem to be development problems.
Next time I go out home and I make a trip to the pharmacy I'll but the paracetamol I need and some vitamin C tablets. I've read here (or somewhere else) that vitamin c is additive to p-aminophenol and that it might regenerate it. We'll see what happens. I should try caffenol as well, just to compare.

Being really thankful for the help given, Max.
 

MattKing

Moderator
Moderator
Joined
Apr 24, 2005
Messages
52,939
Location
Delta, BC Canada
Format
Medium Format
Under the right circumstances and with the right materials, you can see another example of the same effect with "regular" paper.
As the print goes into the fixer, the emulsion begins to clear, the unexposed and undeveloped silver halides which have been veiling the image disappear, and the underling image "pops" (pun intended) into better view.
In the OP's case the veiling effect is so strong that he is seeing more of the veil than he is of the image, until the fixer does its work.
 

tezzasmall

Member
Joined
Dec 29, 2013
Messages
1,135
Location
Southend on Sea Essex UK
Format
Plastic Cameras
Hi Max, I do not know how well your print developer works in comparison to branded ones, but if at all possible, you could try this teaspoon formula, that I have used a few time now and like very much. I also don't know how easy it is to either get a branded developer or indeed the chemicals for the following formula in Argentina? Using a developer that more of us know about, might help us diagnose the problems that you are having.

https://www.afterness.com/kod_d72.html

And yes, there is always caffenol; something that I've tried, but I didn't like either the end result or the smell of the developer.

Terry S
 
Photrio.com contains affiliate links to products. We may receive a commission for purchases made through these links.
To read our full affiliate disclosure statement please click Here.

PHOTRIO PARTNERS EQUALLY FUNDING OUR COMMUNITY:


Ilford ADOX Freestyle Photographic Stearman Press Weldon Color Lab Blue Moon Camera & Machine
Top Bottom