Ilford MG RC Deluxe Paper Curves

High st

A
High st

  • 5
  • 0
  • 39
Flap

D
Flap

  • 0
  • 0
  • 19
Chiaro o scuro?

D
Chiaro o scuro?

  • 2
  • 0
  • 229

Recent Classifieds

Forum statistics

Threads
199,215
Messages
2,787,963
Members
99,838
Latest member
HakuZLQ
Recent bookmarks
0

Chuck_P

Subscriber
Joined
Feb 2, 2004
Messages
2,369
Location
Kentucky
Format
4x5 Format
I wanted to share my first use of the Printalyzer Densitometer to produce a set of paper curves. I followed the procedure in Steve Anchell's book, "Variable Contrast Printing Manual". I projected the 21-step wedge and exposed 7 sheets of Ilford MG RC Deluxe, one for each filtration setting (#00, #0, #1, #2, #3, #4, #5); I chose not to test half-grade settings. If I was a contact printer I would've contacted the wedge, it was advised to conduct this test following your usual printing manner. Yes, I'm aware of potential flare issue that may be impacting the data, but......flare be damned, just sayin.

In Anchell's words, this is a test for "Relative ISO Range Numbers"........generated relative to all that's involved with my equipment and process..........the paper, light source, filtration, developer, dilution, dev time/temp, and toner. The book states....."Theoretically, a paper's ESV (my emphasis: exposure scale value, or LER I believe) should change with each contrast filter. In practice this is not always true. Sometimes two or more adjacent filters do not provide enough change in color density to effect a change in contrast on a particular brand of paper." So this is why I am doing this test, some may say what a waste of 7 sheets of paper, however, knowing if this situation exists in my system, I believe it can help avoid paper waste when printing.

My system/process:
-LPL 4550 XLG VCCE enlarger, quartz-halogen light source with Ilford dial-in filtration settings.
-Dektol 1+3, 3 min dev time
-selenium toning, 1+10
-Ilford Stop
-Kodak rapid fix

Relative ISO RN: (Emin - Emax) x100 round to the nearest 5.

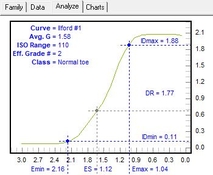
Analysis: BTZS Plotter for Windows: One data set by reading reflection densities before toning and one data set by reading reflection densities after toning the paper. Also, the paper curves of the three curves that are of most interest to me in that it shows #0 filtration provides an effective contrast grade of 1 and that filtration #1 provides a low grade 2 contrast, and the filtration #2, remains a grade 2 but provides a bit higher grade 2 contrast than #1. Filtration settings for both untoned and toned paper provide unchanging effective grades, so not enough of a change due to toning. But, I believe, it does reveal a level of difference that selenium toning has had on the paper's overall response to toning, using the increases shown in Emin, Emax, ESV, and in other columns of data. I know this response can be easily seen on the paper, but seeing it measured in the paper densities, I think is a cool thing to observe....no, I haven't forgotten about potential flare impacts.

PD Reflection densities_Untoned.JPG
PD Reflection densities_Selenium 1+10.JPG


Contrast Equivalent Chart001.jpg


BTZS paper curves for the untoned curves: #0, #1, #2:

Untoned curve #0.JPG
Untoned curve #1.JPG
Untoned curve #2.JPG


BTZS paper curves after toning in selenium 1+10:

Toned curve #0.JPG
Toned curve #1.JPG
Toned curve #2.JPG


I know some expert eyes will be looking at this so I've tried to be as thorough as I can. I'm interested in thoughts and constructive critique.
 

Attachments

  • Untoned curve #1.JPG
    Untoned curve #1.JPG
    28.8 KB · Views: 51
  • PD Reflection densities_Untoned.JPG
    PD Reflection densities_Untoned.JPG
    47.2 KB · Views: 58
Last edited:
OP
OP
Chuck_P

Chuck_P

Subscriber
Joined
Feb 2, 2004
Messages
2,369
Location
Kentucky
Format
4x5 Format
Lol, Sorry..................... I posted this a little while ago but forgot to title the thread properly
 

GregY

Member
Joined
Apr 12, 2005
Messages
3,503
Location
Alberta
Format
Large Format
" I believe it can help avoid paper waste when printing." Chuck, my luddite view is that the graph represents a point in time. Paper characteristics change as it ages....& vary from batch to batch (in my experience).
 
OP
OP
Chuck_P

Chuck_P

Subscriber
Joined
Feb 2, 2004
Messages
2,369
Location
Kentucky
Format
4x5 Format
" I believe it can help avoid paper waste when printing." Chuck, my luddite view is that the graph represents a point in time. Paper characteristics change as it ages....& vary from batch to batch (in my experience).

Yeah, well hopefully so much time won't pass that I have to be concerned about the paper changing in the box.......
 

GregY

Member
Joined
Apr 12, 2005
Messages
3,503
Location
Alberta
Format
Large Format
Yeah, well hopefully so much time won't pass that I have to be concerned about the paper changing in the box.......

Eventually you may have enough papers and sizes that you don't use it all up in a hurry. These days i don't print much 20x24 or even 16x20..... so they tend to stay in my stash for a while....
 

pentaxuser

Member
Joined
May 9, 2005
Messages
20,017
Location
Daventry, No
Format
35mm
Chuck_P, if I have understood your findings accurately I think that with this new Ilford paper as a straight untoned print the best grade you can get is 3 with a 5 grade Ilford filter. Is this correct? If so I wonder why Ilford appear to claim that this paper and its filters will give you 5 distinct grades that match up to what I presume are Ilford's genuine measure of grades 0-5?

Is there such a measure in fact or is it as simple as you having one standard for a grade and Ilford another which would explain the differences

What is your yardstick for deciding what constitutes a genuine grade 5 against which your measurements reveal that the best achievable is only 3?

I am unfamiliar with how such things are measured so please bear with me in my lack of knowledge on these matters

Thanks

pentaxuser
 

ic-racer

Member
Joined
Feb 25, 2007
Messages
16,563
Location
USA
Format
Multi Format
Chuck_P, if I have understood your findings accurately I think that with this new Ilford paper as a straight untoned print the best grade you can get is 3 with a 5 grade Ilford filter. Is this correct? I

I projected the 21-step wedge

By projecting the step wedge, he is testing his enlarger, not the paper. If one is interested in the grade of the paper, contact print of the step wedge needs to be obtained.
 
OP
OP
Chuck_P

Chuck_P

Subscriber
Joined
Feb 2, 2004
Messages
2,369
Location
Kentucky
Format
4x5 Format
Chuck_P, if I have understood your findings accurately I think that with this new Ilford paper as a straight untoned print the best grade you can get is 3 with a 5 grade Ilford filter. Is this correct? If so I wonder why Ilford appear to claim that this paper and its filters will give you 5 distinct grades that match up to what I presume are Ilford's genuine measure of grades 0-5?

Is there such a measure in fact or is it as simple as you having one standard for a grade and Ilford another which would explain the differences

What is your yardstick for deciding what constitutes a genuine grade 5 against which your measurements reveal that the best achievable is only 3?

I am unfamiliar with how such things are measured so please bear with me in my lack of knowledge on these matters

Thanks

pentaxuser

I If you look at the untoned dataset at the number 5 filtration, you will see that the relative RN is 60, and you will also see on the contrast equivalent chart that I provided that 60 correlates to a grade 5 contrast. So with my processing and equipment, dialing in a #5 filtration on MG RC Deluxe will provide an EFFECTIVE contrast grade 5.
 

pentaxuser

Member
Joined
May 9, 2005
Messages
20,017
Location
Daventry, No
Format
35mm
By projecting the step wedge, he is testing his enlarger, not the paper. If one is interested in the grade of the paper, contact print of the step wedge needs to be obtained.

Thanks, well Chuck_P is yet to reply but assuming he echos your reply then does that mean in terms of his test that tells me about the range of the grades that the new Ilford paper can achieve?

I suppose that from a printer's point of view I am seeking to find what it means for me as a relatively ordinary darkroom printer

pentaxuser
 
OP
OP
Chuck_P

Chuck_P

Subscriber
Joined
Feb 2, 2004
Messages
2,369
Location
Kentucky
Format
4x5 Format
By projecting the step wedge, he is testing his enlarger, not the paper. If one is interested in the grade of the paper, contact print of the step wedge needs to be obtained.

Thank you, that's putting it more succinctly, I'm not often good at that. But I thought by stating my process and equipment that would be understood. But I'm not critical, it took me a while some years ago to understand that. I actually did this same test years ago but did so by Anchell's visual approximation of the printed step wedge and was always unsure of my findings. With the PD, it takes the guess work out of it and, I found, has been much more educational for me utilizing the BTZS analysis.
 

pentaxuser

Member
Joined
May 9, 2005
Messages
20,017
Location
Daventry, No
Format
35mm
I If you look at the untoned dataset at the number 5 filtration, you will see that the relative RN is 60, and you will also see on the contrast equivalent chart that I provided that 60 correlates to a grade 5 contrast. So with my processing and equipment, dialing in a #5 filtration on MG RC Deluxe will provide an EFFECTIVE contrast grade 5.

Thanks Chuck, my reply to Ic-racer was made before I saw your reply. As I said I am not familiar with what is in all the columns. I saw Av G and assumed this was shorthand for Grade. Is this average gradient?

So what do I , as a non technical printer, need to draw from that part of your conclusions where you say: Also, the paper curves of the three curves that are of most interest to me in that it shows #0 filtration provides an effective contrast grade of 1 and that filtration #1 provides a low grade 2 contrast, and the filtration #2,

pentaxuser
 

ic-racer

Member
Joined
Feb 25, 2007
Messages
16,563
Location
USA
Format
Multi Format
Even contact printing the step wedge, one has to mash it down good. This contact print was made in a 8x10 proof-printer that for making proof sheets. It did not have enough pressure and there was a lot of bleed that can affect results, depending on the size of the sensor and the exact sensor positioning.
A step wedge projected with an enlarger is going to contain all the fog from the darkroom, stray light and flare from the lens. That is good if one wants to test all that. Compare it to the contact printed wedge and get a good measure of how much contrast your system is losing. A very important test.
Step Wedge.jpg
 

Nicholas Lindan

Advertiser
Advertiser
Joined
Sep 2, 2006
Messages
4,249
Location
Cleveland, Ohio
Format
Multi Format
Some thoughts on using a step tablet when characterizing photographic paper.

Projecting the tablet

This is the method used in the Darkroom Automation tests. A 4x5 31 step tablet was enlarged to 5x7. Measurement of each projected step was made with a Darkroom Automation enlarging meter. The illumination measurements were made at fixed positions at each step using an alignment guide for the meter, thus nulling out uneven enlarger illumination and uneven density in the tablet. An alignment guide was also used in the densitometer so densities were measured at the same location that the illumination measurements were made.

Using an enlarged step tablet makes measuring the patch densities easier as the width of each patch is larger.

Using this method, the densities of the step tablet become irrelevant as a direct measurement is made of the light falling on the paper. Anything that would provide a convenient set of densities will work with this method, a home made step tablet would be entirely adequate.

Conversely, using the densities of the step tablet's patches to calculate the illumination of the enlarged tablet will lead to inaccurate results as flare, uneven illumination, uneven density and a host of other gremlins are not accounted for.

If you don't have a very accurate enlarging meter then this method is best avoided.

Contacting the tablet

This method eliminates all the effects of the enlarger, though it is important to insure the illumination of the tablet is uniform. A grey print made using a #5 filter and checked for uniformity with a densitometer should be adequate.

A downside is that getting the rather small density patch centered in the densitometer is a bit fiddly.

This method depends on the accuracy of the step tablet. For characterizing paper the tolerances of an ordinary Stouffer tablet are more than adequate.

Not using a tablet

A third method is to use test strip printer that moves a strip of paper past an aperture and control the exposure of each patch with a timer.

This method can result in exceedingly precise characterization - a 0.1 stop exposure interval is equivalent to a tablet with 0.03 OD steps.

I can only recommend this method if you are looking at the derivative of the HD curve. A plot of the derivative shows the interaction of the paper's individual emulsions as the contrast filtration changes. This information is of little practical value, however.
 

Nicholas Lindan

Advertiser
Advertiser
Joined
Sep 2, 2006
Messages
4,249
Location
Cleveland, Ohio
Format
Multi Format
I have found Ilford papers to be very stable. 10 year old boxes haven't changed much. Usually the slower the emulsion the less it changes with time.

However, other papers don't fair so well. I found them to be unstable and to vary contrast box to box and even within a box - though trying to tell stability from sheet-to-sheet variability is a judgement call. I just gave up on these papers, they are not suitable for the Darkroom Automation system. I'm sure you can get spectacular prints from them using test-strip methods in combination with a feeling for the paper's quirks. The tests on these papers were from the 2006 time frame and a lot may have changed since then.
 
Last edited:

Nicholas Lindan

Advertiser
Advertiser
Joined
Sep 2, 2006
Messages
4,249
Location
Cleveland, Ohio
Format
Multi Format
I'll second ic-racer's observation on contacting a step tablet - you need to use a spring-back contact frame. I found contacting to be tedious in comparison to projecting the tablet, but I did have an accurate meter to hand so flare et al. weren't a problem.

You can look at flare as providing a flash exposure to get your highlights off the toe of the curve. If you look at things in the right light how can there be any darkness.
 

faberryman

Member
Joined
Jun 4, 2016
Messages
6,048
Location
Wherever
Format
Multi Format
How will this technical information enable you to make better prints?
 
OP
OP
Chuck_P

Chuck_P

Subscriber
Joined
Feb 2, 2004
Messages
2,369
Location
Kentucky
Format
4x5 Format
: Also, the paper curves of the three curves that are of most interest to me in that it shows #0 filtration provides an effective contrast grade of 1 and that filtration #1 provides a low grade 2 contrast, and the filtration #2,

Have you ever made a switch from a lower contrast filter to a higher contrast filter, only to see that the higher filter did not effect a change in contrast like you expected......I can tell I have before I acquired my own enlarger. I was using the local photography club enlarger with Kodak under-the-lens filter set......frustrating, as I didn't understand what was going on and I thought a #3 filter was supposed to be a grade 3 contrast........so now I know, that's maybe yes or maybe no.
 

MattKing

Moderator
Moderator
Joined
Apr 24, 2005
Messages
53,261
Location
Delta, BC Canada
Format
Medium Format
Using this method, the densities of the step tablet become irrelevant as a direct measurement is made of the light falling on the paper. Anything that would provide a convenient set of densities will work with this method, a home made step tablet would be entirely adequate.

Would a Kodak Projection Print Scale work?
1675447975593.png
 

MattKing

Moderator
Moderator
Joined
Apr 24, 2005
Messages
53,261
Location
Delta, BC Canada
Format
Medium Format
How will this technical information enable you to make better prints?

It will help you understand how your paper and enlarger respond to changes in settings on the light source.
 

faberryman

Member
Joined
Jun 4, 2016
Messages
6,048
Location
Wherever
Format
Multi Format
It will help you understand how your paper and enlarger respond to changes in settings on the light source.

You mean if you are using a dichroic color or variable contrast black and white head rather than above or below the lens filters?
 
Last edited:

MattKing

Moderator
Moderator
Joined
Apr 24, 2005
Messages
53,261
Location
Delta, BC Canada
Format
Medium Format
You mean if you are using a dichroic color or variable contrast black and white head rather than above or below the lens filters?

No, I mean with the light source you are actually using.
It is a map of how the system behaves, where the system includes the paper you are using. Used with the test prints themselves, it can help you decide on how best to achieve particular changes in a print you are working on.
It won't resonate the same with everybody - some like following a map, some prefer written directions, and some like to work purely intuitively.
I'm guessing both Chuck_P and Nicholas Lindan are fans of the map approach.
 
OP
OP
Chuck_P

Chuck_P

Subscriber
Joined
Feb 2, 2004
Messages
2,369
Location
Kentucky
Format
4x5 Format
You mean if you are using a dichroic color or variable contrast black and white head rather than above or below the lens filters?

With a color head you can dial in the appropriate filtration for the grades.........But the exposure used to expose for all the filtration settings is based off the lowest contrast filter....or...."dial in the appropriate dichroic filtration to achieve a close approximation of the lowest contrast grade"----Anchell.

The exposure decision is made by a exposure that leaves...at least...3 solid white steps....
but not more than 5.....and at least 2 indistinguishable black steps on either the projected or contacted print. I started at the suggested staring exposure of f/8 for 10 sec, but had to go to 20 sec. So I was wrong, it took me a total of 9 sheets to compete the test. I then exposed the remaining filtration settings at f/8 for 20 sec.
 

faberryman

Member
Joined
Jun 4, 2016
Messages
6,048
Location
Wherever
Format
Multi Format
Let's say you have a set of Ilford variable contrast filters. They are marked ...2, 2.5, 3, 3.5, 4.... You test them with your standard paper and determine they actually yield ...2.1, 2.6, 2.9, 3.4, 4.1.... Is it your filters, step wedge, or densitometer that is off? How does your approach to printing change?

I guess I fall in the "intuitive" or the "visual judgment" school. I start with a No. 2 filter, see what that looks like, and go from there. If I want more contrast, I try a No.3. If that is not enough, I go to a No. 4. If that is two much, I back it down to a No. 3.5. Of course, if you have a dichroic color head or a variable contrast black and white head, you can fine tune. It is an interative process. The actual contrast grade, be it 3.4, 3.5, or 3.6, doesn't matter, at least to me.
 
Last edited:
Photrio.com contains affiliate links to products. We may receive a commission for purchases made through these links.
To read our full affiliate disclosure statement please click Here.

PHOTRIO PARTNERS EQUALLY FUNDING OUR COMMUNITY:


Ilford ADOX Freestyle Photographic Stearman Press Weldon Color Lab Blue Moon Camera & Machine
Top Bottom