• Welcome to Photrio!
    Registration is fast and free. Join today to unlock search, see fewer ads, and access all forum features.
    Click here to sign up

Ilford 500 and versa lab laser alignment

Recent Classifieds

Forum statistics

Threads
201,723
Messages
2,829,096
Members
100,910
Latest member
SuninPisces
Recent bookmarks
0

mitch brown

Member
Allowing Ads
Joined
Apr 25, 2006
Messages
352
Location
Boston Georgia
Format
Multi Format
Good Morning or night as it may be where you are
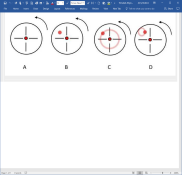
I am confused as to how to use the laser alignment tool from versa labs with my ilford 500 system . the problem is that I get several reflective dots when I use it, I have found that by removing the mixing box fixes the problem so the material in the bottom part must cause the problem. so my question is do I just align the enlarger with the mixing box part removed ? has anyone else used this with Ilford head and had this happen ? your thoughts appreciated
Mitch
 

mike c

Subscriber
Joined
Jan 5, 2009
Messages
2,863
Location
Los Angeles
Format
Multi Format
I do not have a Ilford 500 sytem but do have a Sanders LPL 4500 and Omega D2V 4x5 enlargers and the versa lab laser alignment tool. The tool aligns your neg. stage, lens, and baseboard, not the light source. I would remove the light source if possible .
 

outwest

Subscriber
Allowing Ads
Joined
Aug 18, 2005
Messages
581
Format
Multi Format
? The Versa Lab tool comes with a front surface mirror to use on the negative stage (without the lens mounted) and on the face of the lens when mounted. The laser shouldn't be getting to the mixing box.
 
OP
OP

mitch brown

Member
Allowing Ads
Joined
Apr 25, 2006
Messages
352
Location
Boston Georgia
Format
Multi Format
no front surface mirror all it came with was a 2.5 x 5 inch clear glass piece to put in the film holder for 4 x 5 so the light does reflect some but some goes thro and hits the bottom cover of the mixing box
 

btaylor

Subscriber
Allowing Ads
Joined
Dec 28, 2010
Messages
2,294
Location
Los Angeles
Format
Large Format
Put a piece of black paper on top of the versalab glass in the carrier. You're not aligning the light source. Like mike c, I also use a glass carrier to align the negative stage. I seem to recall reading that the versalab people deleted the front surface mirror because the reflection from the glass worked just as effectively.
 

mike c

Subscriber
Joined
Jan 5, 2009
Messages
2,863
Location
Los Angeles
Format
Multi Format
The Versalab I have came with 2 pieces of glass, the large one that was suppose to be used at the neg stage I broke accidentally, so I just use my glass type carrier.
 

monst

Member
Allowing Ads
Joined
Dec 20, 2007
Messages
95
Location
crystal pala
Format
35mm RF
An old dense neg with a few diagonal line scratched in does it for me. Shows up incorrectly aligned enlargers quite nicely.
 

silveror0

Member
Allowing Ads
Joined
Dec 3, 2007
Messages
364
Location
Seattle area, WA
Format
Large Format
Nine years ago one of our members (ic-racer) posted some info about the Versalab device that I thought was so useful that I copied it to a MS Word document; glad I did because the illustration he attached has evaporated but it's preserved in Word so I've attached it here. I keep this info with my laser device. Here is the link to his post.
 

Attachments

  • 2017-11-06.png
    2017-11-06.png
    191.8 KB · Views: 100

M Carter

Member
Allowing Ads
Joined
Jan 23, 2013
Messages
2,149
Location
Dallas, TX
Format
Medium Format
I use the Versalab weekly. Love the hell out of it (and my wife got it for me for xmas, so it's a constant reminder of "damn, I scored when I landed that woman!!!"

Anyway, mine came with plain glass with white stickers. Stick a sheet of glass in the neg carrier, with a white sticker on the top-side - away from the laser source. This cuts down the reflections.

Want the best tip ever? Get a screw-on filter for your enlarging lens, just a cheap-ass UV or whatever. Tape a small piece of white paper on the inner surface. SO MUCH EASIER than messing with the glass slide and rubber bands the Versalign comes with. I keep the filters stored with the Versalign.

Tip #2: make a DIY Besalign-style board for your lens carrier. Makes doing the lens stage much easier.
 

rpavich

Member
Allowing Ads
Joined
Aug 24, 2015
Messages
1,520
Location
West virginia, USA
Format
35mm
I use the Versalab weekly. Love the hell out of it (and my wife got it for me for xmas, so it's a constant reminder of "damn, I scored when I landed that woman!!!"

Anyway, mine came with plain glass with white stickers. Stick a sheet of glass in the neg carrier, with a white sticker on the top-side - away from the laser source. This cuts down the reflections.

Want the best tip ever? Get a screw-on filter for your enlarging lens, just a cheap-ass UV or whatever. Tape a small piece of white paper on the inner surface. SO MUCH EASIER than messing with the glass slide and rubber bands the Versalign comes with. I keep the filters stored with the Versalign.

Tip #2: make a DIY Besalign-style board for your lens carrier. Makes doing the lens stage much easier.
I think I'll do that, I hate those pieces of glass.
 

rpavich

Member
Allowing Ads
Joined
Aug 24, 2015
Messages
1,520
Location
West virginia, USA
Format
35mm
I use the Versalab weekly. Love the hell out of it (and my wife got it for me for xmas, so it's a constant reminder of "damn, I scored when I landed that woman!!!"

Anyway, mine came with plain glass with white stickers. Stick a sheet of glass in the neg carrier, with a white sticker on the top-side - away from the laser source. This cuts down the reflections.

Want the best tip ever? Get a screw-on filter for your enlarging lens, just a cheap-ass UV or whatever. Tape a small piece of white paper on the inner surface. SO MUCH EASIER than messing with the glass slide and rubber bands the Versalign comes with. I keep the filters stored with the Versalign.

Tip #2: make a DIY Besalign-style board for your lens carrier. Makes doing the lens stage much easier.
Also, can you take some detailed pictures of yours? I'm willing to make one if I know what it is.
 

M Carter

Member
Allowing Ads
Joined
Jan 23, 2013
Messages
2,149
Location
Dallas, TX
Format
Medium Format
Also, can you take some detailed pictures of yours? I'm willing to make one if I know what it is.

Do you mean the lens board? A Besalign board is a sandwich of 2 lens boards, with black foam between them, like mouse-pad thickness. There are three screws in a triangular setup that go through both boards.

You loosen or tighten the screws vs. adjusting the enlarger's lens stage (some enlargers have little or no lens stage adjustments).

So the board with the lens attached has 3 holes that threaded screws pass through, and the lens mounts on that. The 3 screws go into threaded holes on the 2nd board. The 2nd board's lens hole is big enough to access the lens mount ring. So you sort of tilt or swing the lens - subtly - to align it, via pressure from the 3 screws.

You just need 2 lens boards, a drill press, three thumb or allen-set bolts (like a metric M6 or so) and a tap and drill bit that matches the threads of the screws. And a slightly larger bit for the board the screws pass through. And a hole saw or two! One of these days I'll make a PDF instruction sheet. tighten a screw and the foam compresses, angling the board.

Delta_13310_Bes_Align_4x4_Adjustable_Lens_15669.jpg
 

rpavich

Member
Allowing Ads
Joined
Aug 24, 2015
Messages
1,520
Location
West virginia, USA
Format
35mm
Do you mean the lens board? A Besalign board is a sandwich of 2 lens boards, with black foam between them, like mouse-pad thickness. There are three screws in a triangular setup that go through both boards.

You loosen or tighten the screws vs. adjusting the enlarger's lens stage (some enlargers have little or no lens stage adjustments).

So the board with the lens attached has 3 holes that threaded screws pass through, and the lens mounts on that. The 3 screws go into threaded holes on the 2nd board. The 2nd board's lens hole is big enough to access the lens mount ring. So you sort of tilt or swing the lens - subtly - to align it, via pressure from the 3 screws.

You just need 2 lens boards, a drill press, three thumb or allen-set bolts (like a metric M6 or so) and a tap and drill bit that matches the threads of the screws. And a slightly larger bit for the board the screws pass through. And a hole saw or two! One of these days I'll make a PDF instruction sheet. tighten a screw and the foam compresses, angling the board.

Delta_13310_Bes_Align_4x4_Adjustable_Lens_15669.jpg
Yes, that's what I was referring to. Thanks very much for explaining. One of these days I'll take a crack at it.
 
Photrio.com contains affiliate links to products. We may receive a commission for purchases made through these links.
To read our full affiliate disclosure statement please click Here.

PHOTRIO PARTNERS EQUALLY FUNDING OUR COMMUNITY:


Ilford ADOX Freestyle Photographic Stearman Press Weldon Color Lab Blue Moon Camera & Machine
Top Bottom