Hi all
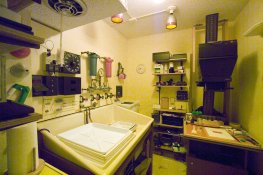
In the process of building a small darkroom in the back corner of my garage (took 3 days to clear about 20 years of accumulated rubbish). I haven't started construction yet but my basic out line will be 1700mm wide and about 1500mm deep. Small door in the middle one end and a purpose built trough with drainage and running water one side and bench space for a enlarger and stuff on the other. I will have storage room out if needed for plenty of elbow space. I am depending on time of day around 186cm tall (6'1 and a bit in grandad measurements) medium build, cramped space does not bother me (im a plumber, am use to it). I have no darkroom experience in the last 25 years. Would be making prints of up to around 500mm/20", also maybe Lith and wet plate and other stuff
So what I want to know is that going to be adequate?
Could make it longer if necessary, but not wider.
How high, wide and deep should I make the trough?
How high for the bench?
How should I ventilate?
Anything else I should consider before I start?
Thanks